Documentation
- Installation & Setup Guide
- How to Reach Us
- Account Registration Guide
- Accessing Your Account
- Add Product
- Import Products
- Units
- Variations
- Category
- Purchase Sell Mismatch
- Purchase Management
- Purchase Return
- Purchase Order
- Purchase Requisition
- Add Purchase
- All Sales (Selling, Credit Sales, Draft, Quotation & Suspended Sales)
- Sales Return
- Shipment
- Discount
- Subscriptions
- Sales Order
- Stock Transfer
- Stock Adjustment
- Add Expenses
- Expenses Category
- Reports
- Settings
- Selling Price Group (products)
- Tax Rates
- Print Labels (Products)
- Import Sales (Invoices)
- Importing Opening Stock
- Shipments
- FRCS TaxCore VMS System
- Supported Devices
- Email Notification Settings – Microsoft 365 & Google Workspace
- Splitting Payments Across Multiple Payment Type
- Reference Number Handling in POS
- Searching Invoices
- POS Hardware Compliance
- Configuring keyboard shortcuts for POS screen
- Daily Report Functionality
- Invoice Cancellation Functionality
Installation & Setup Guide
XPOS is a cloud-based software. Follow the steps below to set up and start using the application.
1. Subscription & Account Setup
- Purchase an XPOS subscription from Defy Technologies.
- After payment, a server will be provisioned automatically, and you will receive an access hostname.
- Your Product Key will be emailed to you.
Payment Methods:
- Offline: Bank transfer. Our finance team will review and send account details.
- Online: Vodafone M-Paisa. Fully automated process.
Note: Steps 2 and 3 are completed only after payment confirmation.
2. Accessing XPOS via Web
- Open your access hostname URL in Google Chrome (recommended).
- Log in using credentials provided by your system administrator.
3. POS Terminal Setup
-
Download the latest Windows client from Defy Downloads.
-
Disable Windows SmartScreen.
-
Double-click the setup file and follow the on-screen instructions.
-
Open the software via the desktop icon.
-
Enter the following:
- Product Key (emailed to you)
- Client Name
- Server Hostname
-
Click Activate. Your software is now ready to use.
If you encounter any issues, contact support:
- Phone: 9991688 / 7771688
- Email: support@defy.com.fj
4. Login Credentials
- Your admin will provide your username and password for logging into the system.
5. Subscription Details
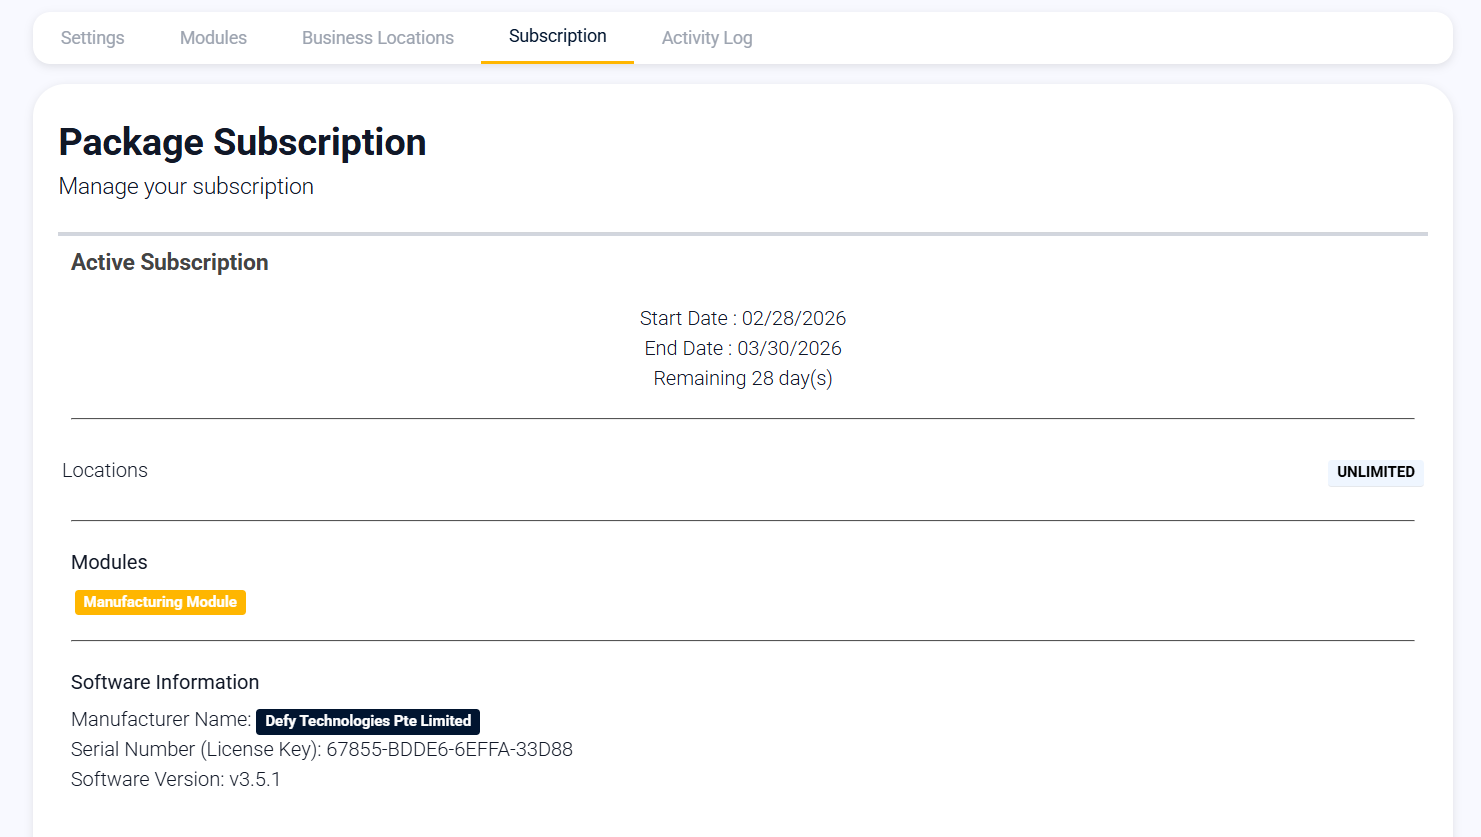
- Go to Settings → Subscription to view your subscription info, including Manufacturer, Serial Number, and Software Version.
How to Reach Us
We are available Monday to Friday: 8:00 AM – 5:00 PM
and Saturday: 8:00 AM – 1:00 PM.
Main Contact:
Phone: 9991688, 7771688
Address: 58 Link Road, Lautoka
P O Box 2521, Lautoka
Support Email: support@defy.com.fj
Finance Email: billing@defy.com.fj
Exclusive Distributor
XTECH – Exciting Solutions
Phone: 9993244, 7973244
Email: naveen@xtech.com.fj
Address: 9 Yankanna Place, Lautoka
Account Registration Guide
Registration Steps
Accessing Your Account
Login Procedure
- Visit the XPOS application at (Provide url)
- Provide your registered email address and password in the login fields. If a security verification is displayed, complete it as required. Select Log In to proceed.
- After successful verification, you will be directed to your Shop Dashboard, where you can begin managing your account.
Add Product
Step-by-Step to Adding Products
1. Go to Add Product

2. Fill in Product Details
-
Product Name: Enter the name.
-
Brand: Select the brand (if applicable).
-
Units: Choose unit (pcs, kg, liters, etc.).
-
Category: Select main category.
-
Sub-category: Optional – select if needed.
-
Weight: Choose weight (kg, grams, etc)
-
Business Location: Where the product is kept or sold (store, warehouse, branch).
-
Warranty: How long the product is covered if it stops working or has a problem.
-
Related Sub Units: Other ways the product is packed or measured (for example: 1 box = 10 pieces).
-
Recorded Quantity: How many of the product you currently have in stock.

3. Set SKU
- Enter a custom SKU or leave blank to auto-generate. Your custom SKU can also be Global Trade Item Number (GTIN) of the item.
- Optionally, add a prefix for easy identification.

4. Not For Selling (Optional)
- Enable if the product should not appear in POS or Sales.
- Useful for ingredients or temporarily disabling a product.

6. Manage Stock
-
Enable or disable stock management.
-
Notes:
- Services (Haircut, Web Development) do not need stock management.
- When disabled, the product can be sold in unlimited quantities.

7. Select Business Location(s)
- Choose where the product will be available

8. Set Tax
- Select the applicable tax (e.g., GST, VAT).
- Make sure tax rates are pre-configured.

9. Choose Product Type
- Options: Single, Variable, or Combo/Bundle.
- Click Save after entering all details.
Single Product
-
Select Single as product type.
-
Enter pricing:
- Default Purchase Price (inclusive/exclusive of tax).
- Profit Margin %.
- Product Image
-
Selling price is auto calculated based on cost and margin.
-
Optional: manually adjust selling price; margin updates automatically.

Variable Product
- Select Variable as product type.
- Create Variation Templates in Products → Variations.

- Add product variations and select applicable variation values.

Additional Features
Select Specific Variations
- For variable products, pick only the needed variation values.
Assign/Remove Locations for Multiple Products
- Go to Products →add products → click Add to Location or Remove from Location.

Deactivate/Activate Products
- Go to Products → add products → click Deactivate Selected.
- Reactivate via Actions → Reactivate.

Bulk Import/Transfer Products
- Export product list via Download Excel in List Products.
- Check formatting.
- Import using Import Products feature.
Import Products
Importing Products – Step-by-Step Guide
Step 1: Open Import Page
- Go to Products in the menu.
- Click on Import Products.

Step 2: Download the Template
- Download the import template file.
- This template contains all required column names and instructions.
Important:
- Do not delete or rename any column headers.
- Fill in the data exactly as shown in the template.

Step 3: Fill in Product Details
- Enter all product information under the correct columns.
- Follow the format mentioned in the template for each field.
Step 4: Upload the File
- After completing the file, upload it using the Import option.
- Wait for the system to process the file.

Common Import Errors and How to Fix Them
Error 1: “UNIT not found”
Reason:
The unit mentioned in the Excel file does not exist in the system.
Solution:
- Go to Products → Units.
- Add the required unit.
- Re-upload the import file.
Error 2: “The separation symbol could not be found”
Reason:
The expiry date format is incorrect.
Solution:
- In Excel, select the expiry date column.
- Change the cell format to Text.
- Enter the date in this format:
MM-DD-YYYY (example:11-25-2018) - Save the file and import again.
Handling Unclear or Unexpected Errors
Sometimes the system may show unclear errors such as:
- “Non-numeric value encountered”
- Other undefined import errors
Best Practice to Resolve This
-
Split your Excel file into smaller files.
-
For example:
- If you have 500 products, divide them into two files of 250 products each.
-
Import each file separately.
This helps identify problematic records and reduces system errors.
Units
Adding Units
Step 1: Access Units
- Go to Products → Units.

Step 2: Add a Basic Unit
-
Enter the Unit Name (e.g., Meter).
-
Enter a Short Name (e.g., Mtr.).
-
Choose whether to Allow Decimals.
- Enabling decimals allows buying and selling in fractional quantities.

Step 3: Add Multiple Units (Optional)
-
Use this when purchasing and selling in different units.
- Example: Purchase in dozens, sell in pieces.
- Example: Purchase in boxes, sell in pieces.

Steps
-
Add the lower unit first (e.g., Pieces).
-
Add the higher unit:
- Check “Add as multiple of another unit.”
- Enter the conversion ratio.
-
When adding/editing products, select the desired unit from the dropdown.
- Purchase and sales prices adjust automatically.
-
Note: Only the lower unit is used to store transactions. Changing conversions later will adjust existing purchase/sales quantities accordingly.

Step 4: Enable and Select Relevant Sub-Units (Optional)
- Useful if only some sub-units apply to a product.
- Example: Sell oranges only in dozens or pieces.
Steps
- Enable feature: Business Settings → Products → Enable relevant sub-units.
- When adding a product, select the main unit and choose the applicable sub-units.
- Purchases and sales can now be performed in these selected sub-units.

Variations
Creating Product Variations
Step 1: Access Variations
- Go to Products → Variations.
- Variations are used for products that come in different options, such as colors, sizes, or other attributes.

Step 2: Add a Single Variation
- Enter the name of the variation (e.g., Color, Size).
- List all the possible values for that variation (e.g., Red, Blue, Green for Color).
- Example: For jeans, create a variation named Color and include all available colors.

Important:
- You cannot delete a variation that is already assigned to a product.
Step 3: Add Multiple Variations for a Product
- For products with more than one attribute (e.g., a shirt with Size and Brand, or a book with Pages and Type), use combined variations.

Steps
-
Create a combined variation name that includes all attributes.
- Example:
Size – Pages.
- Example:
-
Enter the combined values for each possible combination.
- Example:
Long-30,Long-120,Long-200,Small-30,Small-120, etc.
- Example:
This approach ensures every possible combination is tracked correctly for variable products.
Category
Adding Category & Sub-Category
Step 1: Go to Categories

Step 2: Add Category Details
- Enter the Category Name.
- Enter the Category Code (e.g., HSN code)
- Enter your Description.

Step 3: Add as Sub-Category (Optional)
-
If the category is a sub-category:
- Check “Add as sub taxonomy”.
- Select the parent category under which it should fall.

Purchase Sell Mismatch
Correcting Product Stock Mismatch / Incorrect Stock.
Common Errors:
-
Mismatch between sold and purchased quantities.
-
Stock shown in Stock Report differs from the Sales Screen.
- This can happen due to manual database changes or rare system errors.
Solution 1 (Recommended)
Note: You must have Admin role to perform this.
Steps:
-
Open the URL:
www.your-pos-website.com/reports/product-stock-details -
Select the Business Location and click Search.
- A list of products with stock mismatches will be displayed.
-
Click the Fix button for each product to correct the stock.
Solution 2 (If Solution 1 Doesn’t Work)
Steps:
-
Go to List Products.
-
Click the Actions button of the product with mismatch.
-
Select Product Stock History.
-
In Product Stock History:
- Select the Location where the mismatch occurred.
- If it is a variable product, select the specific variation.
-
The system will automatically fix the mismatch for that product at the selected location.
Purchase Management
Adding a Purchase
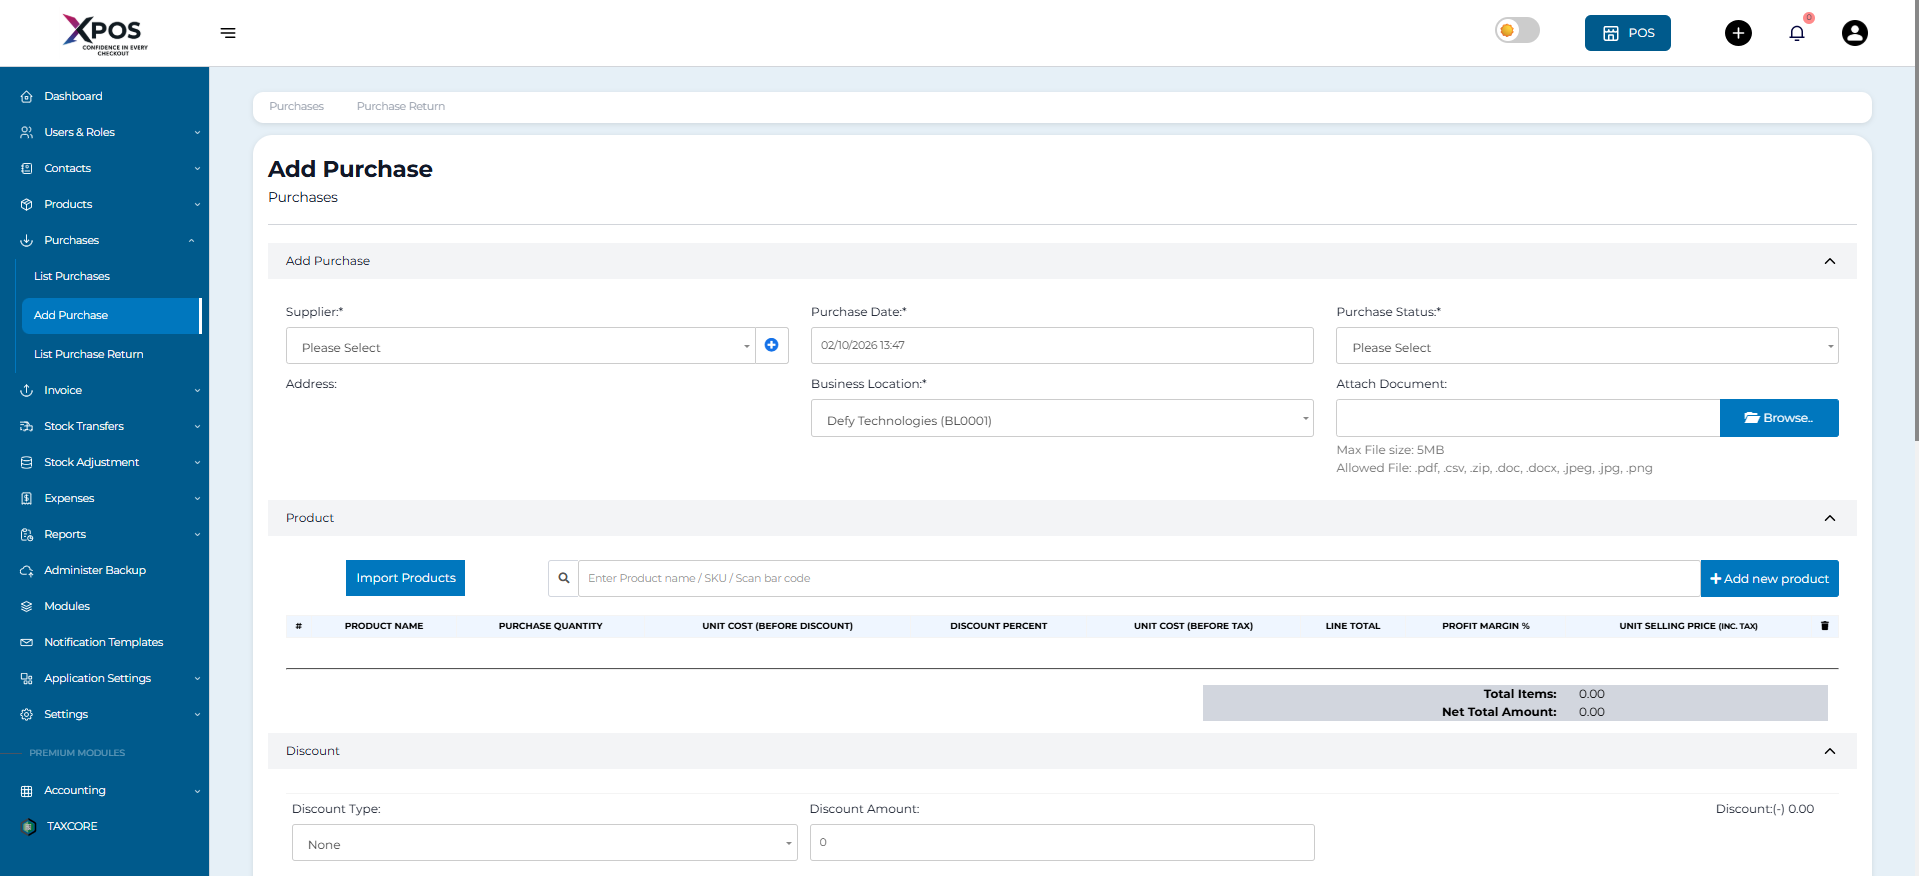
Step 1: Go to Add Purchase

Step 2: Select Supplier
- Type the Supplier Name or Business Name.

- If the supplier does not exist, add them first via:
Contacts → Suppliers → Add or click on the add button.

Step 3: Enter Purchase Details
- Purchase Reference Number
- Purchase Date
- Purchase Status
- Purchase Order

Step 4: Select Business Location
- Choose the location where the purchase is being added.

- To add a new location: Settings → Business Locations → Add Location.

Step 5: Add Products
-
Type the Product Name or scan the barcode.
-
Select the correct product from the suggested list.
-
Enter:
- Purchase Quantity
- Purchase Price
- Tax Information

Step 6: Apply Discounts (Optional)
-
Select Discount Type: Fixed or Percentage.
-
Enter the Discount Amount.
-
Select Purchase Tax.
-
Enter an Additional Notes.
- The system auto-calculates the total after discount.

Step 7: Add Additional Details
- Shipping Details & Charges
- Payment Status
- Payment Account
- Payment Methods
Step 8: Save and View Purchases
- Save the purchase entry.
- View all purchases via Purchases → List Purchases.
- Print product labels by clicking Print Labels in the List Purchases screen.

Step 9: Troubleshooting “No Matching Product Found”
This error appears in three cases:
- Product not found: Check if the product exists in List Products.
- Business Location mismatch: Ensure the product is assigned to the selected location in Add/Edit Products.
- Stock Management disabled: Enable stock management in the product settings to make it available for purchase.
Step 10: Understanding Purchase Price Differences
-
Default Purchase Price:
- Price entered when the product was first added.
- Shown in View Product.
- Remains unchanged unless manually updated.
-
Current Purchase Price:
- Price from the most recent purchase.
- Used in Current Stock Value by Purchase Price report.
- Can vary due to market changes or supplier costs.
Example:
- Last month’s steel price (Default Purchase Price): $120
- This month’s steel price (Current Purchase Price): $125
- View Product: $120
- Stock Value Report: $125
Purchase Return
Viewing Processed Purchase Returns
To view all processed purchase returns, follow the steps below:

The system displays a list of all processed purchase returns.
Reviewing the Purchase Return List
Each processed purchase return is displayed as an informational card containing the following details:
- Reference Number
- Supplier name
- Payment method
- Return date
- Total return amount
- Business Location
- Attach Document
- Purchase Tax

Click anywhere on a purchase return card to view its details.
Viewing Purchase Return Details
To view detailed information about a specific purchase return:
-
Select a purchase return from the list.
-
The details page displays the purchase return number at the top, along with a Back button to return to the Purchase Returns list.
-
Review the return summary, which includes:
-
- Supplier
- Business Location
- Reference Number
- Return Date
- Attach Document

- At the bottom of the page, review the line-item details, including:
-
- Returned products
- Quantities returned
- Unit prices
- Total line amounts
- Purchase tax
- Sub-total amount
- Returned products

Purchase Order
Purchase Order
Step 1: Understand Purchase Order
-
A purchase order is a document issued by the buyer to the supplier to request goods.
-
It includes:
- Buyer and invoicing details
- Delivery information
- Product details and quantities
- Pricing, taxes, and discounts
- Payment terms and details
- Shipping charges (if applicable)
- Additional notes
-
The supplier creates a sales order or invoice based on the purchase order.
-
Purchase orders can have the following statuses:
- Ordered
- Partial
- Completed
Step 2: Enable Purchase Order
- Go to Settings.
- Select Business Settings.
- Open the Purchase tab.

- Enable Purchase Order.
- Click Save.
.png)
Step 3: Create a Purchase Order
- Go to Purchase →List Purchase → Purchase Order.
- Click Add Purchase Order.

3.Enter all required details.
4.Click Save.

5.Note: Stock is not updated when a purchase order is created.
6.You can print the purchase order and send it to the supplier.
Step 4: Convert Purchase Order to Purchase
- After receiving goods, the supplier issues a sales order or invoice.
- Go to Purchase → Add Purchase.
- Select the supplier.

4.Choose the relevant purchase order from the Purchase Order dropdown.

5.The system will automatically load products, prices, taxes, and discounts.
6.Adjust quantities if needed.
-
Click Save.
-
The purchase order status will update automatically.
Purchase Requisition
Purchase Requisition
Step 1: Understand Purchase Requisition
- A Purchase Requisition (PR) is a document created by an employee to request the purchase of products when stock levels are low.
- While creating a purchase requisition, only products with quantities below the alert level will be displayed.
- Note: At least one purchase entry must exist for a product to appear in the Purchase Requisition list.

Step 2: Enable Purchase Requisition
- Go to Settings.
- Select Business Settings.
- Open the Purchase section.
- Enable the Purchase Requisition checkbox.
- Save the settings.
- The Purchase Requisition tab will appear in the sidebar.

Step 3: Create a Purchase Requisition
- Click the Purchase Requisition tab.
- Click Add.

- Enter the required details.

- Save the purchase requisition.
Step 4: Convert Purchase Requisition to Purchase Order
- After the purchase requisition is created, it can be converted into a purchase order.
- Go to Purchase → Purchase Order → Add.

- Select the supplier.


- Select the required PR ID to load the requisition details.
Step 5: Partial Purchase Handling
-
If the ordered quantity is reduced while converting the requisition into a purchase order:
- The requisition status will automatically change from Ordered to Partial.
Add Purchase
Step 1: Understand Purchase Invoice
- A purchase invoice is automatically created for every purchase entry in the system.
Step 2: Print a Purchase Invoice
- Go to Purchases → Add Purchases.

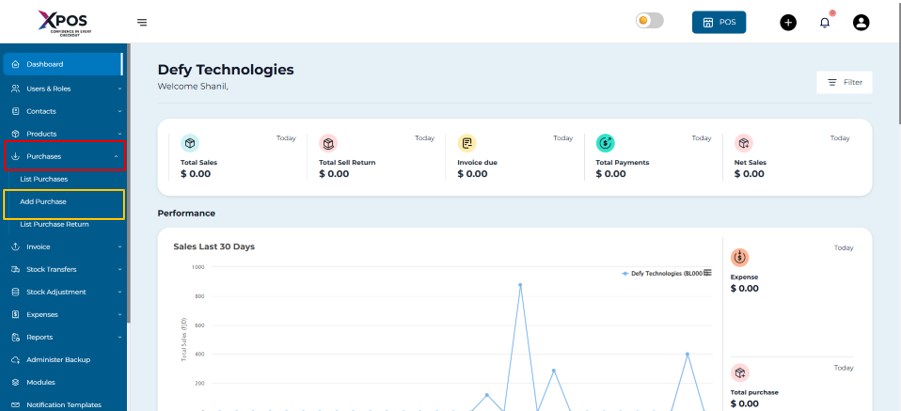
2.Locate the required purchase entry.
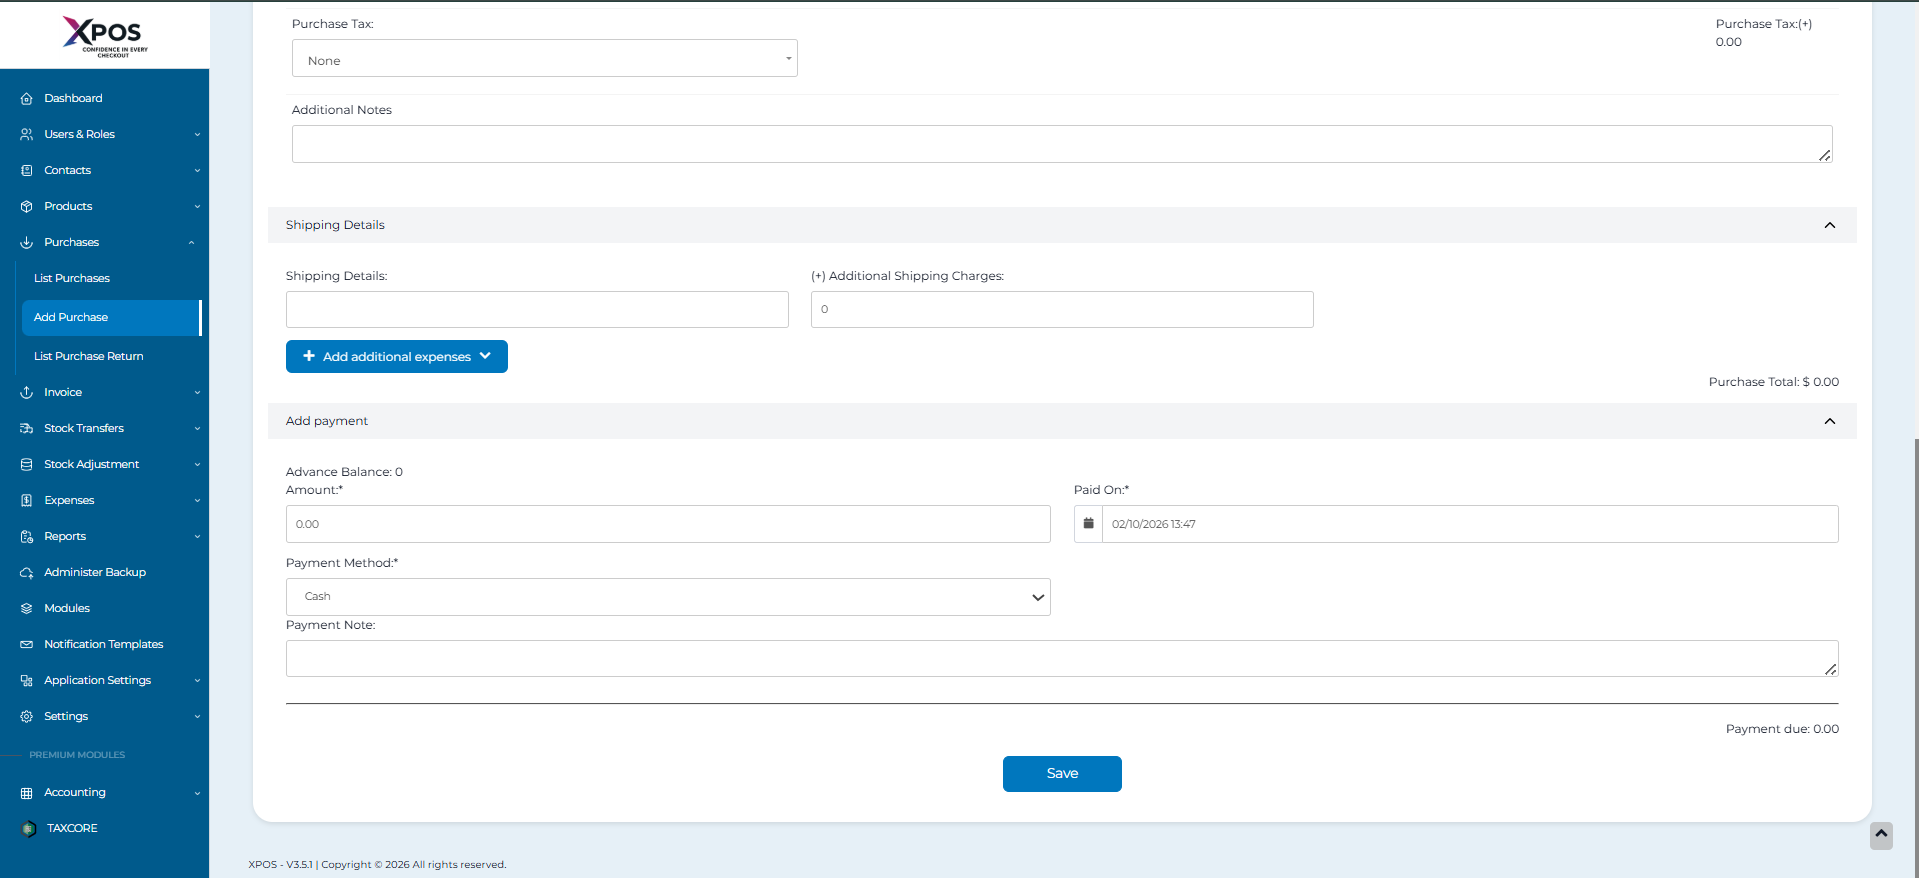
-
Click Save.
-
Select Print to generate the purchase invoice.
Step 3: Barcode on Purchase Invoice- A barcode is automatically generated on the purchase invoice.
- The barcode is based on the Purchase Invoice Number.
All Sales (Selling, Credit Sales, Draft, Quotation & Suspended Sales)
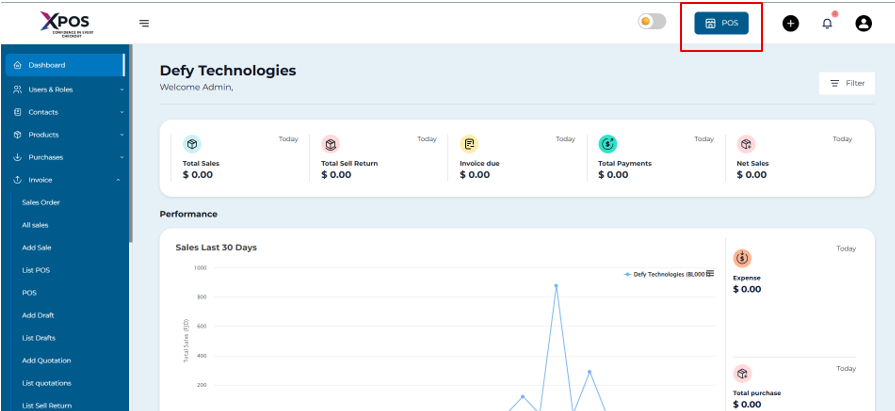
Step 1: Open the POS Screen
- Click on POS


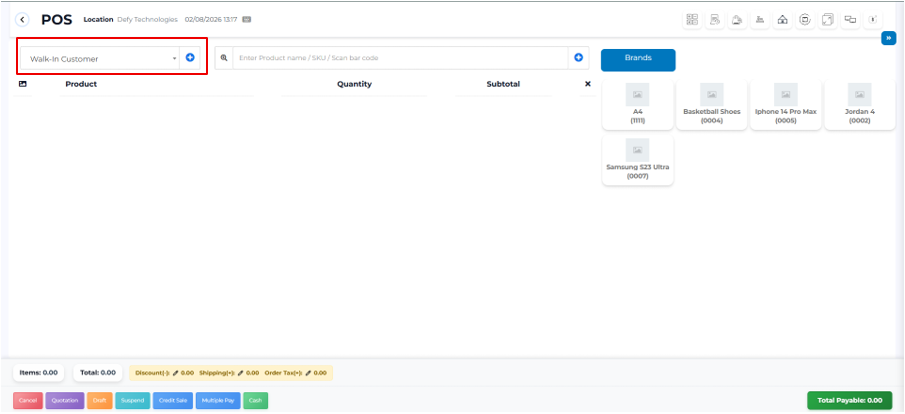
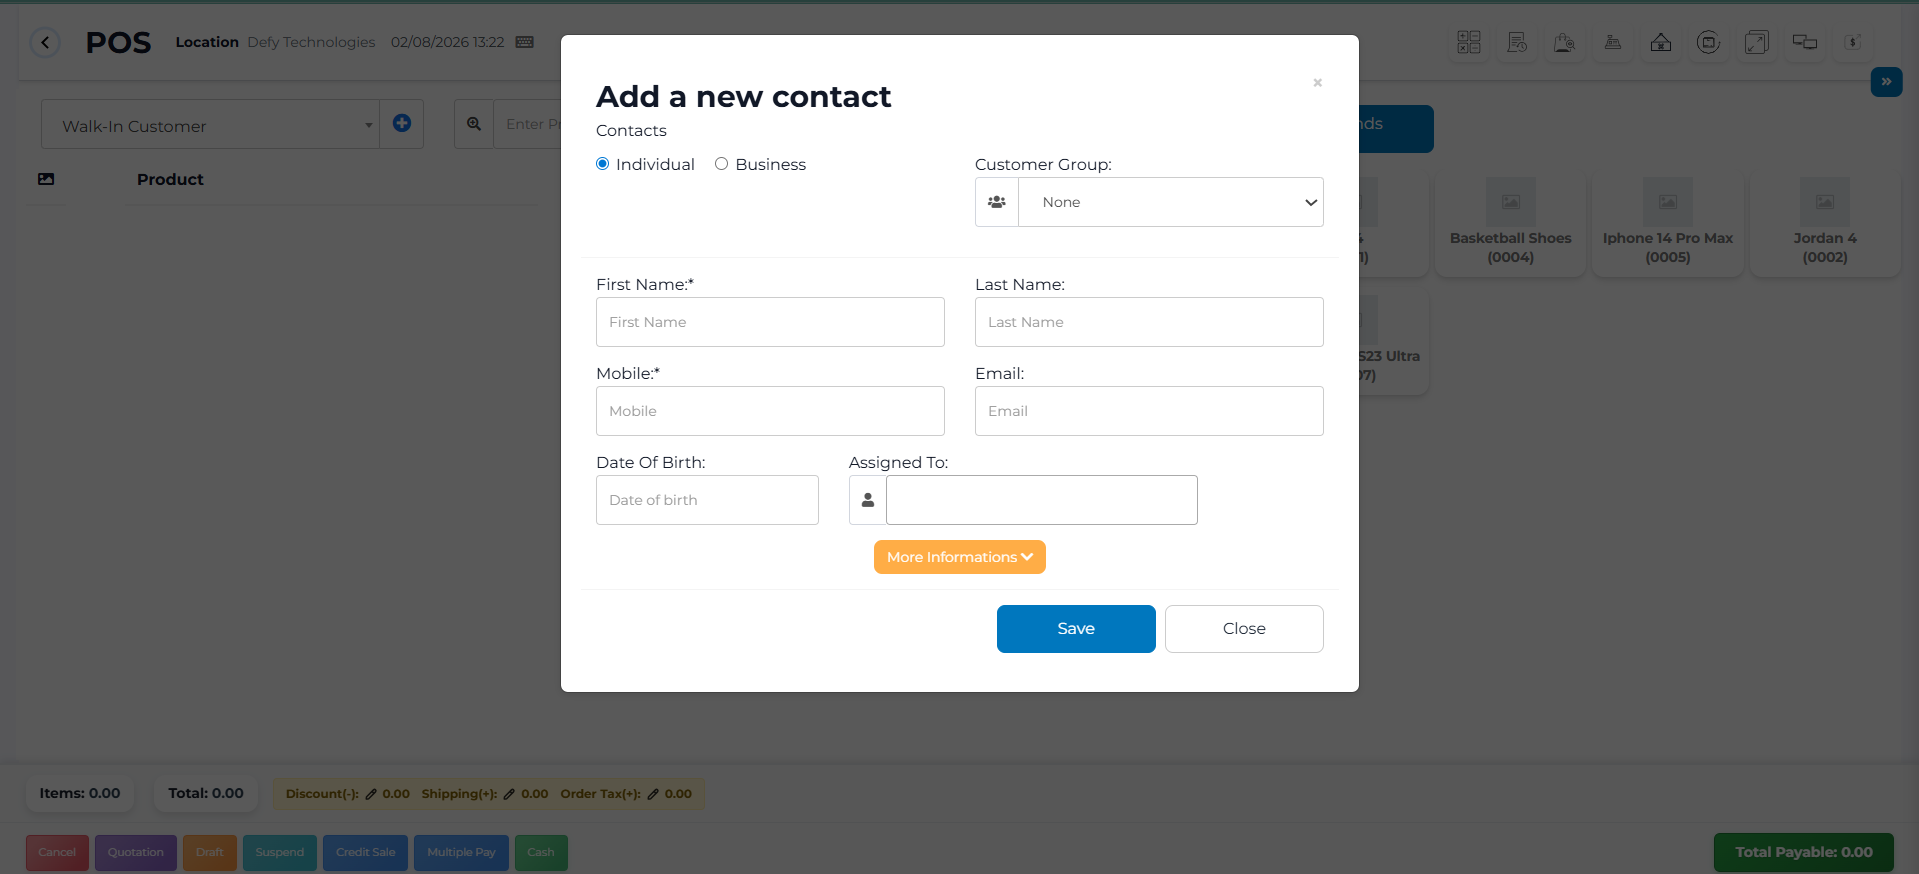
Step 2: Select a customer
- By default, Walk-In Customer is selected.

- To select an existing customer:
- Search by Name, Email, or Phone Number

- Search by Name, Email, or Phone Number
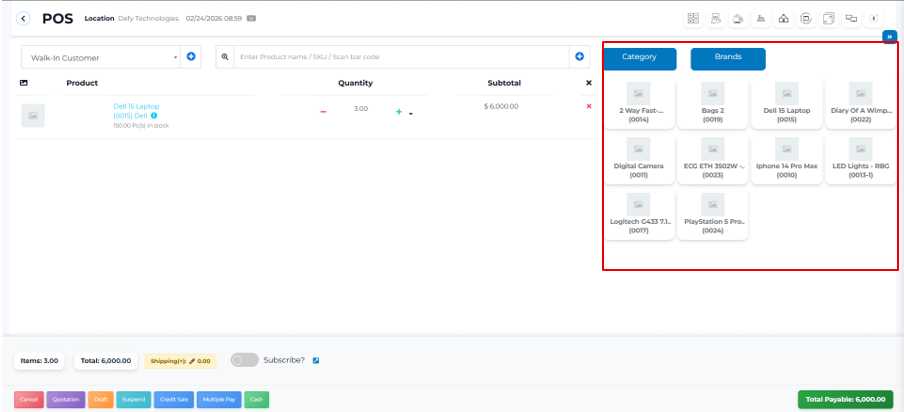
Step 3: Search and Add Products
-
Enter the product name in the search bar or scan the barcode.
-
If multiple products appear:

- Select the correct product from the dropdown list.
-
If only one product matches:
- The product is added to the cart automatically.

- The product is added to the cart automatically.
-
To remove an added item, simply click the X on the right. See the screenshot for reference.

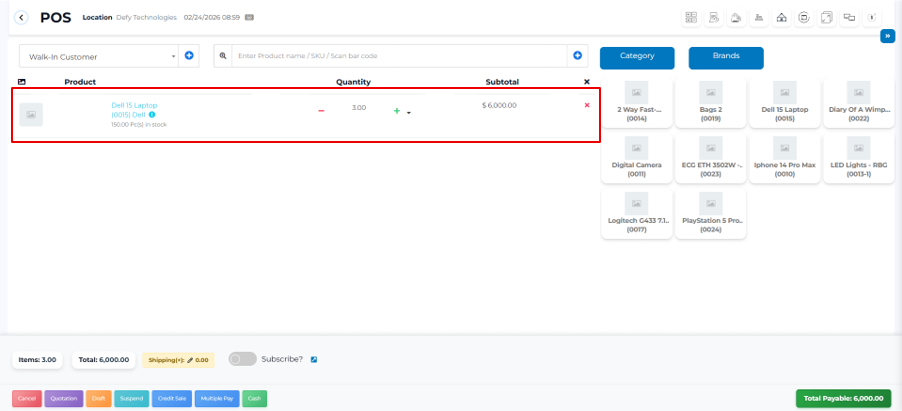
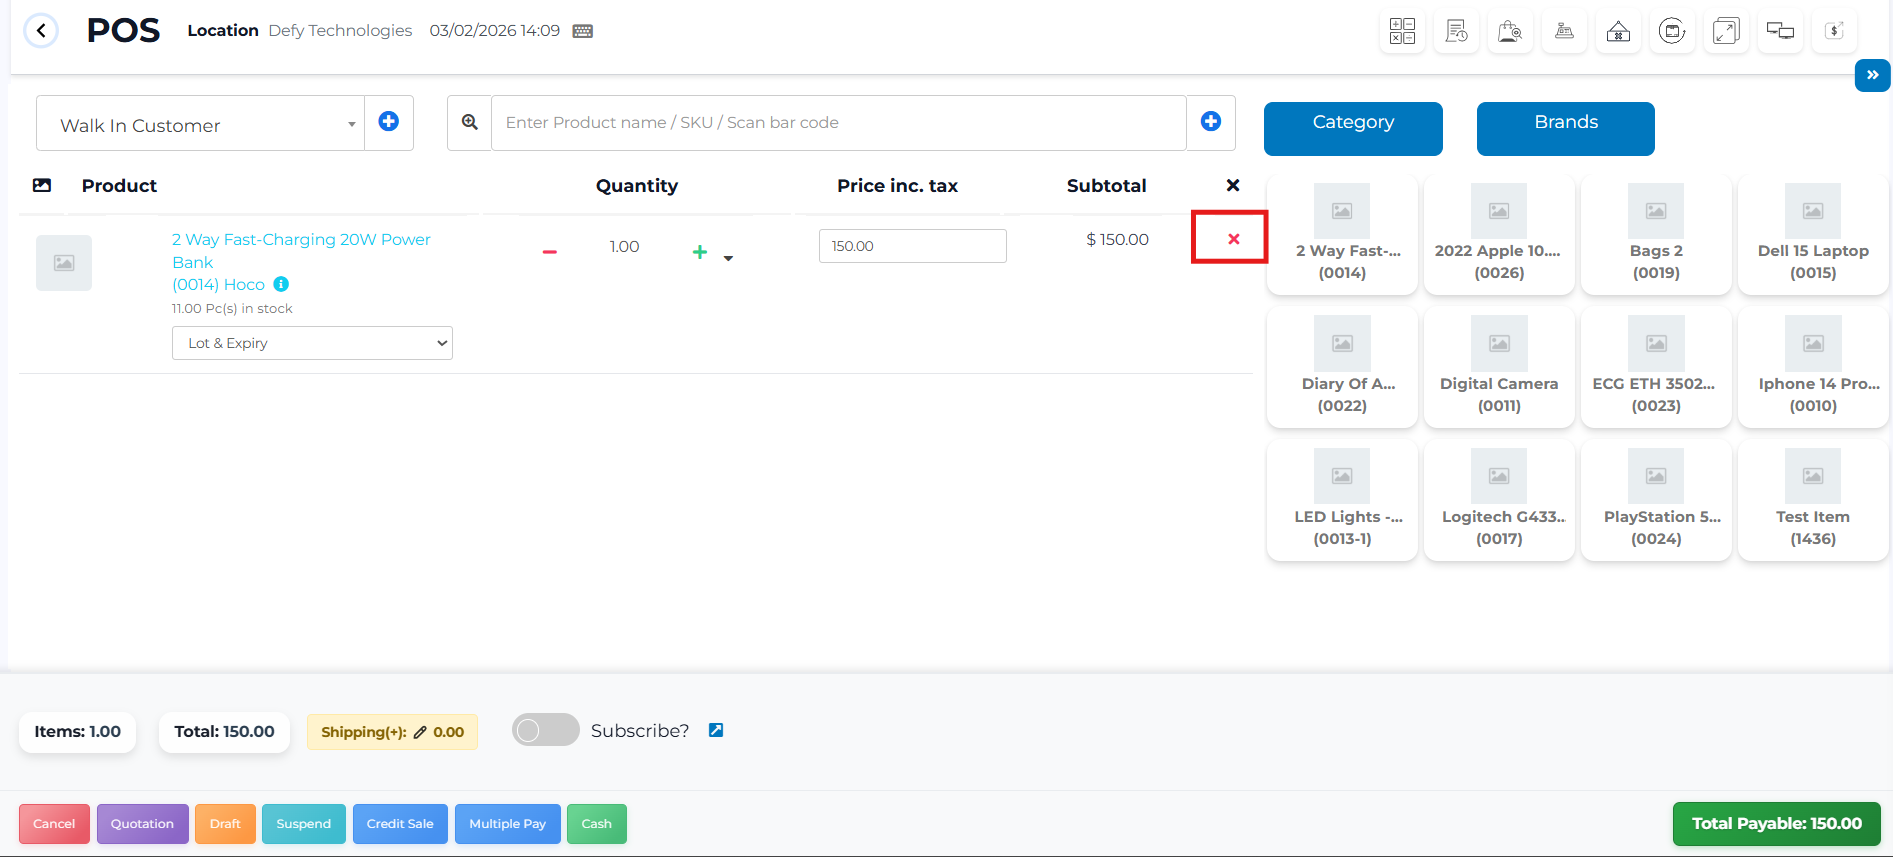
Step 4: Modify Product Details (If required)
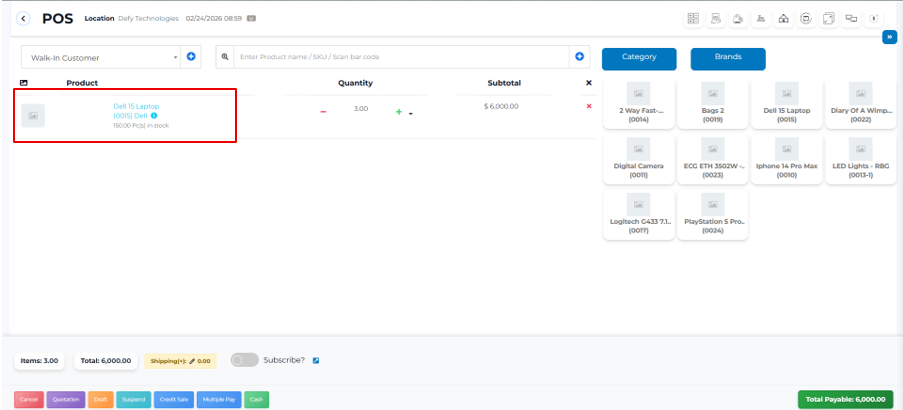
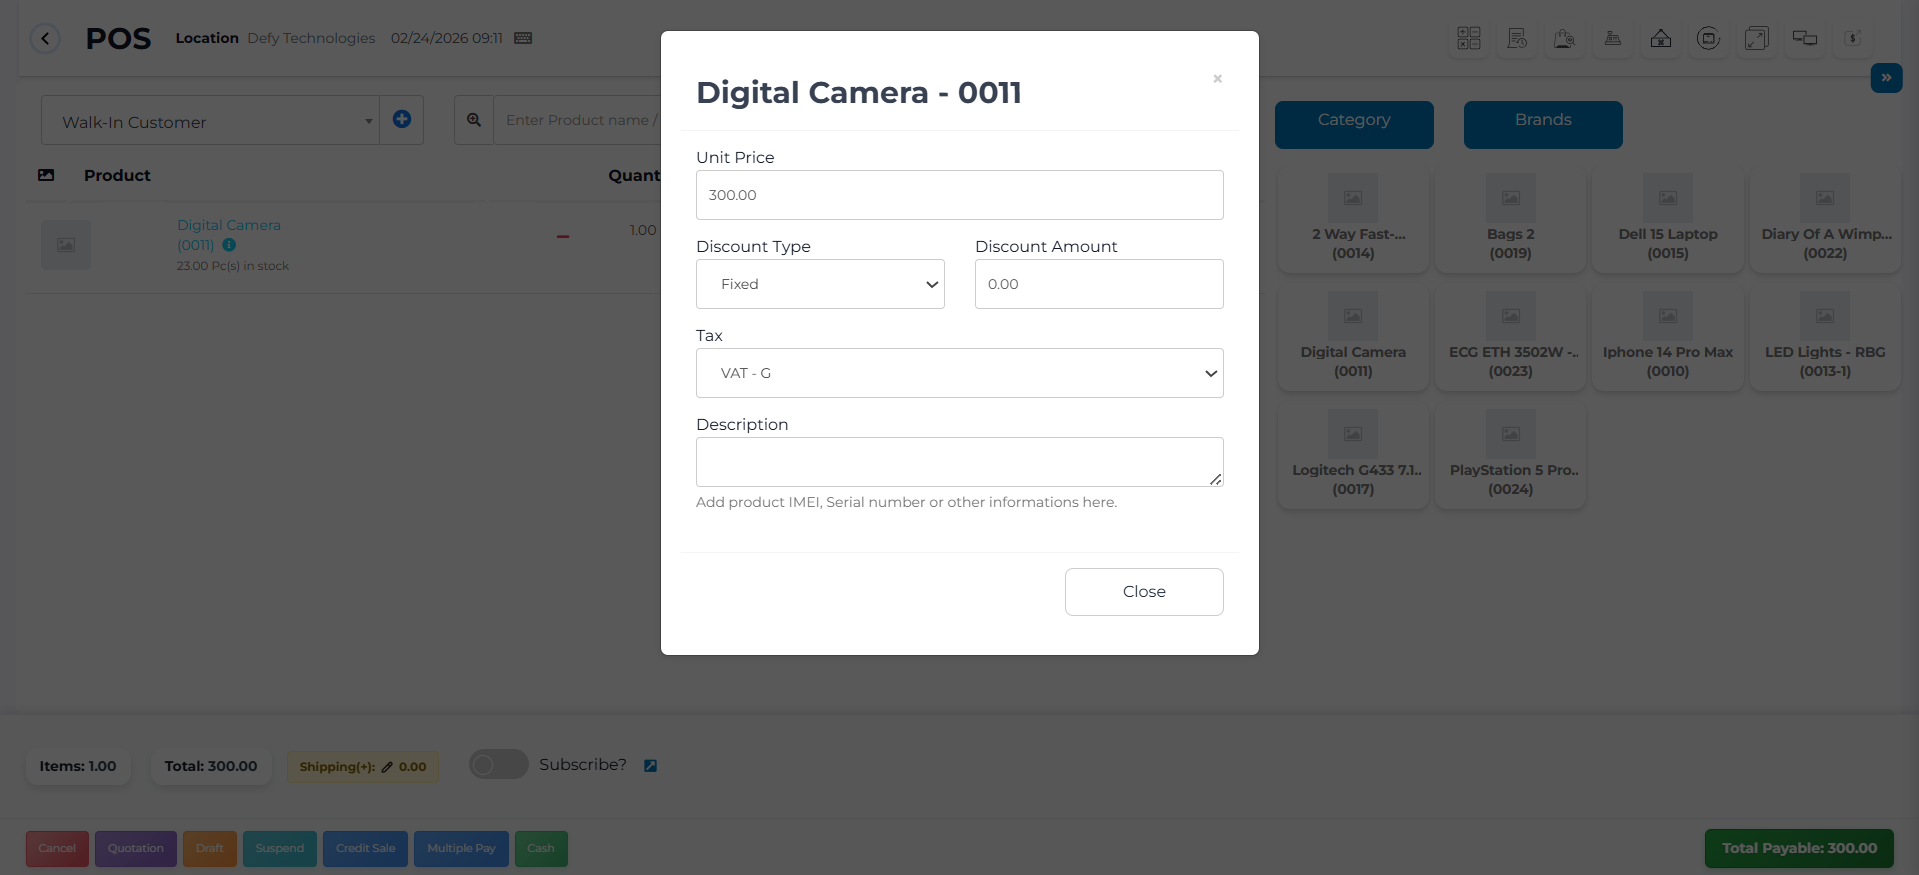
- Click on the product name in the cart.

- Update any of the following:
- Selling price
- Tax
- Discount
 Note: Product-level tax editing is available only if Inline Tax is enabled
(Business Settings → Tax → Enable Inline Tax in Purchase and Sell).
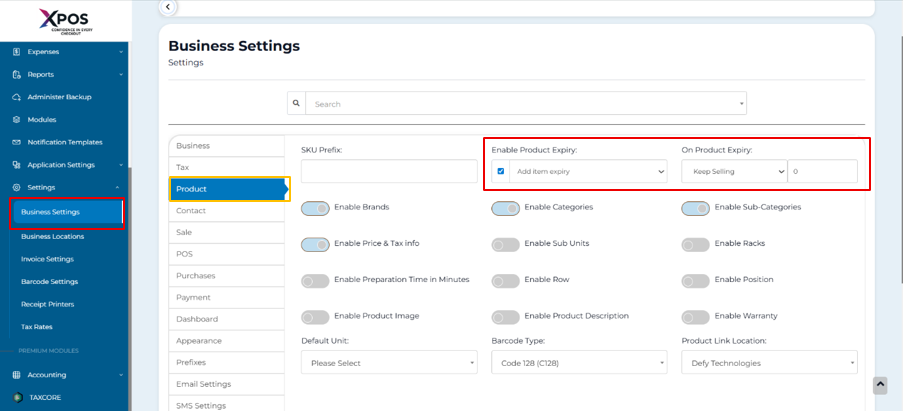
Step 5: Select Lot Number or Expiry Date (If enabled)
- If lot tracking is enabled, choose the lot number.
- go to Business Settings → Product → click on enable product expiry.

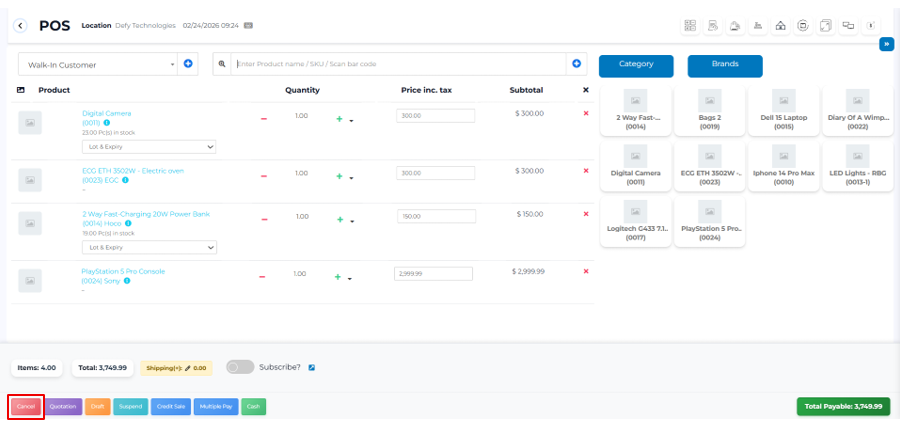
Step 6: Cancel the Sale (Optional)
- Click Cancel if the transaction should not proceed.
- Canceled sales are not saved, and stock remains unchanged.

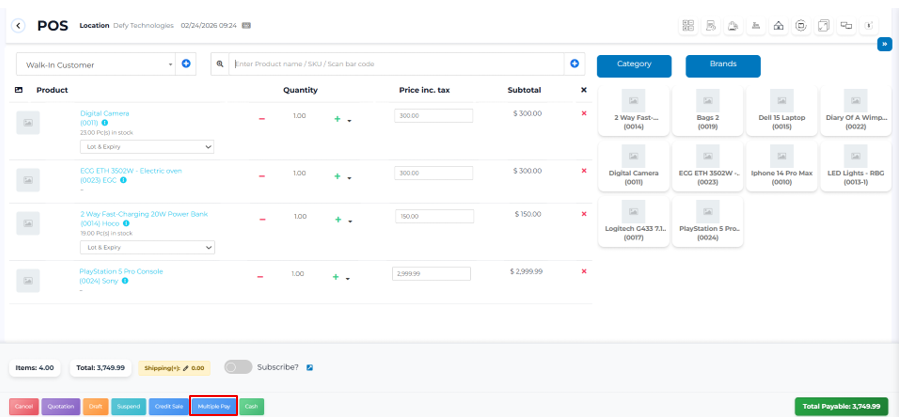
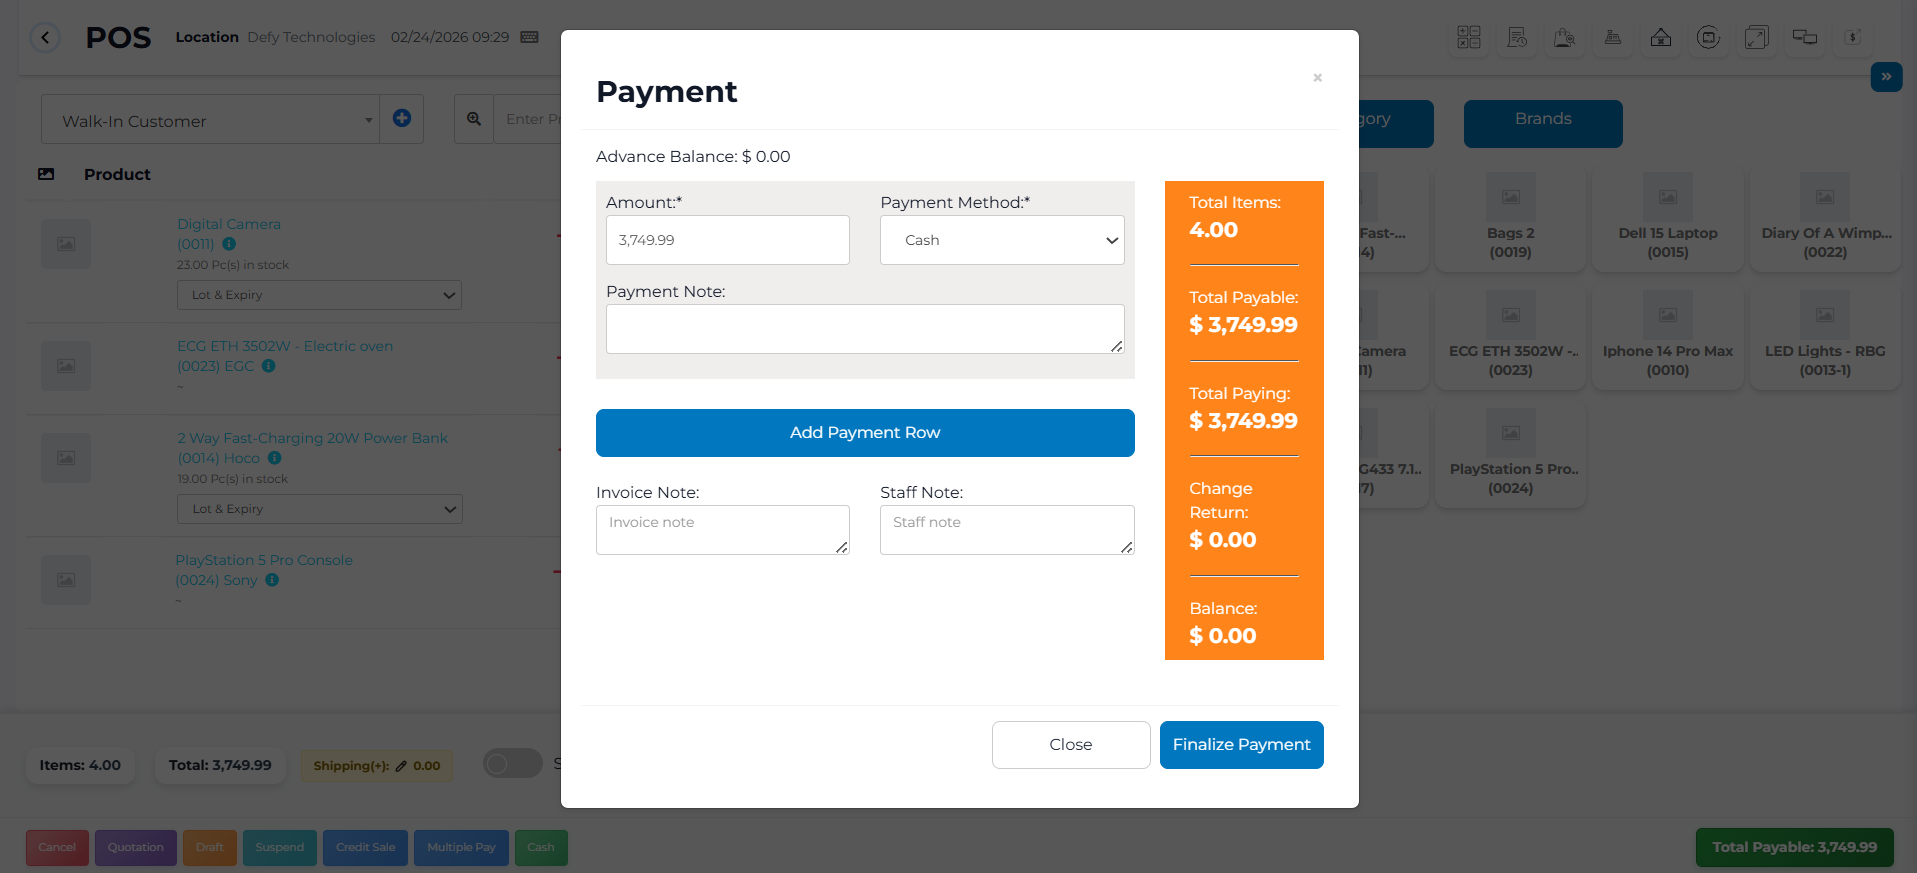
Step 7: Finalize the Sale
Click Finalize Payment.
- Select the Multiple Pay.

- Enter the payment amount.
- Click Save to complete the sale.

Step 8: Print the Invoice
- After saving, select the Print Invoice option.
- Ensure margin settings are set to Default for correct printing.
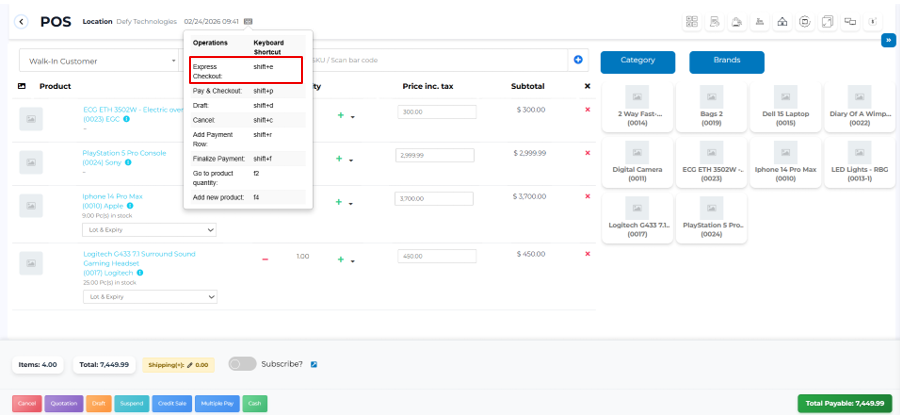
Step 9: Use Express Checkout (Optional)
- Click ctrl+e. It will Enable Express Checkout Automatically.
- The system:
- Marks the sale as Paid
- Sets the payment method to Cash
- Skips the payment screen
- Invoice printing depends on location settings.

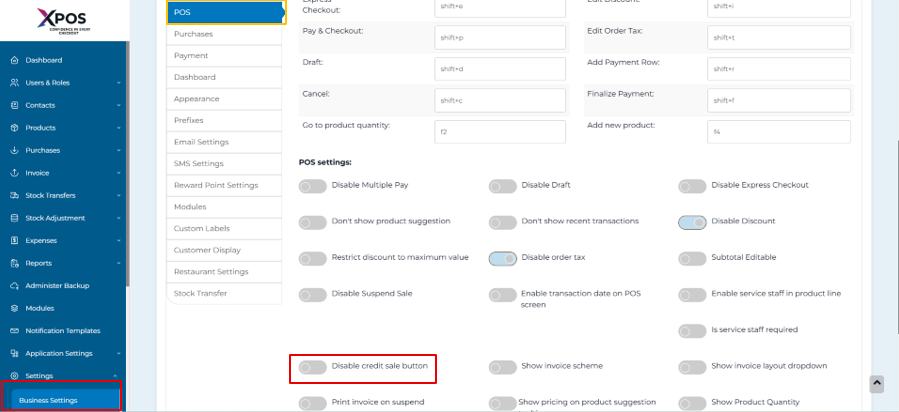
Step 10: Make a Credit Sale (Optional)
A. Full Credit Sale
-
Enable credit sales:
- Go to Settings → Business Settings → POS
- Enable Show Credit Sale Button
-
On the POS screen, click Credit Sale.

B. Partial Credit Sale
Example: Invoice total = $1,000
Customer pays = $700
Steps:
- Click Multiple Pay
- Select payment method and enter $700
- Finalize payment
- Remaining amount is saved as customer credit.
Step 11: View or Edit Sales Records
- Go to Sell → List Sales to view completed sales.
- Go to Sell → Drafts to view draft sales.
- Sales and drafts can be edited before finalization.
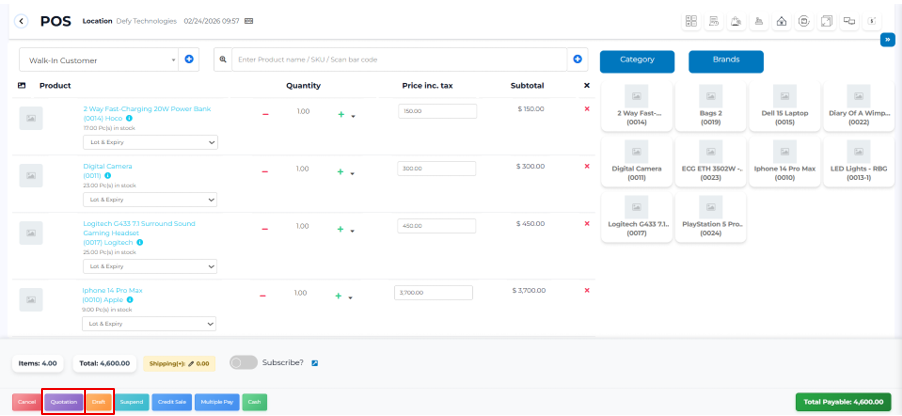
Step 12: Create Drafts or Quotations
- During a sale, select Draft or Quotation.
- Save the transaction.
- Stock is not deducted.

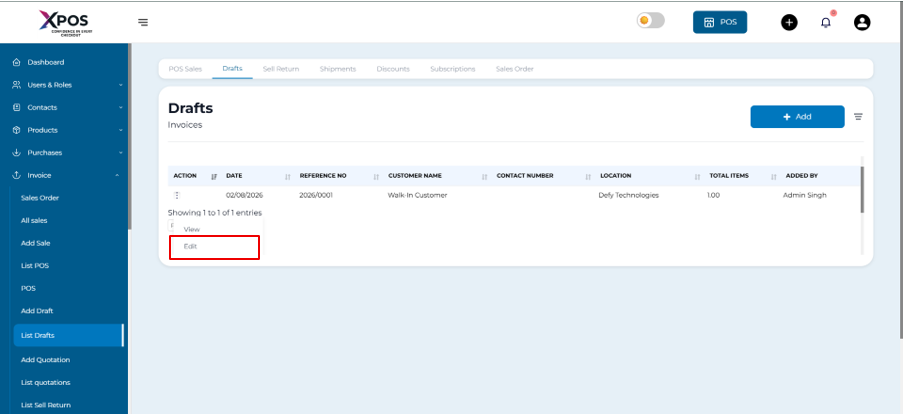
Step 13: Convert Draft or Quotation to Sale
- Go to Invoice → List Drafts or Sell → List Quotations

- Click Actions → Edit

- Change status to Final
- Save the transaction.
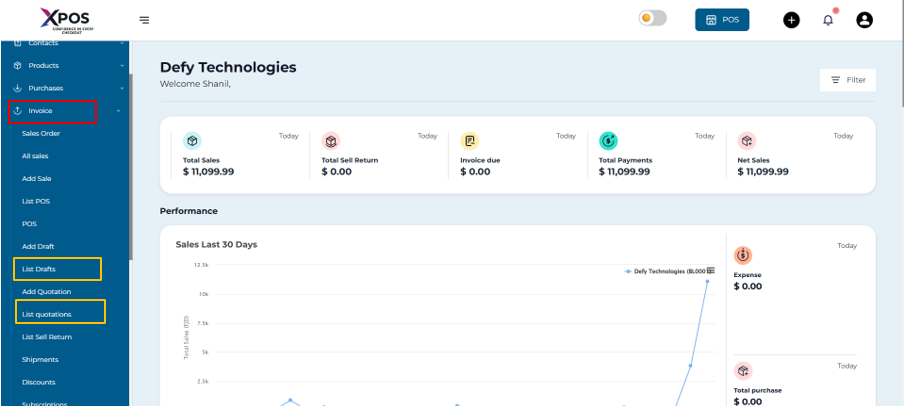
Step 14: Copy a Quotation
- Go to Invoice → List Quotations
- Click Actions → Copy Quotation
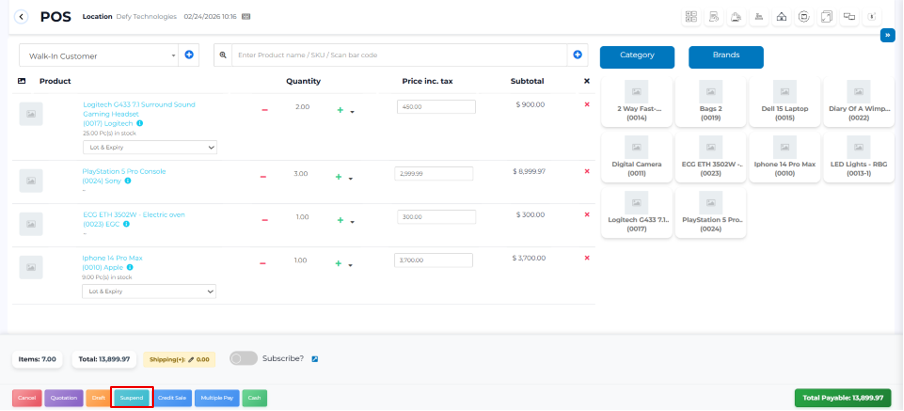
Step 15: Use Suspended Sales
- Click the Suspended Sales (cyan button) on the POS screen.
- Enter a reference (e.g., Table number or Room number).
- Resume and finalize the sale when required.

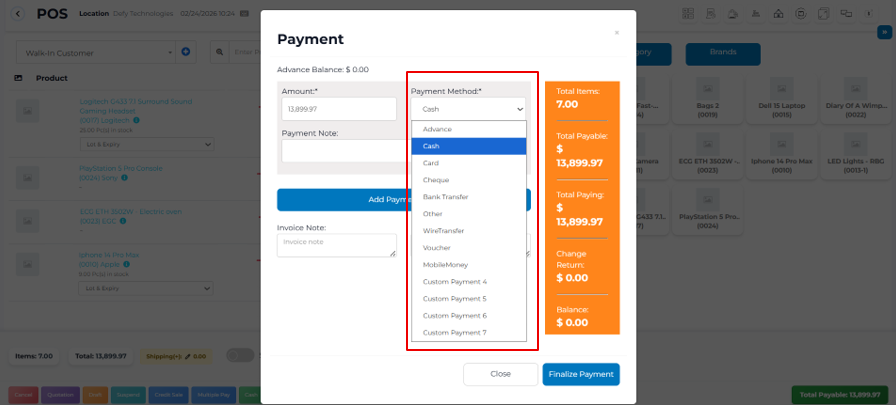
Step 16: Accept Payments
- Choose a payment method:
- Cash
- Card
- Multiple Pay

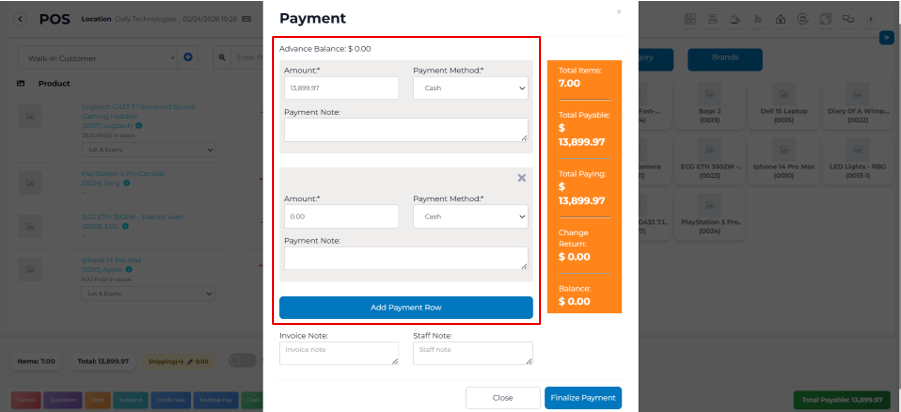
- Use Multiple Pay when:
- Customer uses more than one payment method
- Change return is required

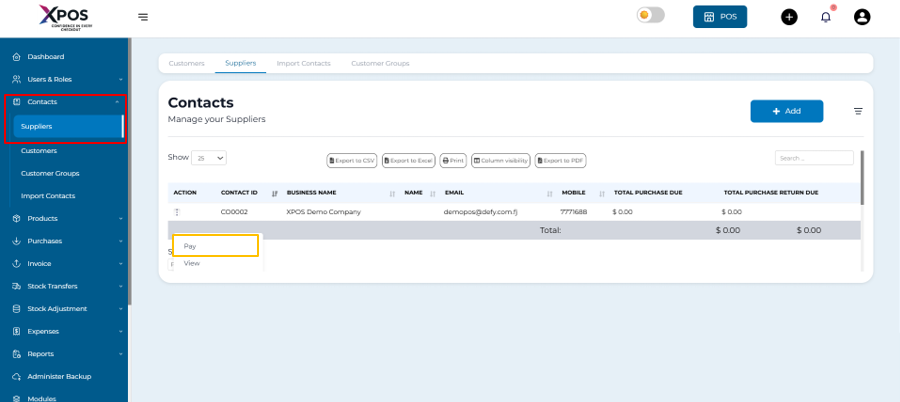
Step 17: Pay Supplier Due Amount
- Go to Contacts → Suppliers
- Click Actions → Pay Due Amount

- Enter payment details and save.
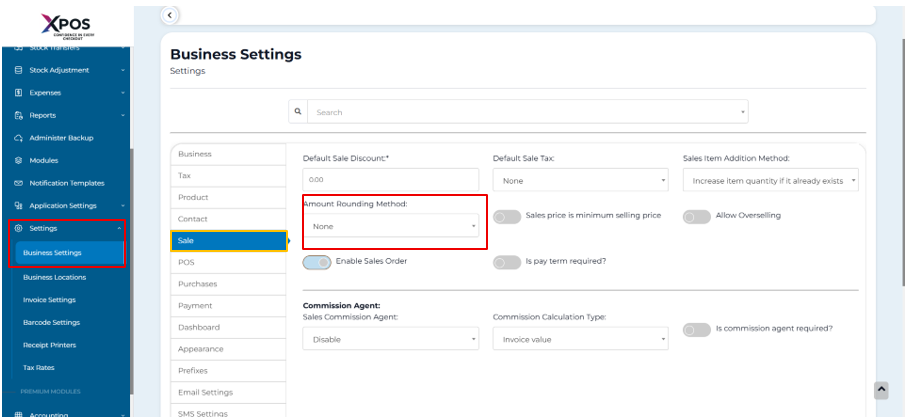
Step 18: Enable Sales Amount Rounding
- Go to Settings → Business Settings → Sales
- Select a rounding method:
- Nearest whole number
- Nearest decimal (e.g., 0.05)

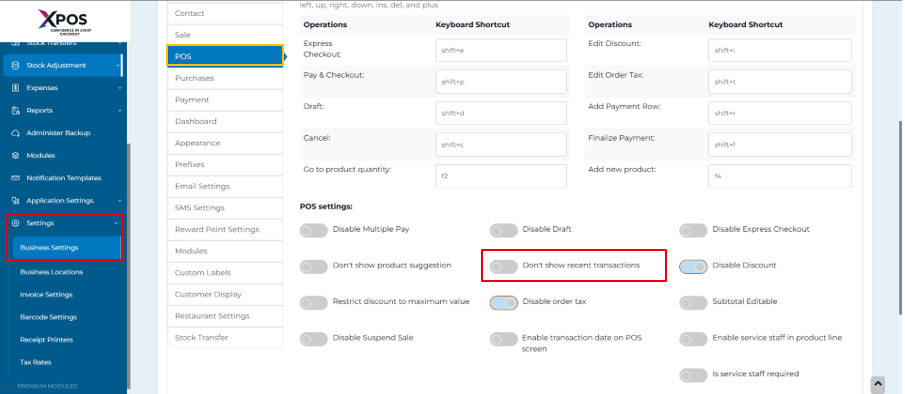
Step 19: Add Sales for a Past Date
From POS Screen
- Go to Business Settings → POS
- Enable Transaction Date on POS Screen
- Select the required date while selling.

From Sales Screen
- Go to Invoice → Add Sale
- Select the desired Sale Date
- Save the transaction.
Sales Return
How to Process a Sales Return
Sales returns can be handled in two different ways, depending on your requirement.
Method 1: Modify the Original Sale (Recommended)
This method is quick and best suited for simple returns.
Steps:
- Open Invoice → List Sell Return.

-
Locate the sale you want to adjust.
-
Click Edit for that invoice.
-
Either:
- Remove the item completely, or
- Decrease the quantity being sold.
-
Save the changes.
What Happens:
- The system automatically puts the returned quantity back into inventory.
- No separate sales return entry is needed.
Shipment
Assigning a Delivery Person to a Shipment
- While entering shipment details during a sale, you can select or assign a delivery person.
- This helps track who is responsible for delivering the order.
Printing a Delivery Note (Delivery Receipt)
Follow the steps below to generate and print a delivery note for a sale.
Step-by-Step Process
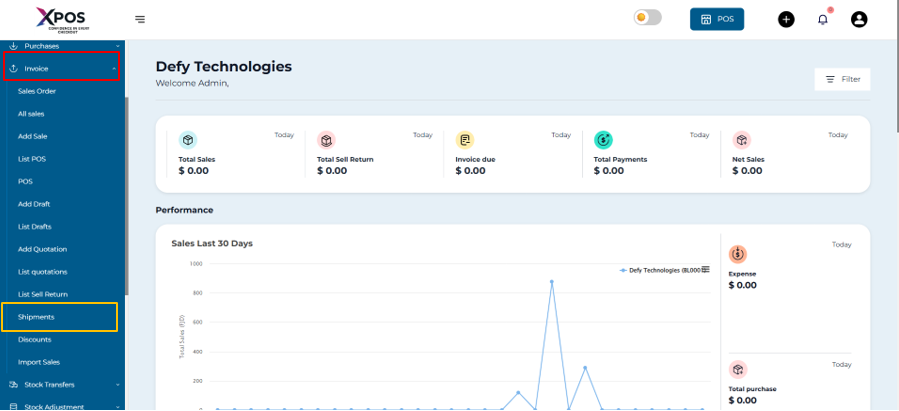
Step 1:
While creating the sale, ensure that shipping details are added.
- Go to Invoice and click on Shipment.

- Press the Filter.
- Fill in the details to locate your specific products

Step 2:
- Go to the Invoice > All Sales screen and locate the sale created in Step 1.

Step 3:
- If you want your shipment details to be edited, click one the edit dropdown menu and press edit shipping to change any adjustments.

Discount
Where can you find discount
- Click on Invoice and press Discount and click **Add.

How to Add / Edit Discount
Use this section to create or update discount rules in the system.

Discount Fields Description

Basic Discount Information
Name
- Enter a unique name for the discount.
- This name is used to identify the discount in reports and settings.
- Example: New Year Discount, Seasonal Offer.
Product Selection
Products
- Select specific products to which the discount will apply.
- Leave this field empty if the discount should apply based on brand or category instead.
Brand
- Select a brand to apply the discount to all products under that brand.
- Optional field.
Category
- Select a product category to apply the discount to all products in that category.
- Optional field.
- Note: You may apply the discount using Products, Brand, or Category, depending on your requirement.
Location
- Select the business location where the discount will be active.
- Required field.
Priority
- Defines the order of application when multiple discounts are available.
- Lower numbers have higher priority.
- Example: A discount with priority
1will be applied before one with priority2.
Discount Configuration
Discount Type
-
Choose how the discount is calculated:
- Fixed – A flat amount is deducted.
- Percentage – A percentage is deducted from the selling price.
Discount Amount
-
Enter the value of the discount:
- For percentage, enter a number like
10for 10%. - For fixed, enter the amount to be deducted.
- For percentage, enter a number like
Discount Validity Period
Starts At
- Set the date and time when the discount becomes active.
- Optional field.
Ends At
- Set the date and time when the discount expires.
- Optional field.
- If no start or end date is selected, the discount remains valid until manually disabled.
Selling Price Group
Selling Price Group
-
Select the price group to which the discount applies.
-
Options:
- All – Applies to all selling price groups.
- Specific price group – Applies only to the selected group.
Customer Group and Status
Apply in Customer Groups
- Enable this option to apply the discount only to specific customer groups.
- Useful for wholesale, VIP, or membership-based pricing.
Is Active
-
Toggle to enable or disable the discount.
- On – Discount is active and applied.
- Off – Discount is saved but not applied.
Subscriptions
Subscriptions – Step-by-Step Guide
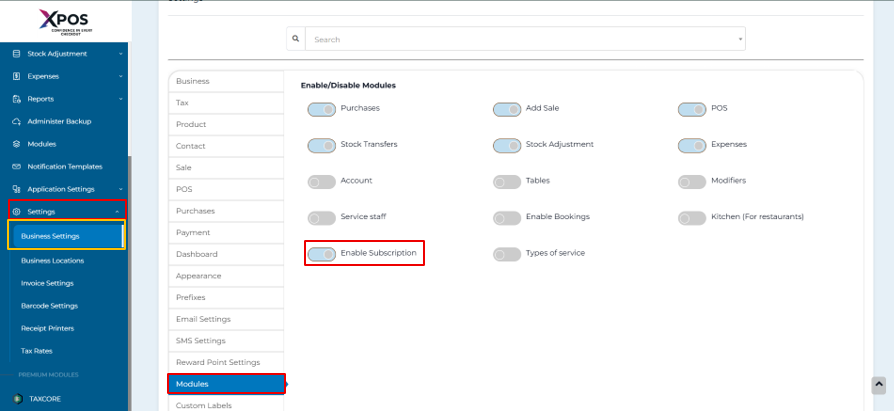
Step 1: Enable the Subscriptions Feature
- Go to Setting → Business Setting → Modules.
- Check the option Enable Subscriptions.
- Click Upload Setting.

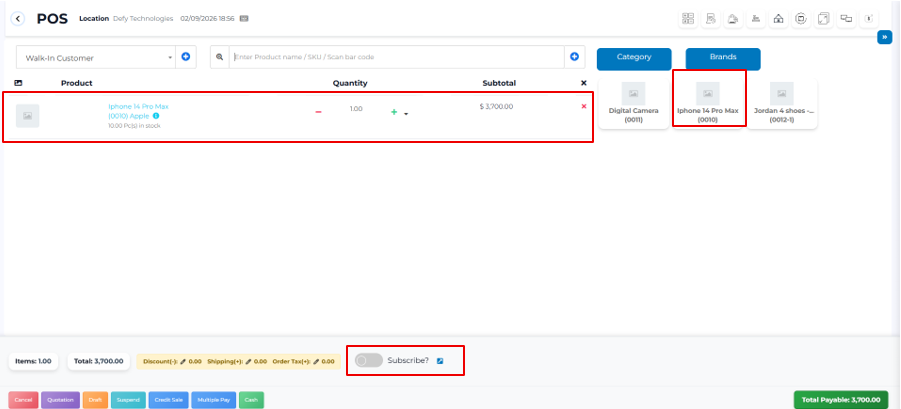
Step 2: Create a Subscription from POS or Sales Screen
- Go to Invoice and open POS or Sales Screen
- Add products to the sale as usual.
- Select the Subscribe? checkbox.

Step 3: View and Manage Subscriptions
- Go to Invoice → List POS → Subscriptions.
- View the list of all subscriptions.
- Use the available options to start or stop a subscription as required.

Step 4: Automatic Invoice Generation & Notifications
-
The system automatically generates subscription invoices based on the set frequency.
-
When an invoice is created:
- A notification is sent to the Administrator.
- A notification is sent to the Salesperson.
Sales Order
Sales Order Overview
A Sales Order is a formal document issued by the seller to the buyer in response to a Purchase Order. It confirms the details of the transaction before goods are delivered.
A sales order typically includes:
- Buyer billing information
- Delivery details
- Product list and quantities
- Pricing, taxes, and discounts
- Payment terms and payment information
- Shipping charges (if applicable)
- Additional notes or instructions
Once the buyer approves the sales order, the seller proceeds with shipping the goods.
Sales Order Statuses
A sales order can have the following statuses:
- Ordered – Order has been created
- Partial – Order has been partially fulfilled
- Completed – Order has been fully processed Step-by-Step: Enabling Sales Orders
- Go to Settings.
- Select Business Settings.
- Open the Sales tab.

-
Enable Sales Order.
-
Click Update Setting.

Step-by-Step: Creating a Sales Order
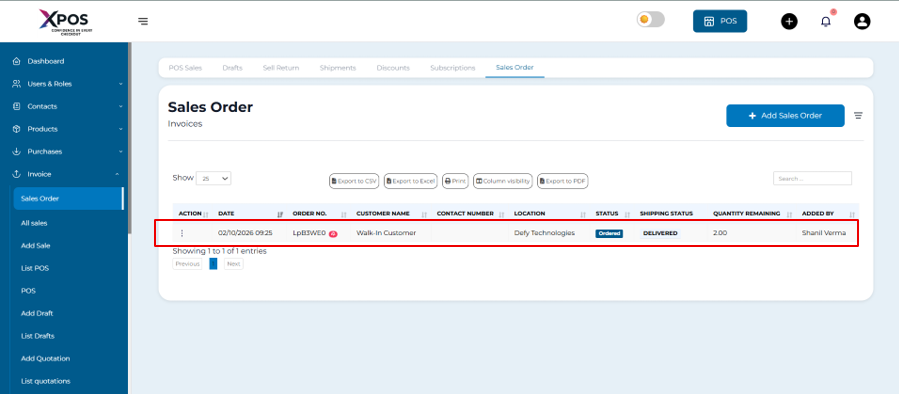
- Go to Invoice and click on List POS.
- Click on Sales Orders.
- Select Add Sales Order.

-
Enter all required details such as:
- Customer information
- Products and quantities
- Pricing, tax, and discounts
- Shipping Details
-
Click Save.
Note: Inventory is not deducted when a sales order is created.
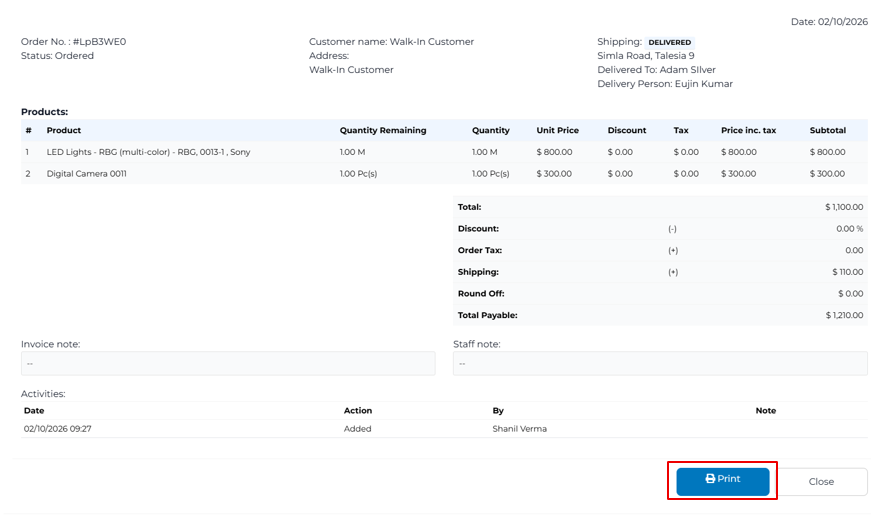
Step-by-Step: Printing and Sharing a Sales Order
- Open the created sales order.

- Click Print.

- Share the printed or digital copy with the buyer for approval.
Step-by-Step: Converting a Sales Order to a Sale
Once the buyer approves the sales order, it can be converted into a sale.
-
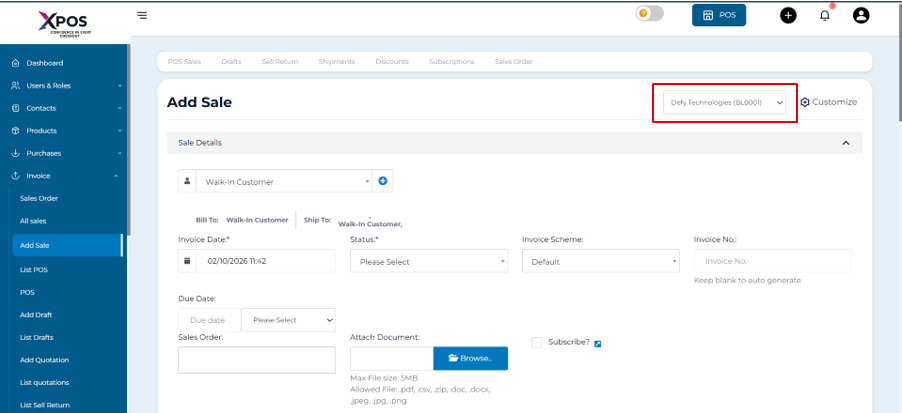
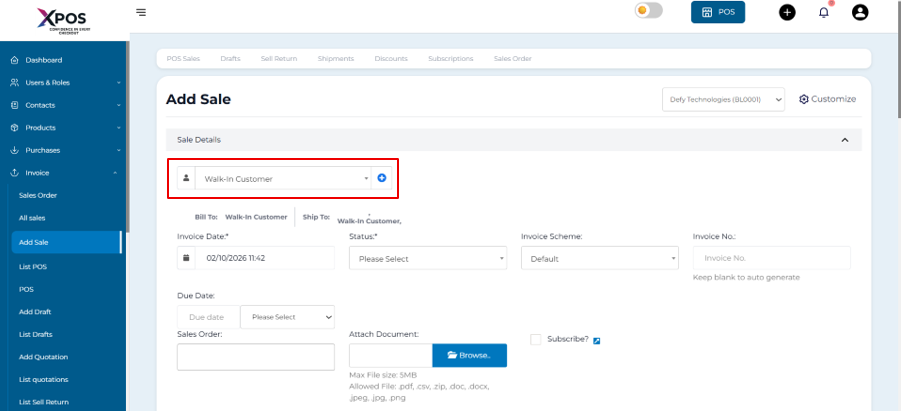
Go to Invoice→ Add Sale.
-
Select the Business Location.

-
Choose the Customer.

-
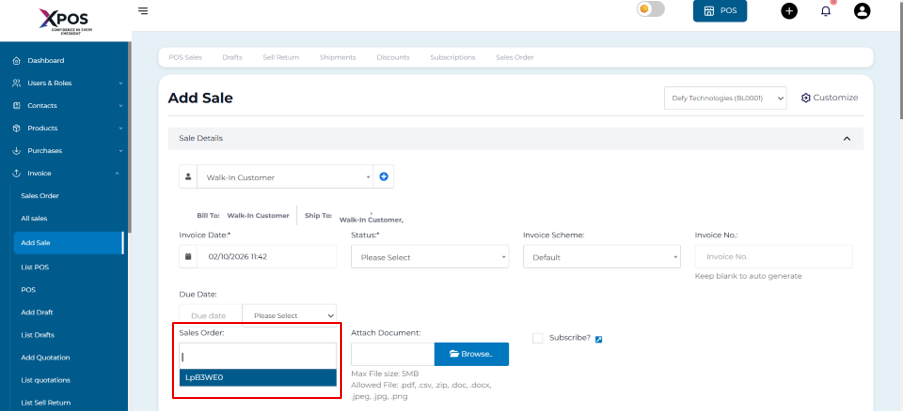
Open the Sales Order dropdown.
-
Select the approved sales order.

-
The system will automatically load:
- Products
- Prices
- Taxes
- Discounts
-
Adjust product quantities if needed.
-
Complete and save the sale.
Stock Transfer
What Is Stock Transfer?
Stock Transfer is the process of moving products from one location to another (for example, from a warehouse to a store).
When a stock transfer is completed:
- Stock quantity decreases at the source location (From)
- Stock quantity increases at the destination location (To)
Stock levels are updated only when the transfer status is marked as Completed.
How to Create a Stock Transfer
Follow these steps to record a stock adjustment:
Step 1: Open Stock Transfer
- Go to Stock Transfer and press Add Stock Transfer

Step 2: Select Location and Date
- Choose the Business Location where the stock adjustment applies.
- Select the date of adjustment.

Editing a Stock Transfer
Stock transfers can be edited only under specific conditions.
When Editing Is Allowed
- The transfer status is Pending
- The transfer status is In-Transit
When Editing Is Not Allowed
- The transfer status is Completed
Note:
If a completed transfer needs changes, delete it and create a new stock transfer.
Stock Not Appearing in the Destination Location?
If stock is not showing in the To Location, check the following:
-
Product is assigned to the destination location
- Make sure the product is added to that location in the system.
-
Transfer status is marked as Completed
- Stock levels update only after completion
Hiding Product Price During Stock Transfer
You can restrict certain users (like warehouse staff) from seeing product prices while transferring stock.
How to Hide Purchase Price for a Role
Step 1: Go to Users & Roles > Users > Roles.
Step 2: Click Edit for the required role (e.g., Warehouse Worker)

Step 3: Under the Product section, uncheck “View Purchase Price”
Step 4: Save the changes.

Stock Adjustment
How to Create a Stock Adjustment
Follow these steps to record a stock adjustment:
Step 1: Open Stock Adjustment
- Go to Add Stock Adjustment in the system.

Step 2: Select Location and Date
- Choose the Business Location where the stock adjustment applies.
- Select the date of adjustment.
Step 3: Choose Adjustment Type
Select one of the following:
-
Normal Adjustment
- Used for regular or expected losses
- Example: leakage, minor damage, expiry
-
Abnormal Adjustment
- Used for unexpected or major losses
- Example: fire, accident, theft
- This classification helps in reporting and analysis.

Step 4: Add Products and Quantity
- Select the products you want to adjust.
- Enter the quantity to be reduced for each product.
The entered quantity will be deducted from the available stock.
Step 5: Enter Recovered Amount (If Any)
-
Sometimes you may recover money from damaged stock, such as:
- Insurance claims
- Selling scrap or waste material
-
Enter the recovered amount here.
-
If nothing is recovered, enter 0.

Add Expenses
Adding Expenses (Employee, Customer, or Supplier)
XPOS allows you to record expenses related to employees, customers, or suppliers. These expenses help track costs accurately and improve financial reporting.
How to Manage Expenses
This section explains how to view existing expenses and add new expense entries.
Steps to View Existing Expenses
Step 1: Open Accounting
- Go to the Dashboard
- Click Expenses from the sidebar menu

Step 2: Open Expenses
- Click Expenses to open the expense management page

Steps to Add a New Expense
Step 3: Open Add Expense Form
- Scroll to the bottom of the screen
- Click Add Expense

Step 4: Understand the Expense Cards
Each expense card shows:
- Expense category
- Business Location
- Expense note
- Sub Category
- Date created
- Reference Number
- Expense for
- Expense For Contract
- Total Amount
- Attach Document**
- Applicable tax

Step 5: Select Expense Category
- Use the Select Category dropdown
- Choose the appropriate category for the expense

Step 6: Choose Payment Method
- Open the Payment Method dropdown
- Select how the expense was paid

Step 7: Enter Expense Amount
- Fill in the Amount field

Step 8: Add Optional Details
- Enter a description or note (optional)

Step 9: Save the Expense
- Click Save
Step 10: Confirm Expense Creation
- The new expense will appear in the expense list
Expenses Category
How to Manage Expense Categories
Expense categories help you organize and track different types of expenses efficiently.
Steps to View and Manage Expense Categories
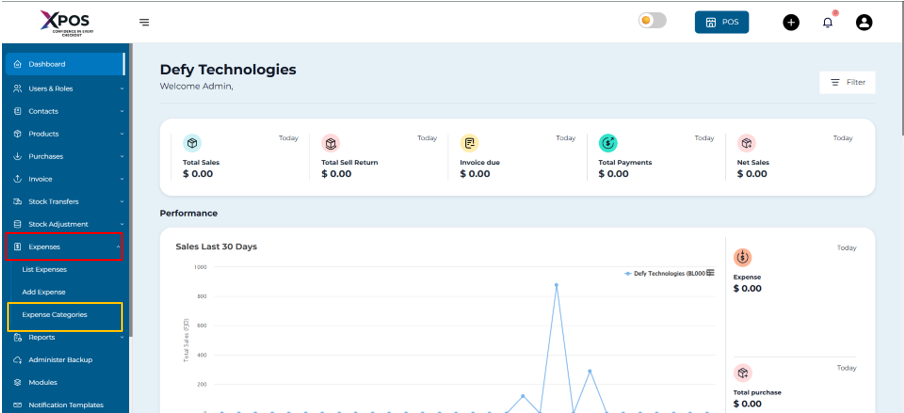
Step 1: Open Accounting
- Go to the Dashboard
- Click Expense Category from the sidebar menu

Step 2: Open Expenses
- Select Expenses to access the expense management page

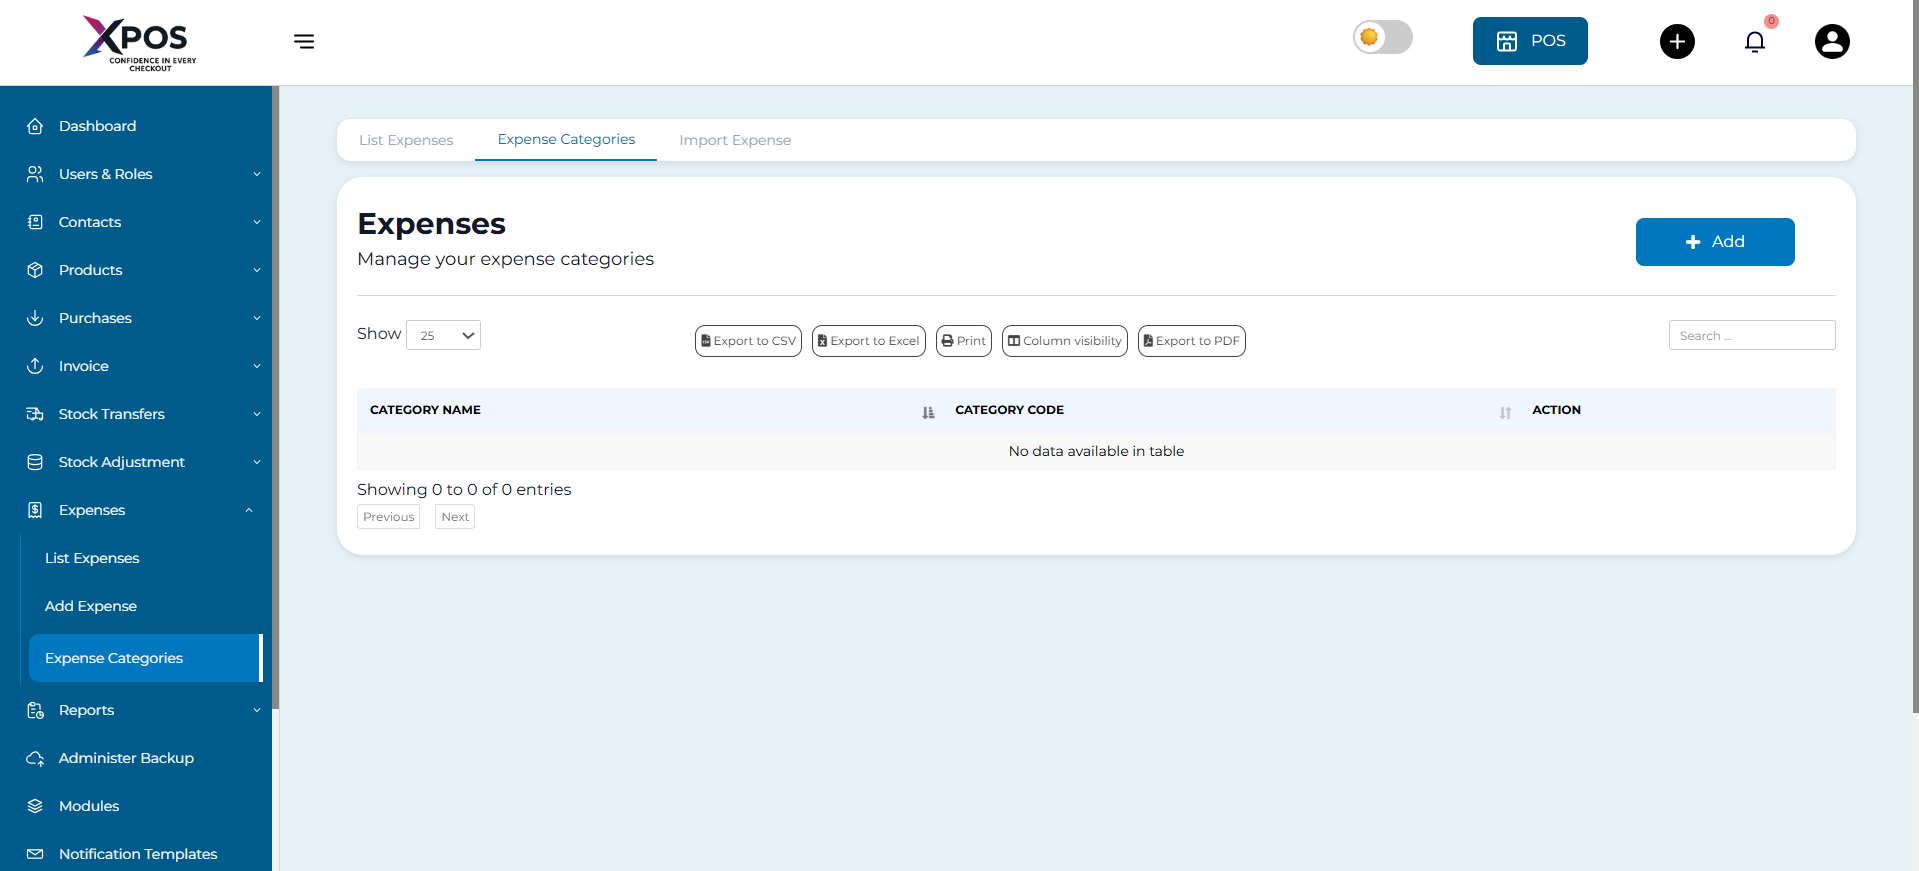
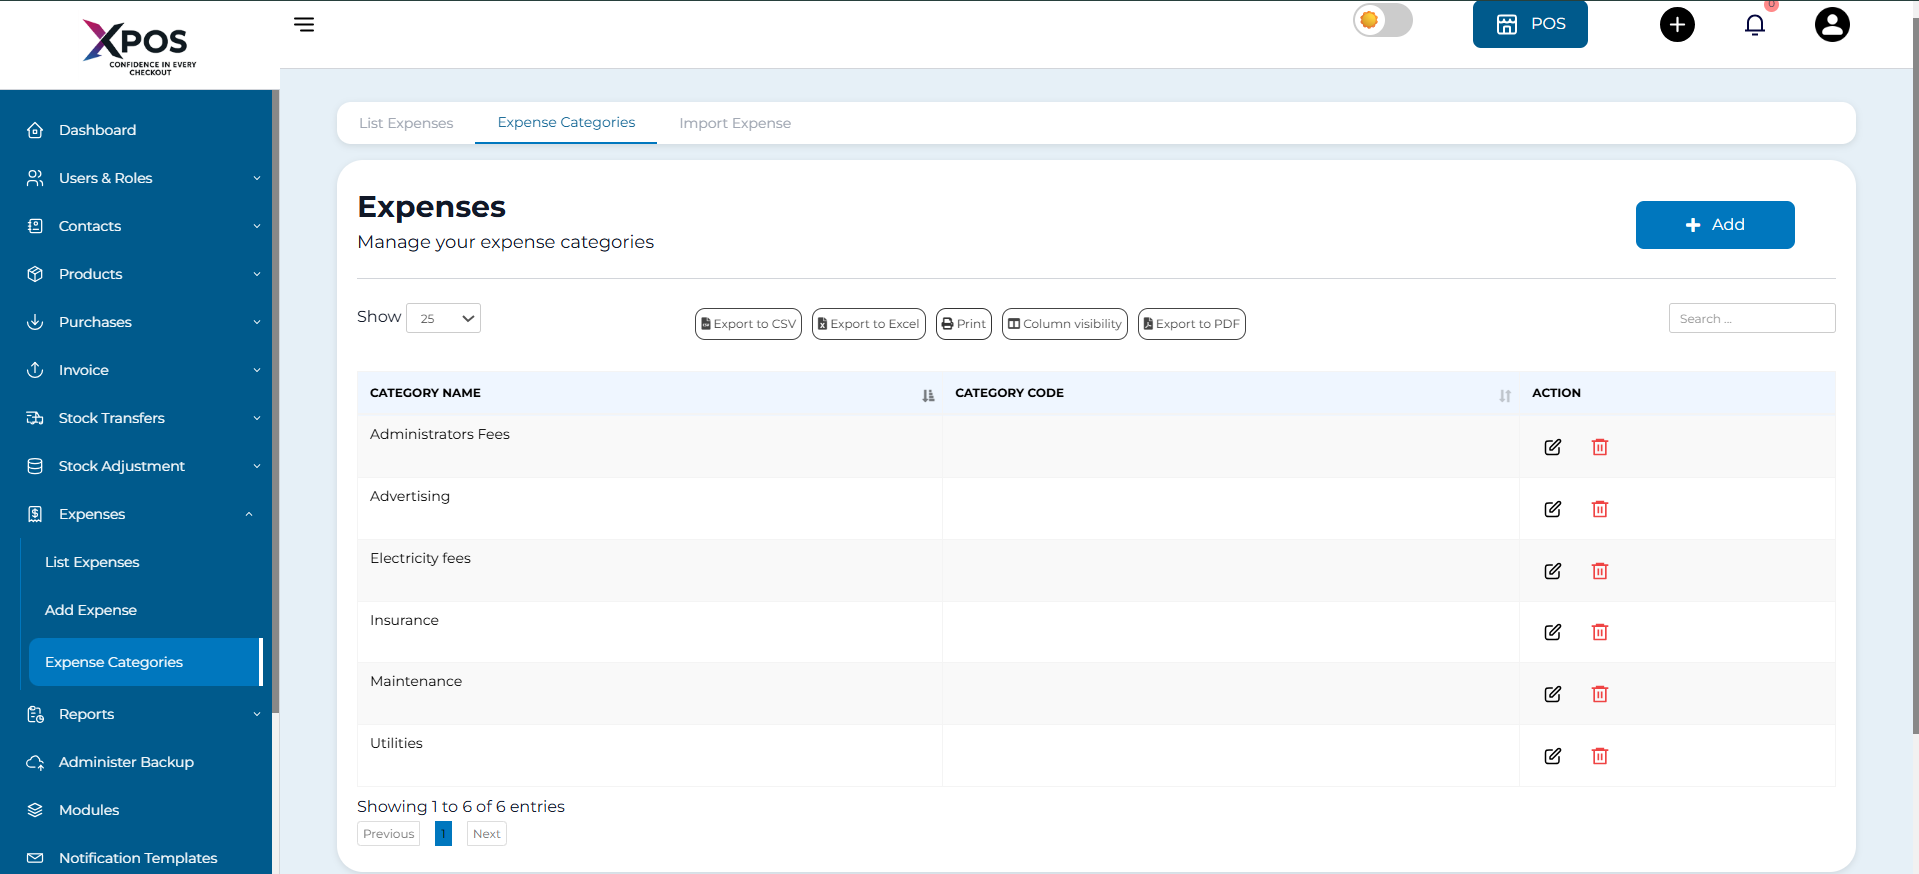
Step 3: View Existing Categories
- At the top of the page, you will see your existing expense categories displayed as cards
- Each card represents one expense category

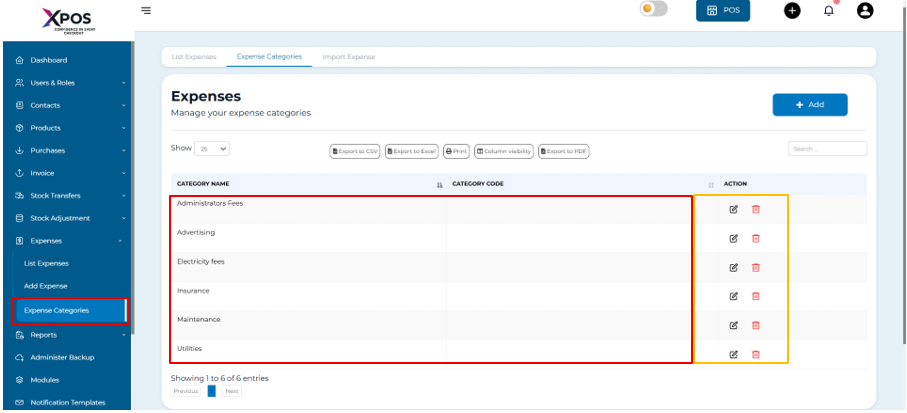
Step 4: Understand Category Options
- The category name is shown on the left side.
- On the right side, you will find options to:
- Edit the category
- Delete the category

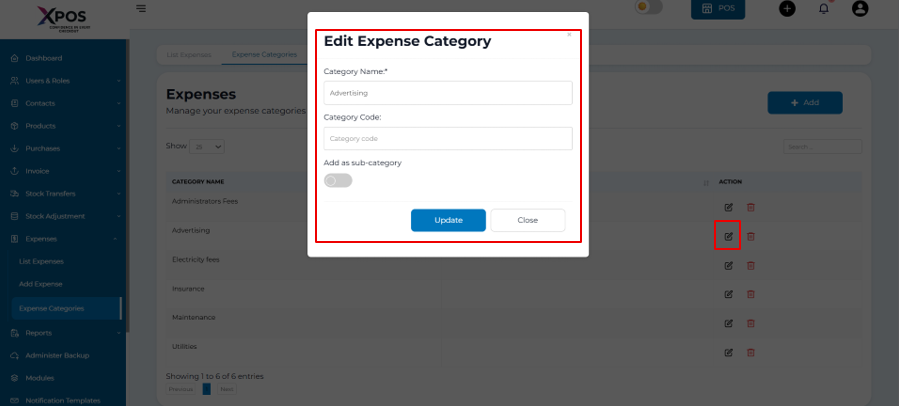
Step 5: Edit an Expense Category
- Click the Edit button next to the category
- Update the category name as needed
- Save the changes

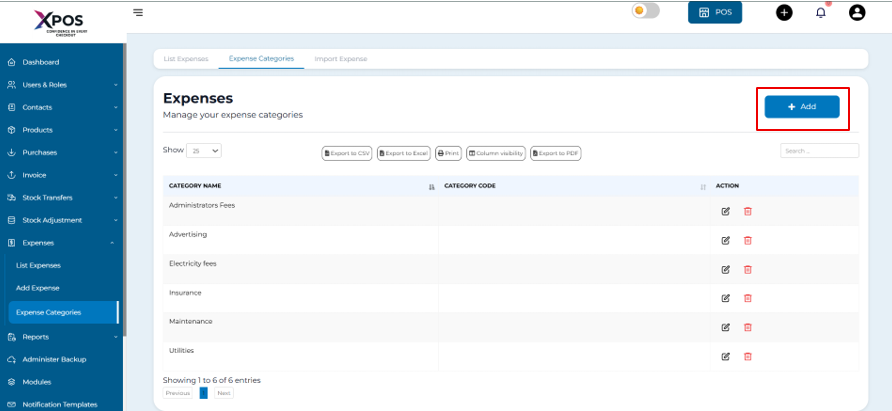
Steps to Add a New Expense Category
Step 6: Open Add Category Form
- Click the Add Category button

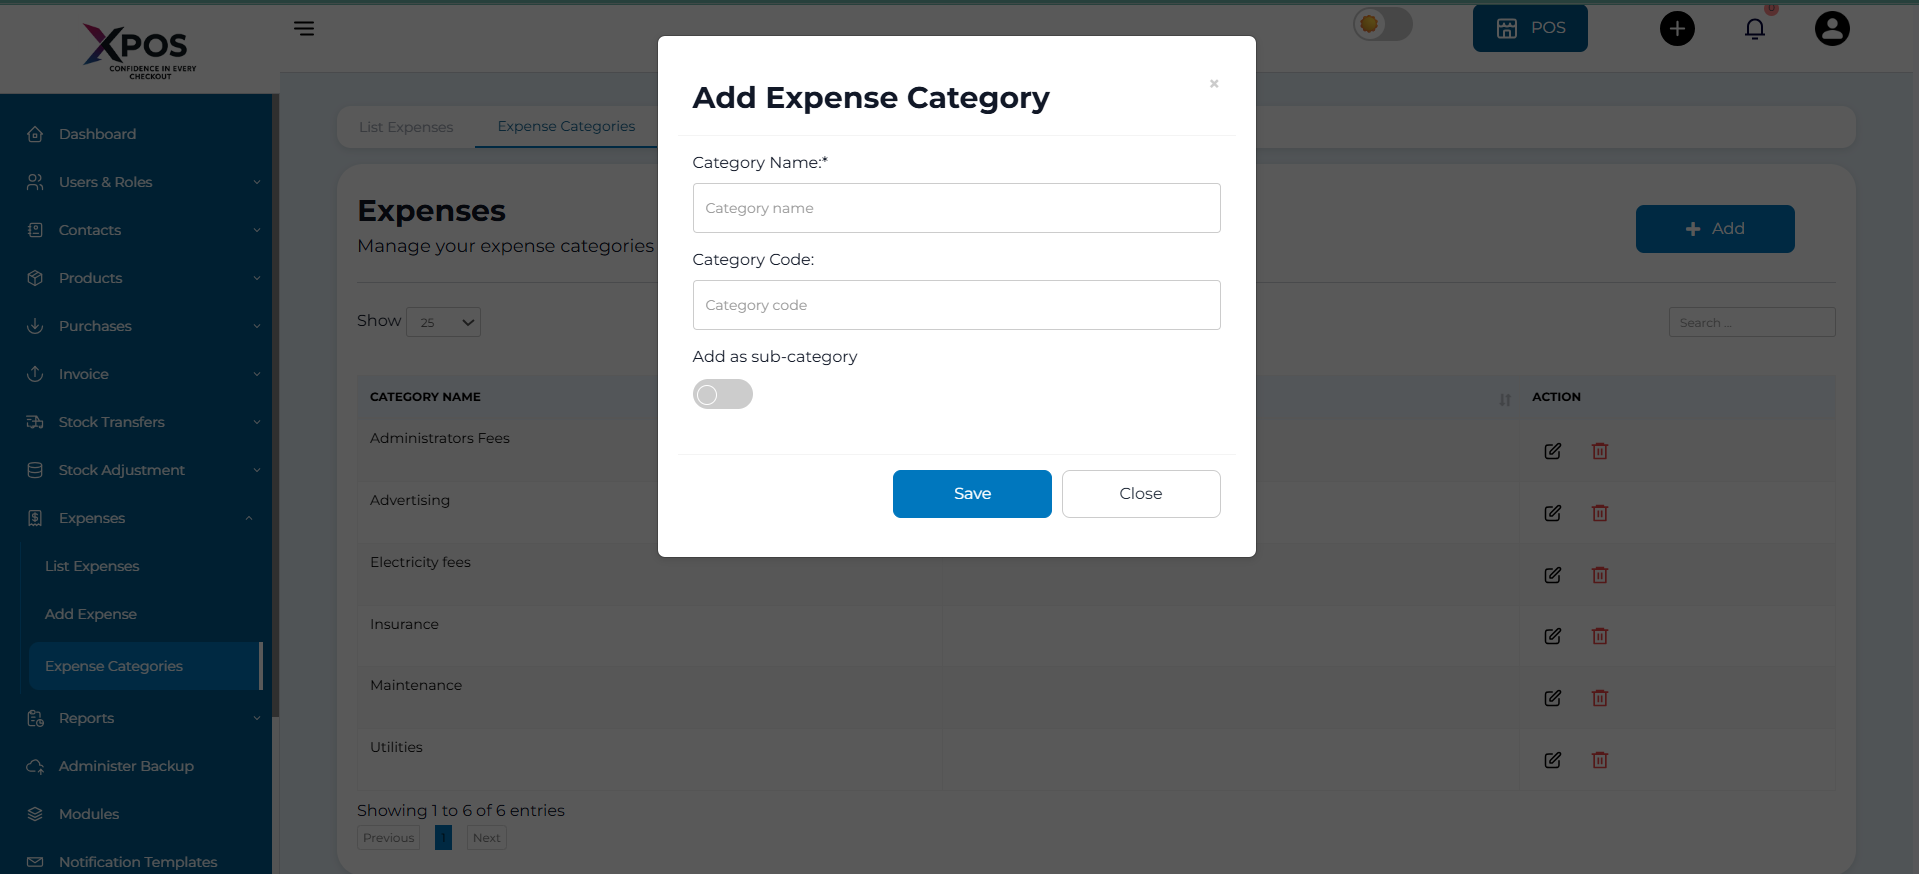
Step 7: Enter Category Details
- Type the name of the new expense category

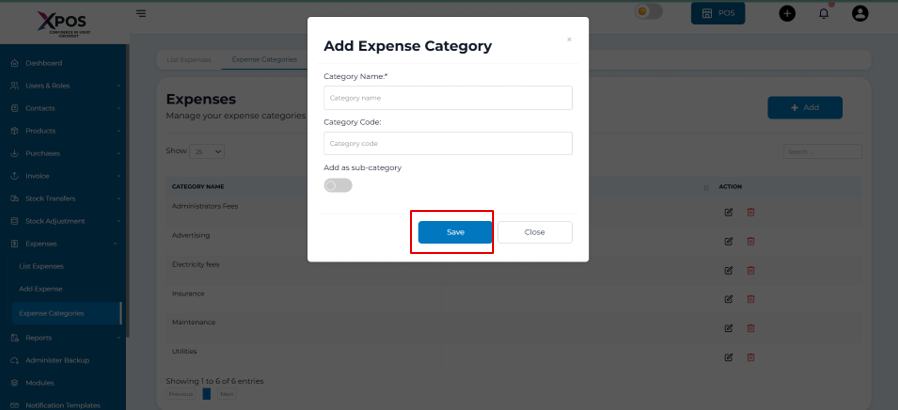
Step 8: Save the Category
- Click Save

Step 9: Confirm Category Creation
- The new category will appear in the list of expense categories
Reports
Reports Overview
Reports give you a complete overview of your business performance. They help you analyze sales, purchases, stock, expenses, and other important business data.
How to View Reports
- Go to Reports
- Select the report you want to view

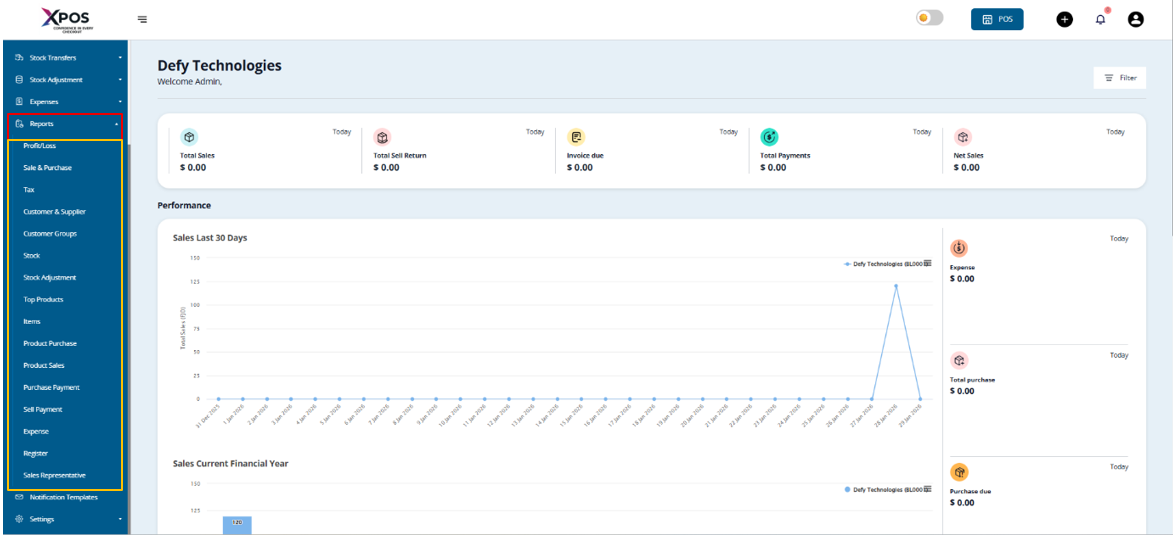
Many reports include filters that allow you to narrow down data and analyze your business more effectively.
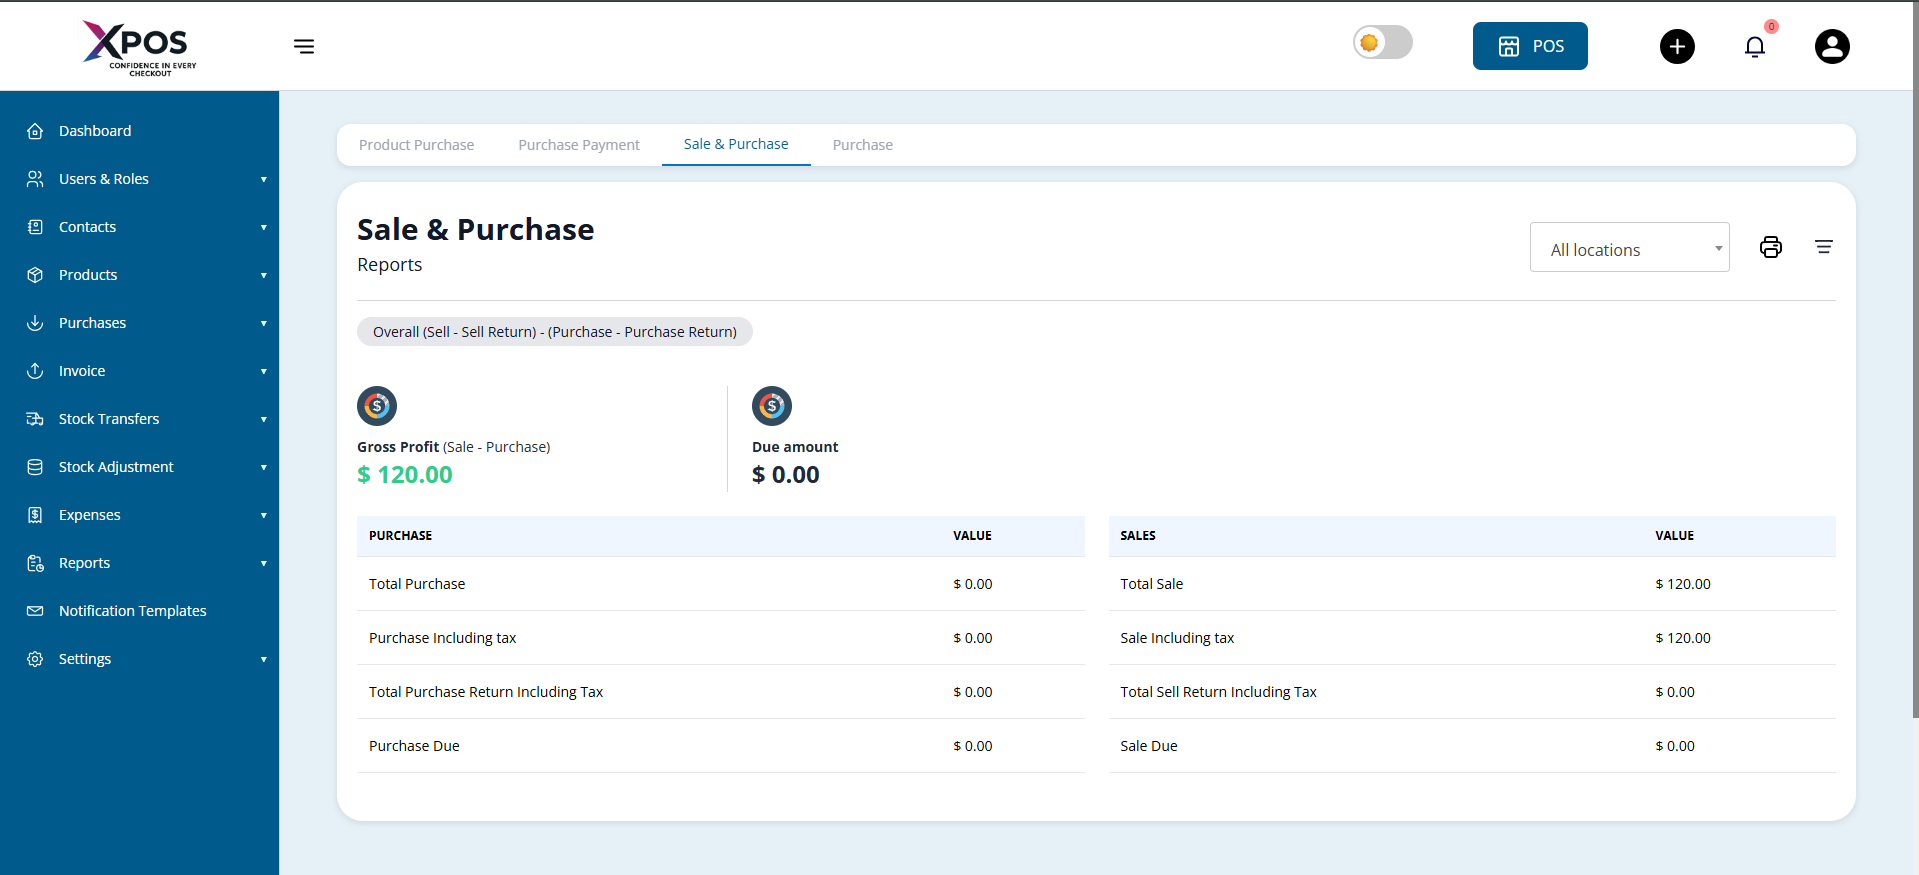
1. Purchase & Sale Report
This report provides a summary of purchases and sales, including:
- Total purchases and sales
- Purchases and sales including tax
- Outstanding purchase dues
- Total sales and purchase
- Sales and Purchase including tax
- Outstanding sales and purchase dues

2. Tax Reports
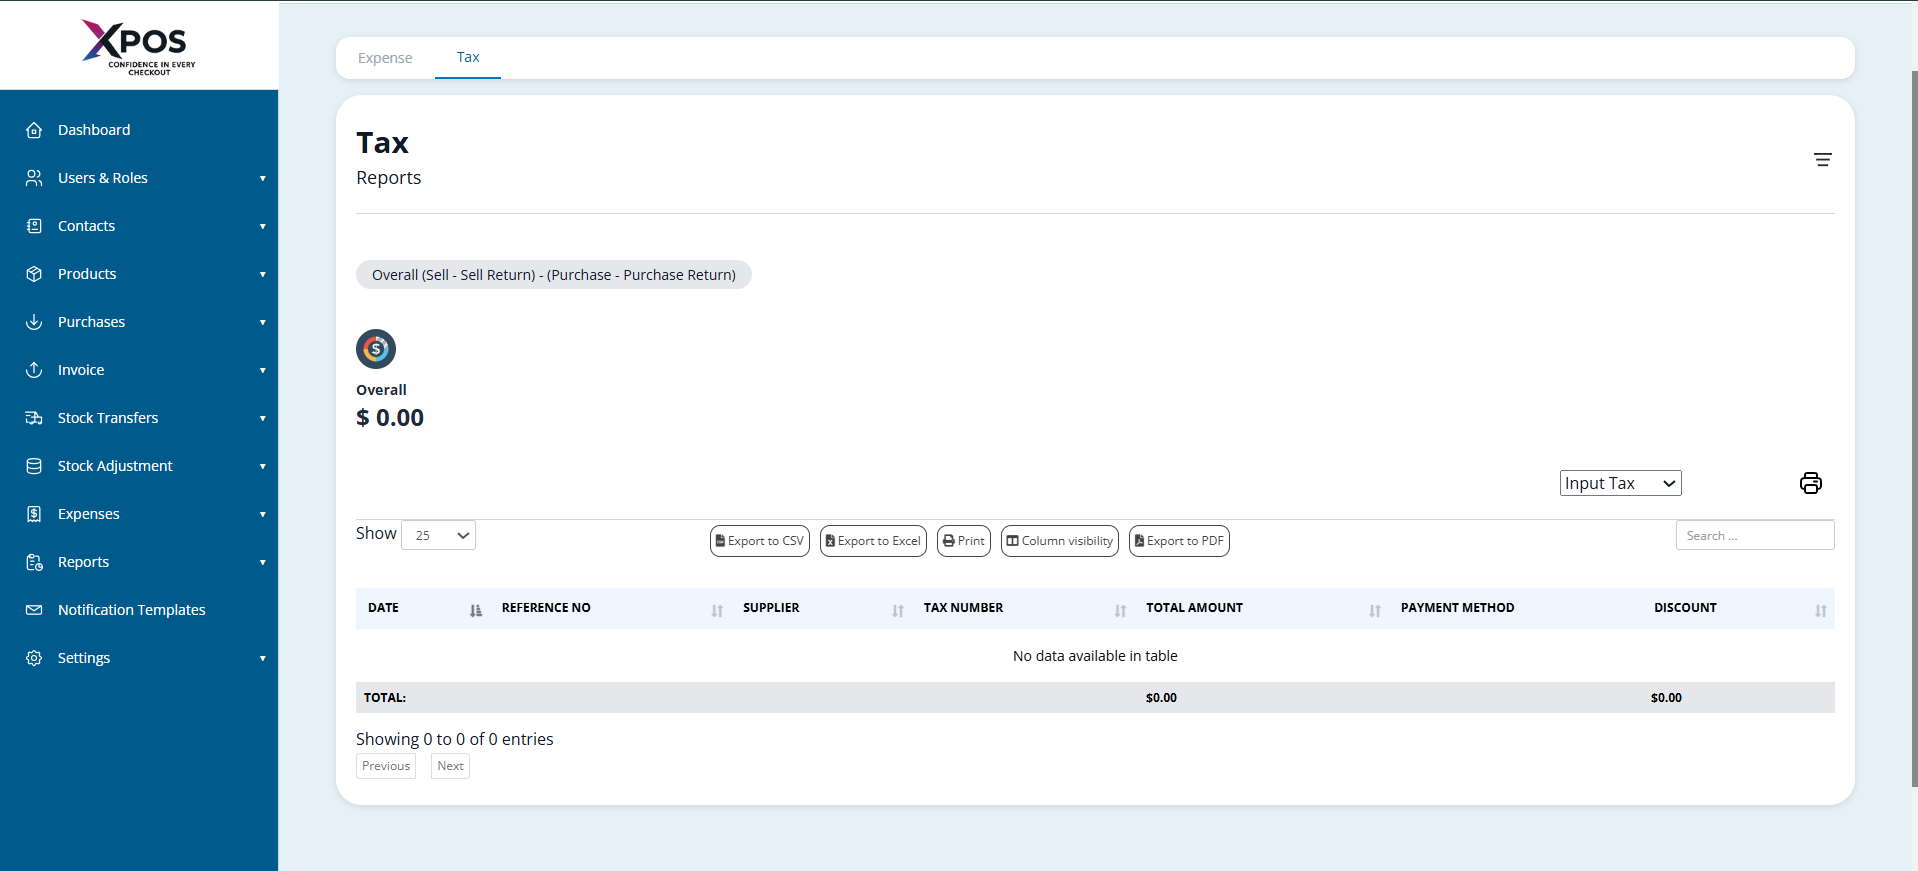
Tax reports show:
- Input Tax (tax paid on purchases)
- Output Tax (tax collected on sales)
 These reports help with tax tracking and compliance.
3. Contacts Report (Customers & Suppliers)
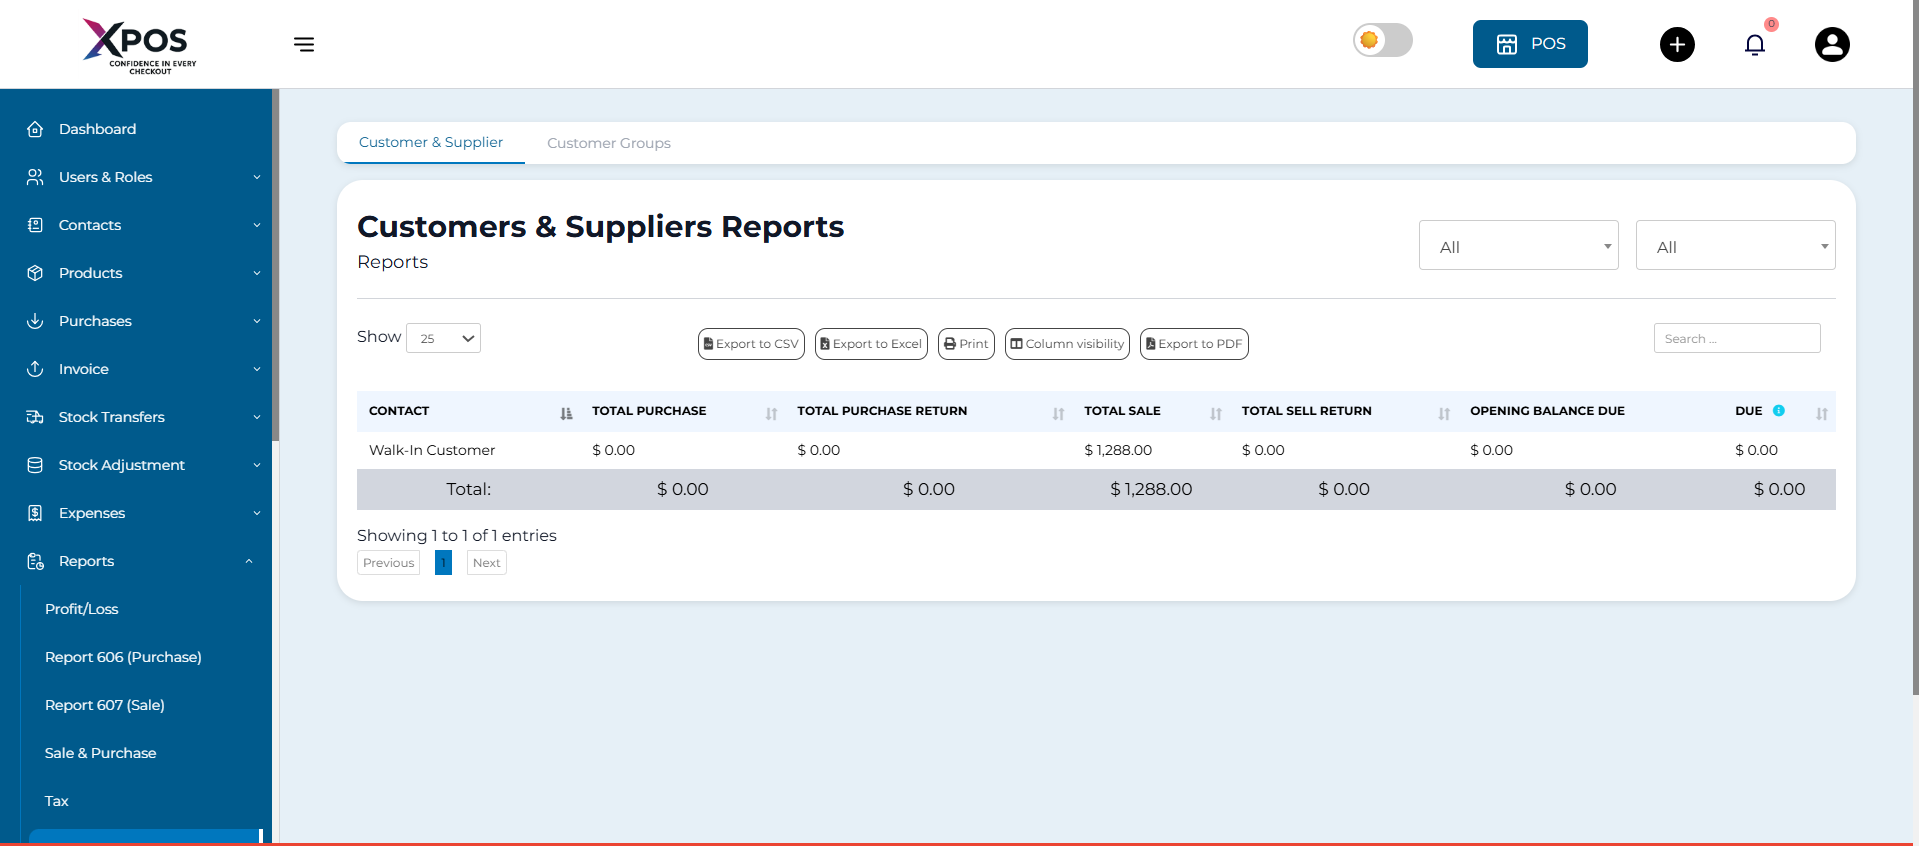
This report displays purchase and sales details for all customers and suppliers, along with outstanding balances.
- A positive due amount means payment is expected from the contact
- A negative due amount means payment is owed to the contact

4. Stock Report
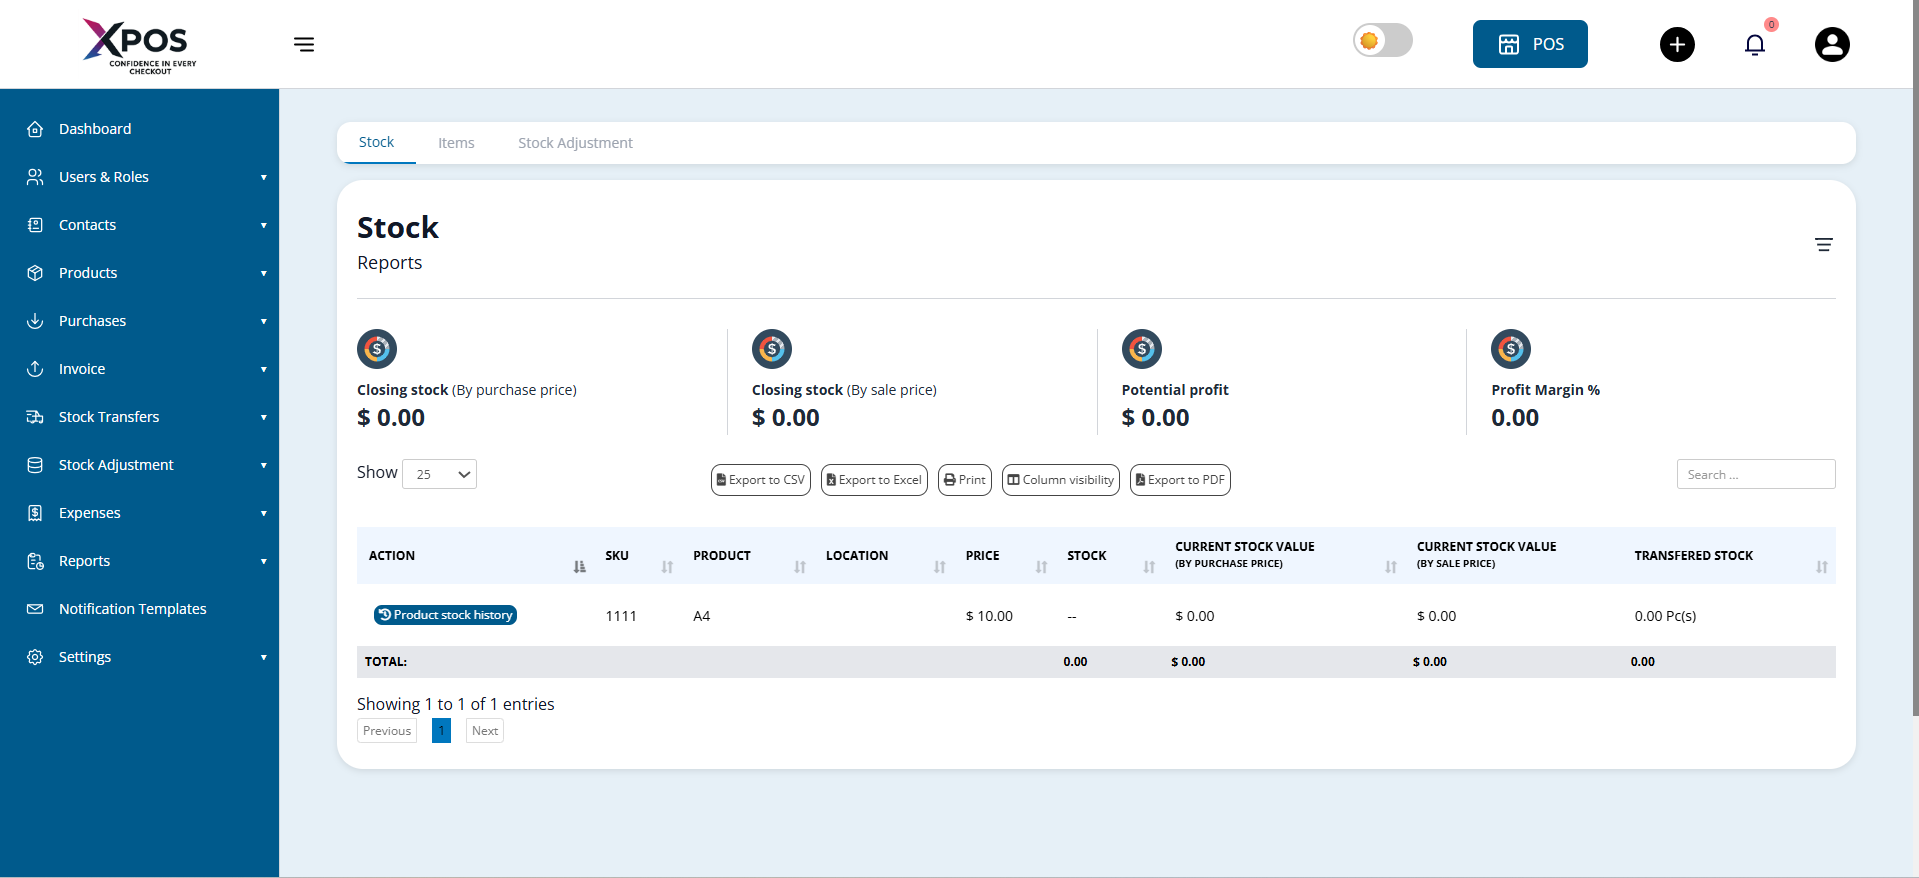
The stock report provides details of current inventory, including:
- Available stock quantity
- Total quantity sold for each product

5. Variable Products
- Click the green plus (+) button next to the SKU to view stock details for each product variation
Stock Value by Purchase and Sales Price
Within the stock report, you can also view:
- Current stock value based on purchase price
- Current stock value based on selling price
6. Product Stock History (Date-wise)
To track stock movement over time:
- Use the Product Stock History link in the stock report
- View stock changes based on selected dates
Trending Products Report
This report helps identify high-demand products.
You can apply filters such as:
- Business location
- Product category and sub-category
- Brand and unit
- Date range
- Number of products (Top 5, Top 10, or any custom number)
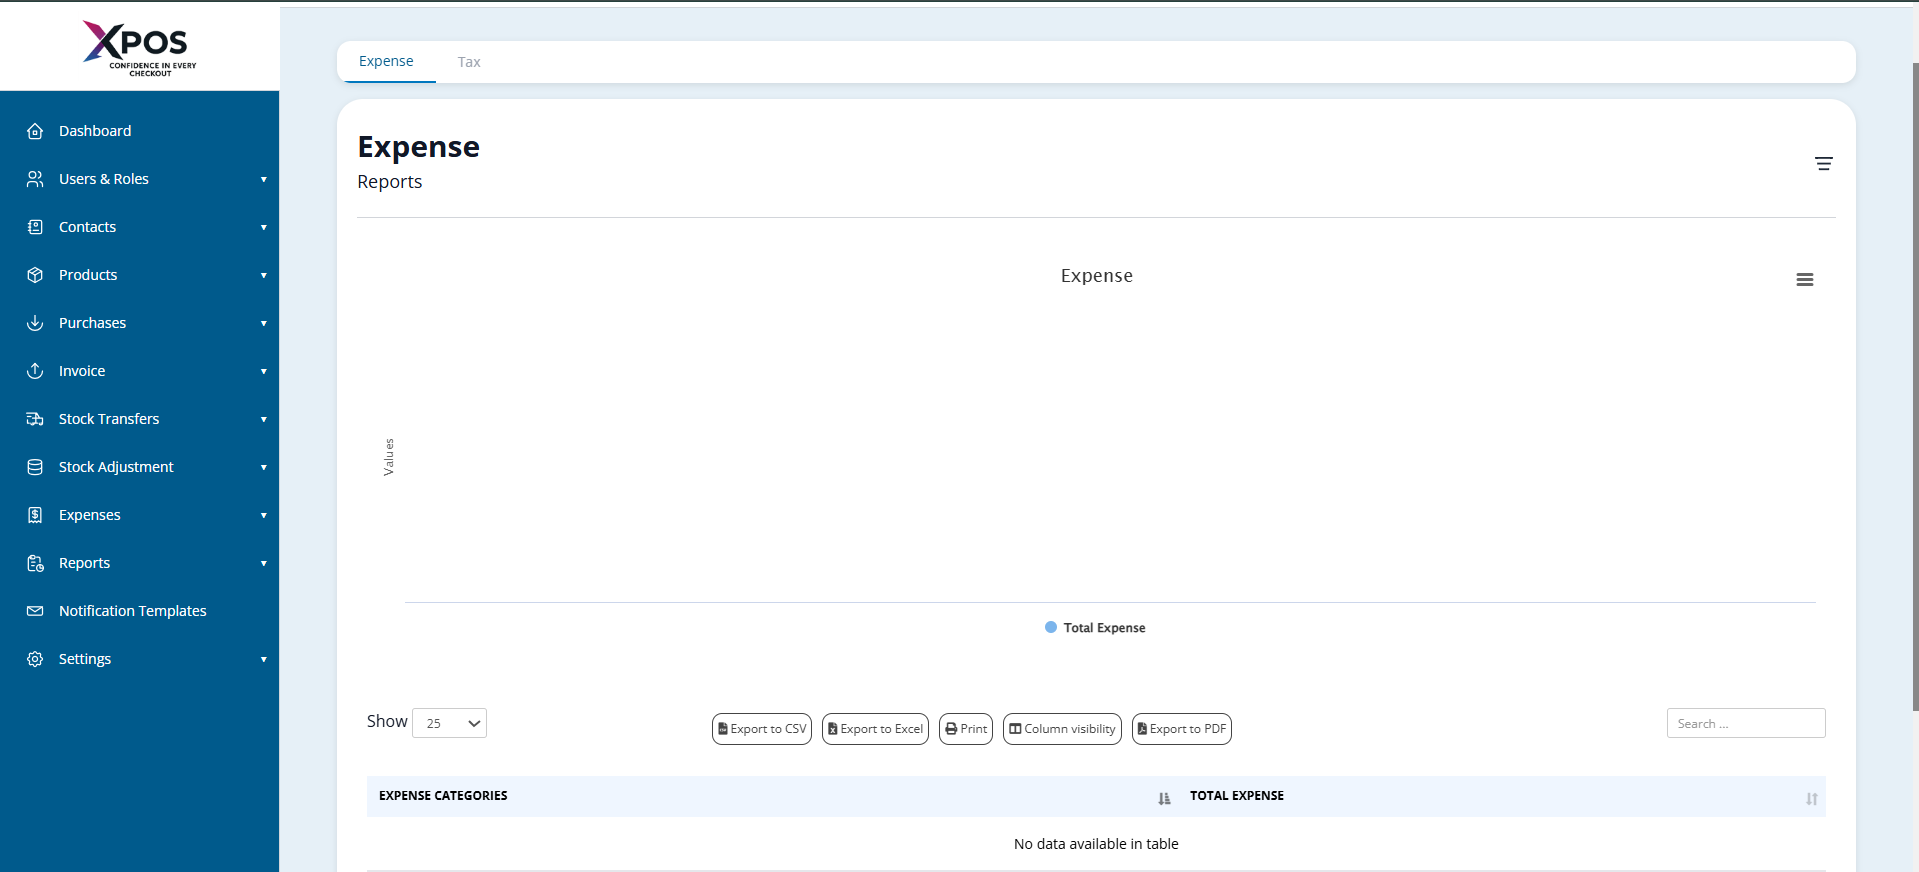
7. Expense Report
The expense report helps analyze:
- Expenses by business location
- Expenses by category

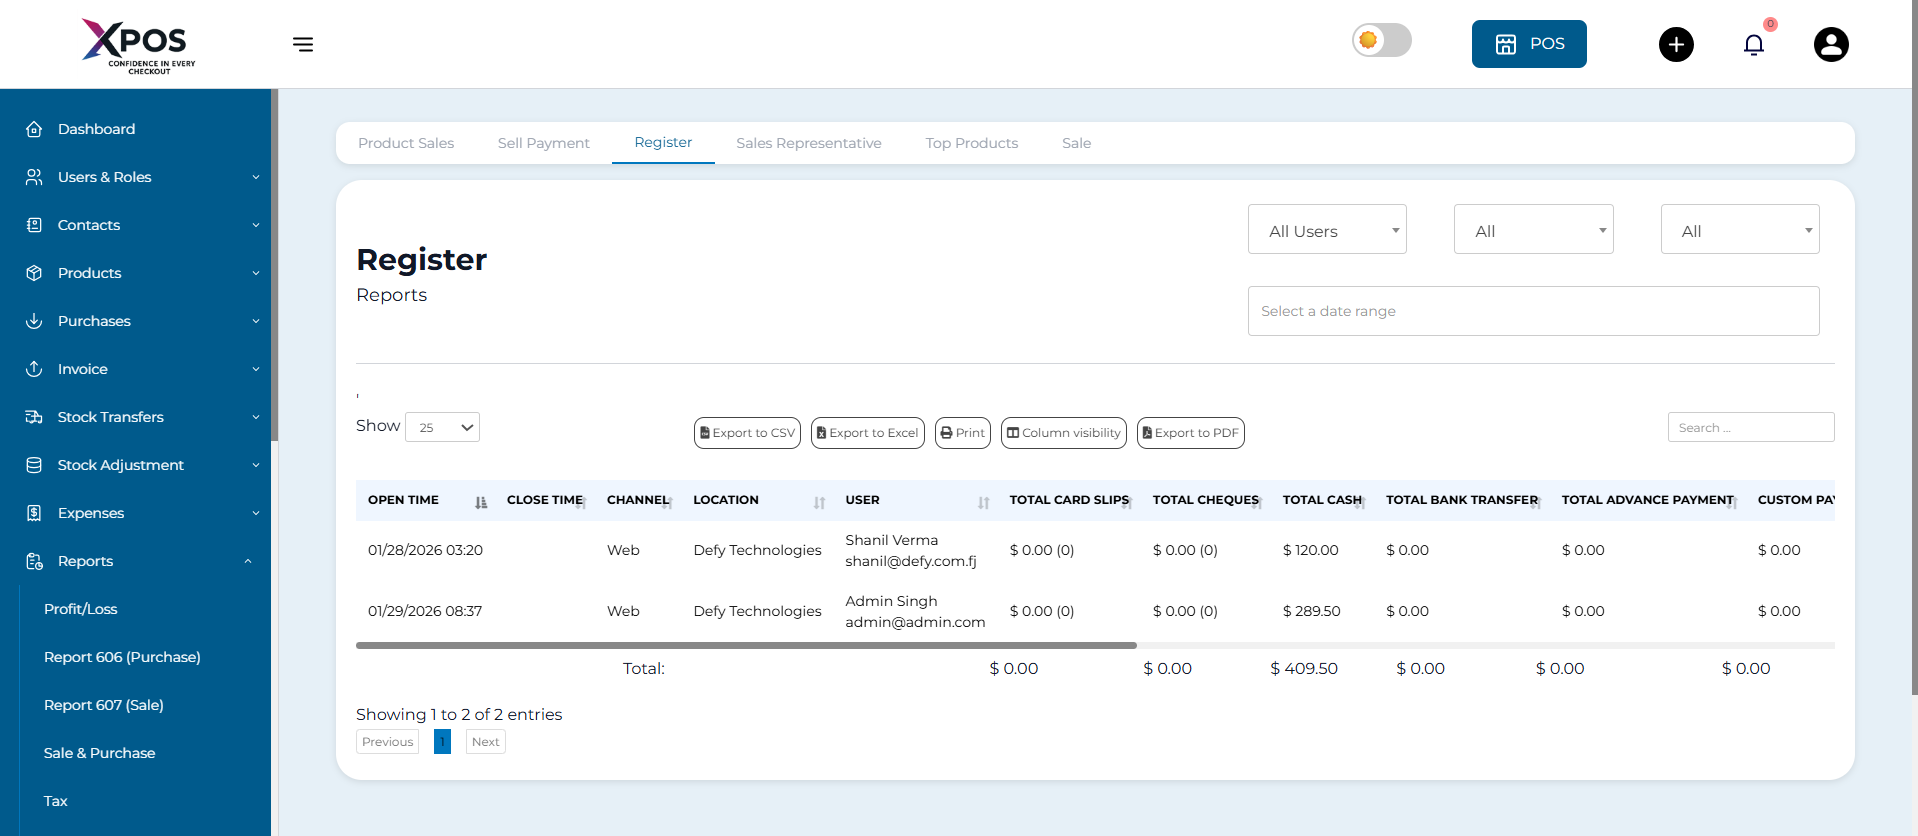
8. Register Report
This report shows details of all registers.
You can filter registers by:
- User
- Status (Open or Closed)

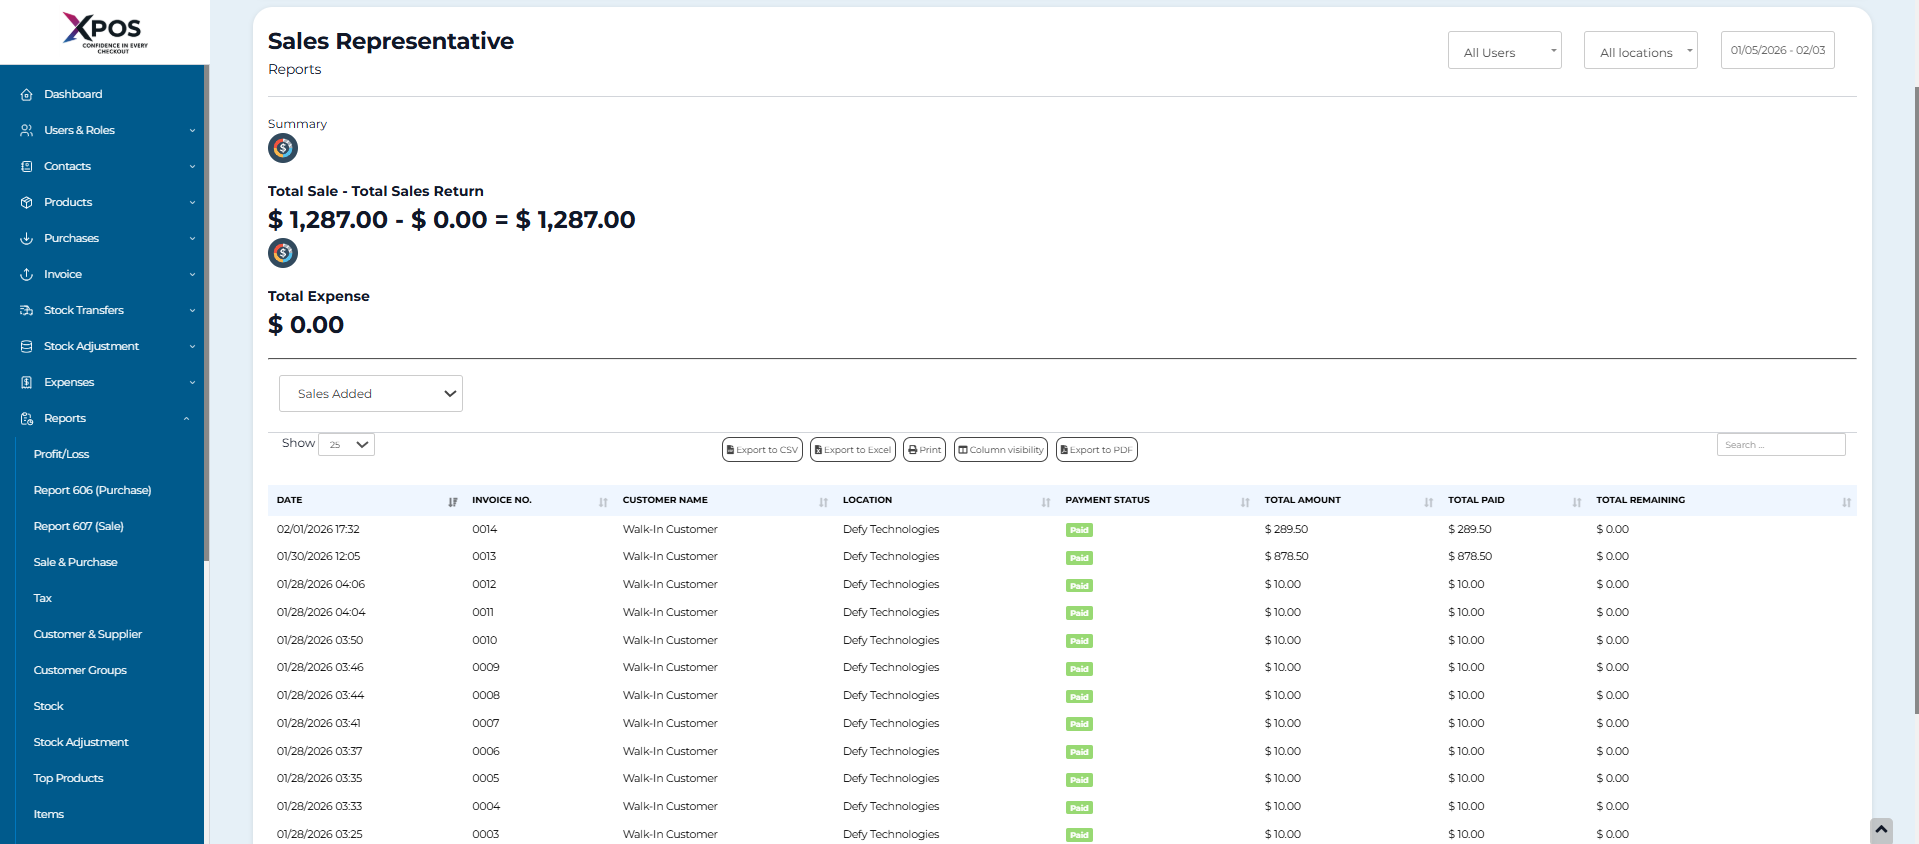
9. Sales Representative Report
This report displays:
- Sales data
- Expense data for sales representatives
Filters available:
- User
- Business location
- Date range

Grouping Invoices in Product Sell Report
Invoices can be grouped for easier analysis.
How to View Grouped Invoices
- Go to Reports > Product Sell Report
- Click the Grouped tab
Grouping Criteria
Invoices are grouped by:
- Date
- Product name
Example:
All sales of a specific product on the same day appear in one row. Sales of the same product on different dates appear in separate rows.
Settings
How to Search in Settings
The Settings section contains many options, which can sometimes feel overwhelming. To make things easier, XPOS provides a built-in search feature that helps you quickly find any setting.
Steps to Search for a Setting
- Go to Settings
- Locate the Search field at the top of the Settings page
- Type a keyword related to the option you are looking for
- Matching settings will appear instantly as you type
- Click the relevant result to open that setting
1. Business Settings Overview
Business Settings allow you to configure common information and rules used across your business operations. These settings help standardize sales, taxes, pricing, and system behavior.
Basic Business Information
You can update the following details:
- Business Name
- Business Start Date
- Default Profit Margin
- Currency
- Time Zone
- Business Logo
Financial Year Settings
- Set the financial year based on your country
- Some countries start the financial year in January
- Others start in April
- Select the option that applies to your business
Tax and Pricing Settings
Tax Information
- Configure your business tax details
- Set default sales tax applied to transactions
Default Sales Discount
- Set a default discount that applies automatically to sales
Product SKU Prefix
-
Enable Product SKU Prefix to automatically add a prefix to product SKUs
-
When enabled:
- The prefix is added to manually entered SKUs
- If SKU is left empty, the system auto-generates one with the prefix
Contact Settings
Default Credit Limit
-
Location: Business Settings > Contact
-
This value is used as the default credit limit when creating:
- Customers
- Suppliers
Sales Settings
Default Sale Discount
-
Location: Business Settings > Sale
-
Automatically applies a discount to sales in:
- POS screen
- Add Sales screen
Sales Item Addition Method
Controls how products are added to the cart in POS and Sales screens.
Options:
-
Add item in new row
- Always adds the product as a new line
-
Increase item quantity if it already exists
- Increases quantity if the product is already in the cart
- Adds a new row only if the product is not present
Amount Rounding Method
-
Defines how product prices are rounded
-
Options include:
- Whole number
- Rounded decimal values
-
If no method is selected, prices remain as whole numbers
Minimum Selling Price Rule
Sales price is minimum selling price
- Prevents selling a product below its set selling price
- Allows selling above the set price
- Useful for protecting profit margins
Inline Tax Display
- Enable Inline Tax from Business Settings > Tax
- Displays prices including tax on the POS screen
Enable Sales Order
- Turn on this option to use the Sales Order feature
Transaction Edit Limit
Edit Transactions Beyond 30 Days
- You can control how many days a transaction remains editable
- Set the allowed number of days in Business Settings
- Increasing this value allows older transactions to be edited
System Settings
Datatable Entry Selection
- Location: Business Settings > System
- Set the default number of rows displayed in data tables
Allow Overselling of Products
-
Location: Business Settings > Sale
-
Enable this option to sell products even when stock is unavailable
-
Useful for:
- Non-stock items
- Special order scenarios
Important Note:
-
If a sale is made for out-of-stock products using this option:
- The profit for those products will be calculated as negative.
2. Setting Invoice Scheme
XPOS allows you to customize how invoice numbers are generated for your business.
How to Configure an Invoice Scheme
Step 1: Open Invoice Settings
- Go to Settings
- Select Invoice Settings
Step 2: Add a New Invoice Scheme
- Click Add to create a new invoice scheme
Step 3: Choose Invoice Format
-
Select an invoice number format, such as:
XXXX<Year>-XXXX
Step 4: Customize Invoice Details
You can configure the following options:
- Custom prefix (optional)
- Starting invoice number
- Number of digits for the invoice number
Step 5: Preview the Invoice Number
- The Preview box shows how the invoice number will look based on your selected options
Step 6: Set Default Invoice Scheme
- Choose one invoice scheme as the default
- Only the default scheme will be used when generating invoices for the business
3. Adding a New Label or Barcode Setting
XPOS includes several ready-to-use barcode and label configurations. If your label size or layout is not available, you can create a custom configuration.
Before you begin, make sure you have all label measurement details.
All measurements must be entered in inches.
Steps to Add Barcode Sticker Settings
Step 1: Open Barcode Settings
- Go to Settings
- Select Barcode Settings
- Click Add
Step 2: Enter Basic Details
- Provide a name for the barcode setting
- Add a description for reference (optional but recommended)
Step 3: Choose Sticker Type
- If you are using label rolls, enable Continuous feed or rolls
- Some measurement fields are not required when this option is enabled
Step 4: Enter Measurement Details
(All values must be in inches)
Enter the following information as applicable:
- Additional top margin
- Additional left margin
- Sticker width
- Sticker height
- Paper width
- Paper height
- Number of stickers per row
- Distance between rows
- Distance between columns
- Total number of stickers per sheet
Testing the Barcode Setting
Step 5: Print a Test Label
- Go to Purchase
- Use the Print Label option to print a sample sticker
Step 6: Adjust if Needed
- If alignment or size is incorrect, return to Barcode Settings
- Edit the measurements until the label prints correctly
4. Tax Rates
Tax Rates allow you to define and manage taxes applied to purchases and sales.
How to Add a New Tax Rate
- Go to Settings > Tax Rates
- Click Add
- Enter a tax name (for example: VAT @ 5%)
- Enter the tax percentage
- Save the tax rate
Tax Groups
Sometimes, more than one tax needs to be applied to the same invoice or purchase. In such cases, you can use Tax Groups.
How to Create a Tax Group
- Go to Settings > Tax Rates
- Click Add Tax Group
- Enter a meaningful group name
- Select the tax rates to include in the group
- Save the tax group
Important Points About Tax Groups
- The tax rate of a tax group is the total of all selected sub-tax rates
- If a sub-tax rate is updated, the related tax group rate updates automatically
- A tax rate cannot be deleted if it is already used in a tax group
How to Disable Tax
If you do not want to use taxes in your system, follow these steps:
Step 1: Open Business Settings
- Go to Settings > Business Settings
Step 2: Disable Tax Options
- Uncheck Enable inline tax in purchase and sell
- Uncheck Enable Price & Tax info
Step 3: Remove Default Sales Tax
- Set Default Sale Tax to None
Selling Price Group (products)
Selling Price Groups in XPOS
(Sell products at different prices such as retail, wholesale, or location-based pricing)
What Are Selling Price Groups?
Selling Price Groups allow you to sell the same product at different prices based on:
- Customer type (Retail / Wholesale)
- Business location
- User (cashier)
- Special pricing rules
1. Adding a Selling Price Group
Steps:
- Go to Products → Selling Price Groups.
- Click Add.
- Enter a name for the price group
(example: Wholesale, Retail, Branch A Price). - Save the price group.
2. Choosing Price Type: Fixed or Percentage
When creating or editing a selling price group, you can set prices in two ways:
Option 1: Fixed Price
- You manually enter a specific selling price for each product.
- Example: Product price = $50
Option 2: Percentage Based
-
The selling price is calculated using a percentage.
-
Example:
- +10% from default price
- -5% discount from default price
Choose the option that best fits your pricing strategy.
3. Adding Prices for Different Price Groups
Steps:
- Go to Products → List Products.
- Edit a product.
- Scroll to the Selling Price Groups section.
- Enter prices for each price group.
- Save the product.
Repeat this process for all products that need different pricing.
4. Exporting & Importing Selling Price Groups
Export Prices
- Go to Products → List Products.
- Click Download Excel.
- The file will include selling price group columns.
Import Prices
- Download the export template.
- Update the prices under the relevant selling price group columns.
- Import the file back into the system.
Tip: This is useful for bulk price updates.
5. Selling Using a Specific Price Group (POS)
When a selling price group is applied:
- The POS automatically uses the assigned price.
- No manual price change is needed at checkout.
The price group can be applied based on:
- User
- Customer
- Location
6. Assigning a User to a Selling Price Group
Steps:
- Go to User Management → Users.
- Edit the user.
- Select a Selling Price Group.
- Save changes.
Now, whenever this user logs into POS, the assigned price group will be applied.
7. Assigning a Customer to a Selling Price Group
Steps:
- Go to Contacts → Customers.
- Edit the customer.
- Select a Selling Price Group.
- Save.
This ensures the customer always receives the correct pricing.
8. Assigning a Selling Price Group to a Business Location
Steps:
- Go to Business Settings → Business Locations.
- Edit the location.
- Select the required Selling Price Group.
- Save changes.
This is useful when each branch has different pricing.
9. Frequently Asked Questions (FAQ)
9.1 How to Hide Selling Price Groups in the POS Screen for Cashiers?
Solution:
- Go to Business Settings → POS Settings.
- Disable or hide the Selling Price Group option.
- Save settings.
This prevents cashiers from changing price groups during sales.
Tax Rates
Tax Rates & Tax Groups – User Guide
1. Adding a Tax Rate
Tax rates are used to calculate tax on sales and purchases.
Steps to Add a New Tax:
- Go to Settings → Tax Rates.
- Click Add.
- Enter a descriptive name
(example: VAT @ 5%). - Enter the Tax Rate (%).
- Save the tax rate.
2. Creating Tax Groups
Tax Groups are useful when more than one tax needs to be applied to the same sale or purchase.
When to Use Tax Groups:
- Multiple taxes apply to a single invoice
- Combined tax calculation is required
Steps to Add a Tax Group:
- Go to Settings → Tax Rates.
- Click Add Tax Group.
- Enter a meaningful group name
(example: GST + Service Tax). - Select the taxes you want to include in this group.
- Save the tax group.
Important Notes About Tax Groups:
- The total tax rate of a tax group is the sum of all included taxes.
- If you edit a tax inside a tax group, the group’s total tax rate updates automatically.
- A tax cannot be deleted if it is already being used in a tax group.
3. Disabling Tax in the System
If you do not want to use tax in purchases or sales, follow these steps.
Steps to Disable Tax:
- Go to Settings → Business Settings.
- Uncheck Enable inline tax in purchase and sell.
- Uncheck Enable Price & Tax info.
- Set Default Sale Tax to None.
- Save changes.
Important Note:
- When inline tax is disabled, the “Price Including Tax” column will not appear on the POS screen.
Print Labels (Products)
Printing Product Labels in XPOS
XPOS includes a built-in feature that allows you to print customized product labels with barcodes and product details.
1. How to Open the Print Labels Screen
You can access the Print Labels screen in multiple ways:
1.1: From Products Menu
- Go to Products → Print Labels.
2. Printing Labels – Step by Step
Once you are on the Print Labels screen, follow these steps:
Step 1: Add Products
-
Search and add products using:
- Product name
- Barcode
- SKU ID
Step 2: Set Label Quantity
- Enter the number of labels needed for each product.
Step 3: Choose Label Information
-
Under “Information to show in labels”, select or deselect the details you want to print, such as:
- Product name
- Price
- Barcode
- SKU
Step 4: Select Barcode Settings
-
Choose a barcode layout that matches your sticker paper.
-
Common label formats are already available.
-
To create a new layout:
- Go to Settings → Barcode Settings
Step 5: Preview Labels
- Click Preview to review the labels before printing.
Step 6: Print Labels
- If the preview looks correct, click Print.
- Important Printing Tips
-
In the browser print window, always set Margins to Default.
-
If some text appears cut off:
- Hide unnecessary information, or
- Use the 20 Labels Per Sheet format for better spacing.
4. Common Error & Solution
Error: “Unsupported SKU ID for the selected barcode type”
Reason:
The product’s SKU does not match the required format for the selected barcode type.
Solution:
- Edit the product.
- Change the Barcode Type to Code 128.
- Save the product.
- Try printing the label again.
Import Sales (Invoices)
Importing Sales in XPOS
The Import Sale feature allows you to add multiple sales records at once using an Excel file, saving time and manual effort.
1. Steps to Import Sales
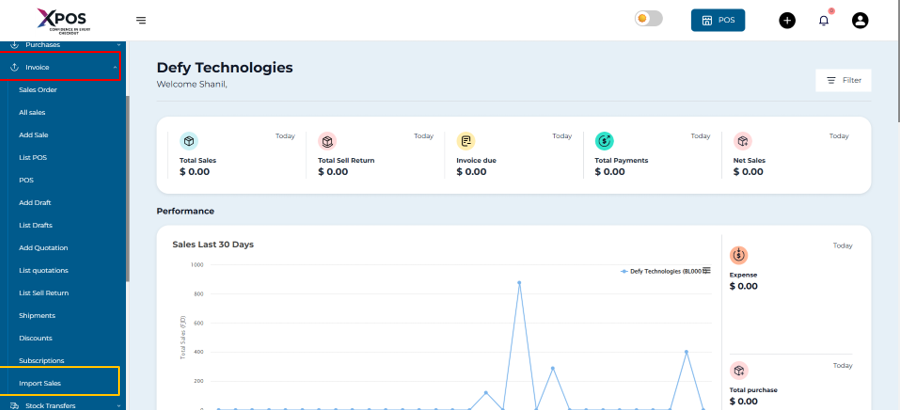
Step 1: Open Import Sale Page
- Go to Sales → Import Sale.

Step 2: Download the Template
- Click Download Template.

- This file contains the required columns and instructions.
- Do not rename or remove any column headings.
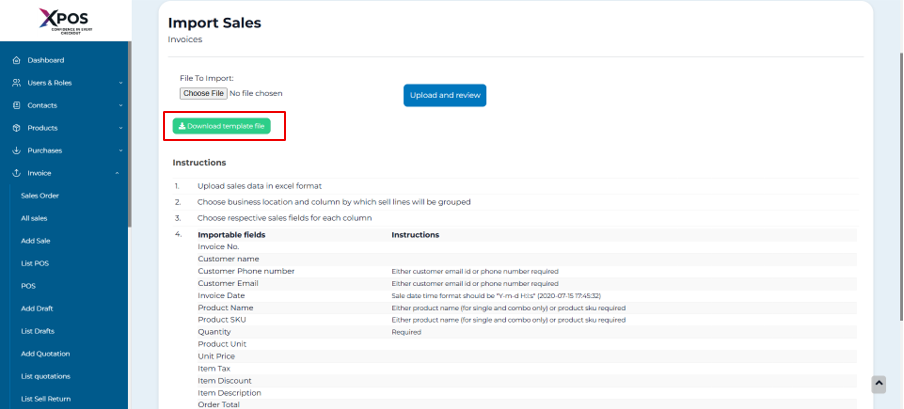
Step 3: Fill in Sale Details
- Open the downloaded Excel file.
- Enter all sale data as per the instructions shown on the Import Sale page.
- Ensure values such as dates, product names, quantities, and prices follow the specified format.
Step 4: Upload the File
- Save the completed Excel file.
- Click Choose File and select the file.
- Click Submit to import the sales.
2. Handling Import Errors
- If the system shows errors after uploading, it means some data does not follow the required format.
- Review the error message.
- Correct the data in the Excel file.
- Upload the file again.
3. Understanding “Group Sell Line By” Field
The Group Sell Line By option tells the system which rows belong to the same sale.
How It Works:
- You must select a column that uniquely identifies a sale.
- All rows with the same value in that column will be grouped into one invoice.
Example:
-
If your Excel file contains an Invoice_Number column:
- All products from the same invoice should have the same Invoice_Number.
- Select Invoice_Number in the Group Sell Line By dropdown.
This ensures the system creates one sale per invoice number instead of multiple separate sales.
4. “You Cannot Select a Field Twice” Error
Cause:
This error occurs when the same column name is mapped more than once during the import process.
Solution:
- Review the column mapping table.
- Make sure each field is selected only once.
- Remove duplicate selections.
- Proceed with the import again.
Importing Opening Stock
Import Opening Stock
Import Opening Stock allows you to upload the initial stock quantities for multiple products at once using a file, instead of entering them individually.
Importing Opening Stock
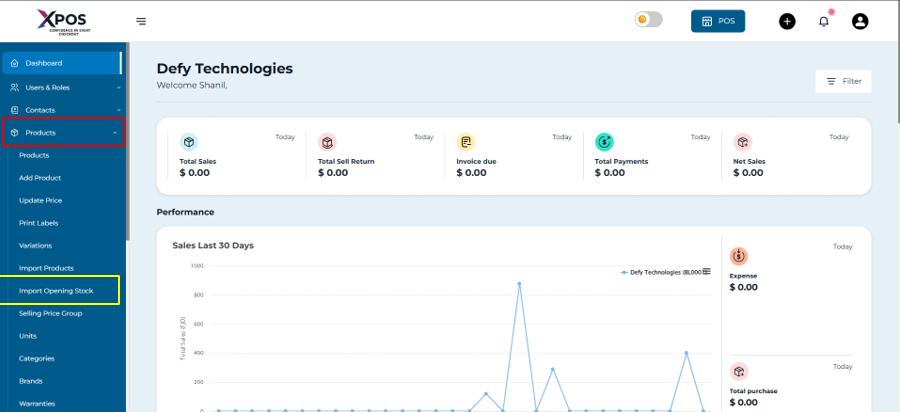
Follow the steps below to import opening stock:
- Go to Products.
- Select Import Opening Stock.

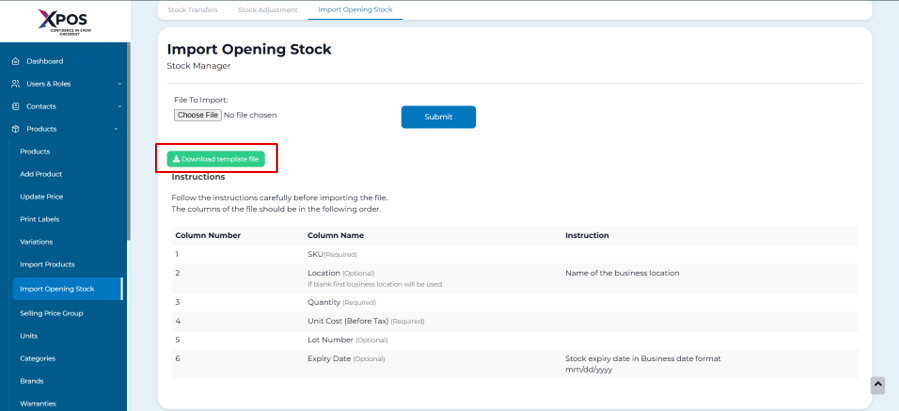
- Download the sample import file (if required).

- Enter the opening stock quantities in the file.
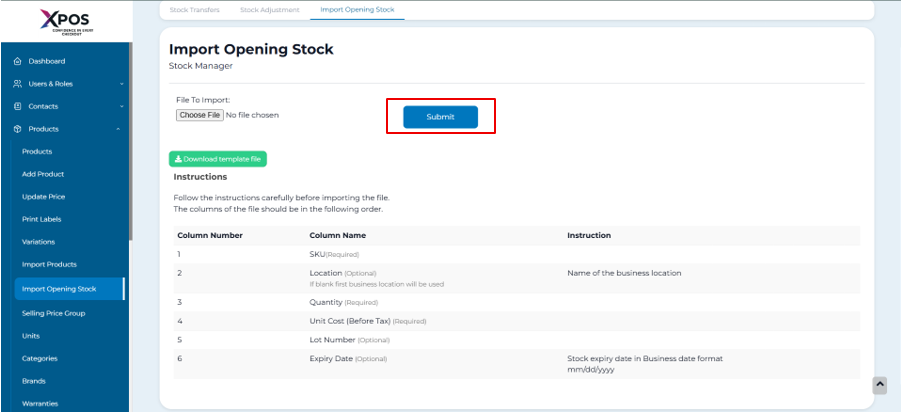
- Upload the completed file.
- Click Submit to apply the changes.
 The uploaded quantities will be recorded as the opening stock for the corresponding products.
Editing Imported Opening Stock or Setting It to Zero
If opening stock has already been imported and needs adjustment, follow the steps below.
Adjust Imported Opening Stock
Adjustment Examples
-
If the existing opening stock is 10:
- Enter -10 to reduce the stock to 0.
- Enter -4 to adjust the stock to 6.
- Enter 5 to increase the stock to 15.
The system updates stock based on the adjustment values provided in the import file.
Shipments
Adding a Delivery Person to a Shipment
You can assign a delivery person while creating a sale that includes shipment details.
Steps to Add a Delivery Person
-
Create a new sale.
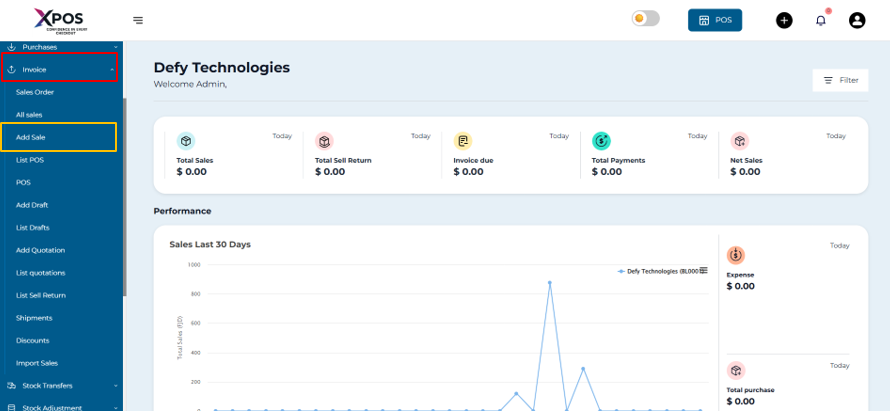
2. Enter the required shipment details.
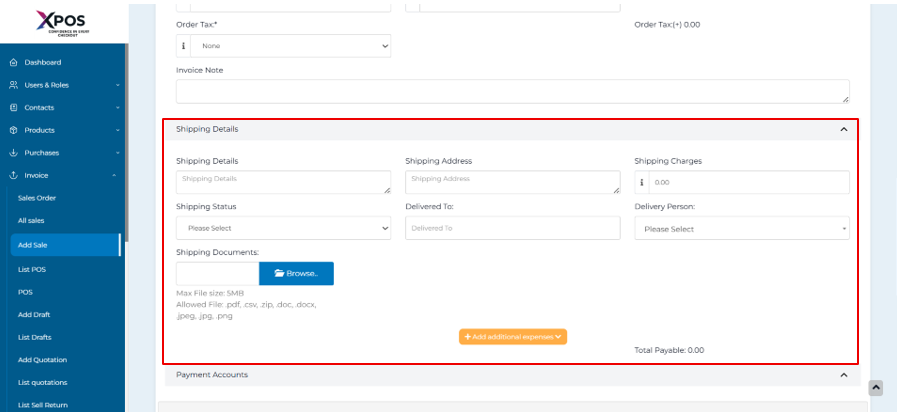
3.Select a delivery person from the available options.
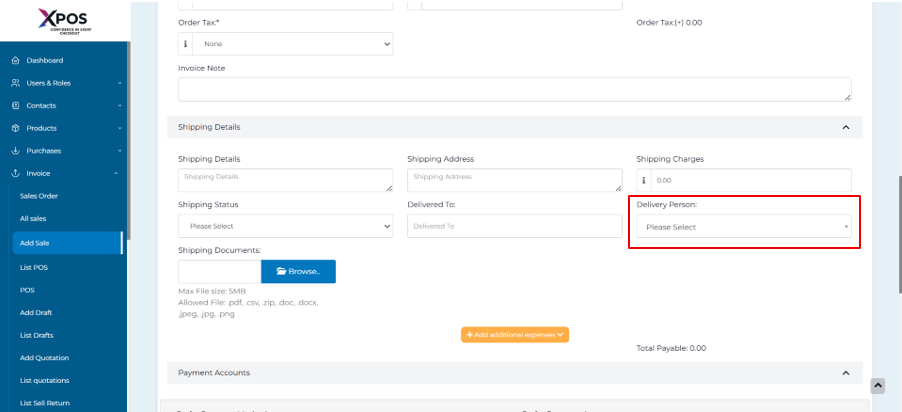
-
Complete and save the sale.
Adding a Delivery Note to a Sale
A delivery note can be generated for sales that include shipping information.
Steps to Add a Delivery Note
-
While creating a sale, make sure to add shipping details.
-
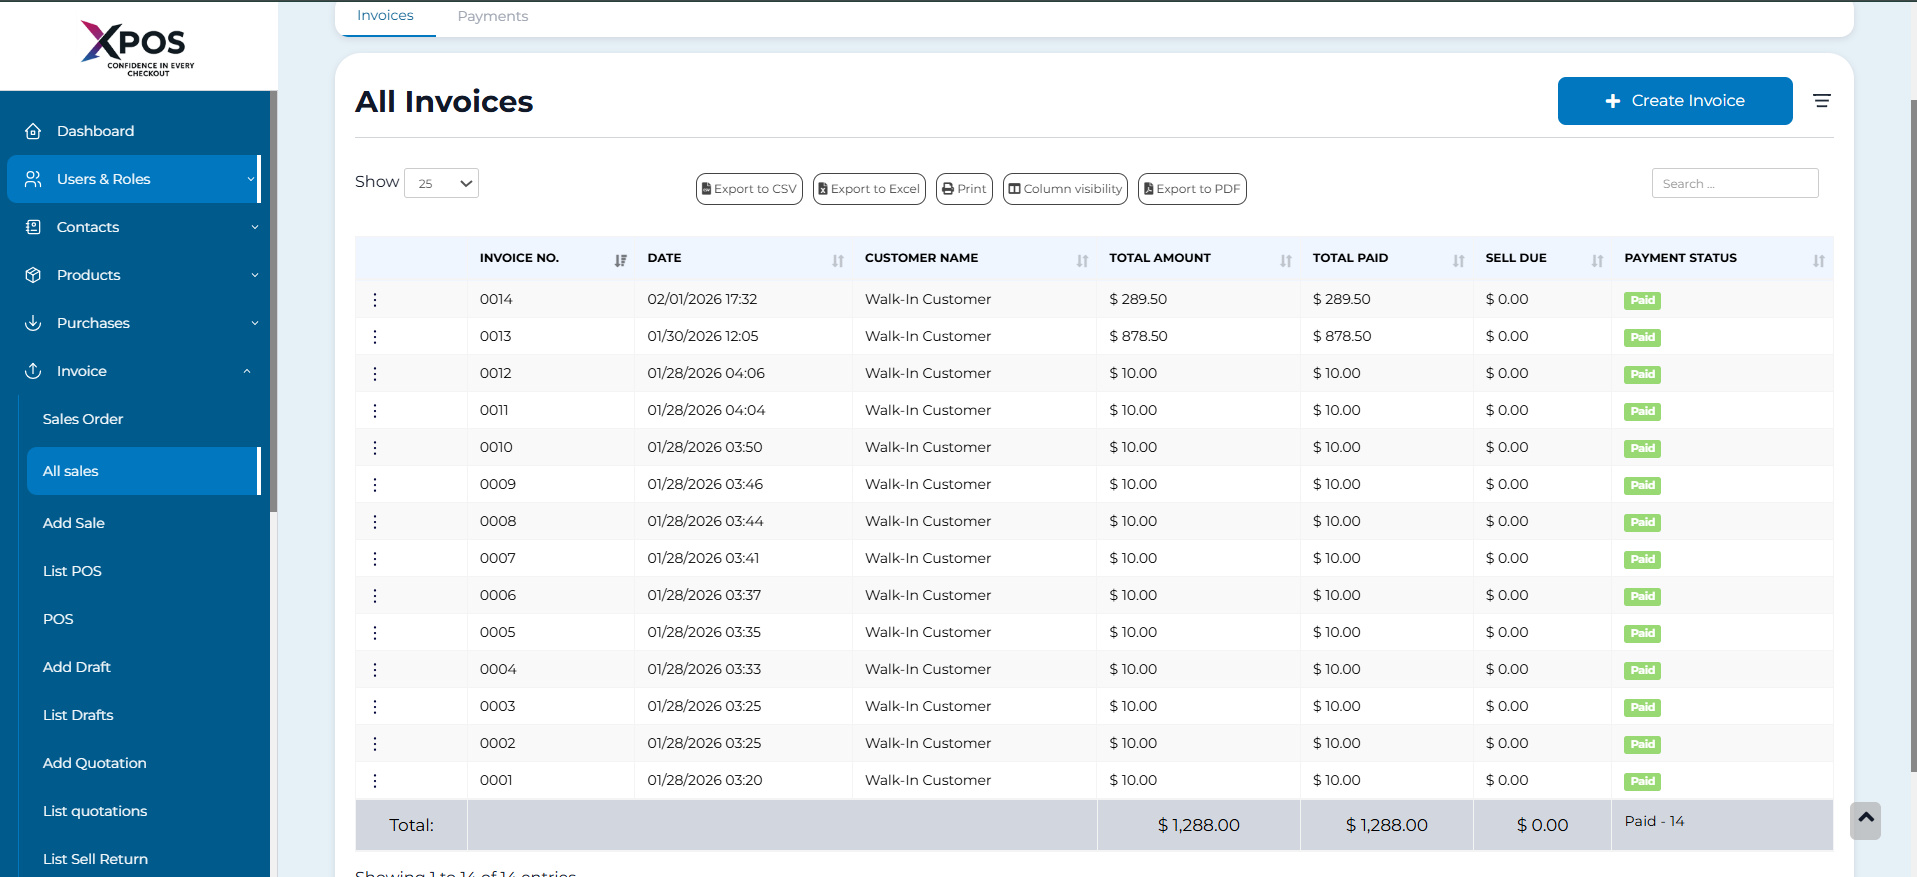
After saving the sale, go to the All Sales screen.
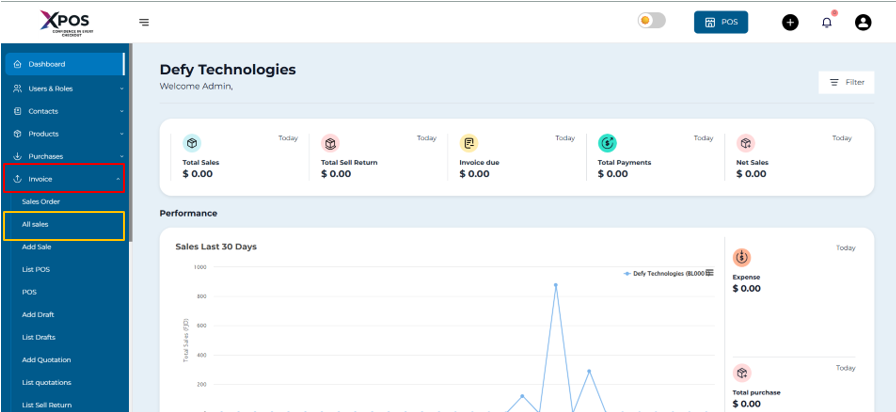
3. Locate the required sale.
4. Click the Action dropdown for that sale.
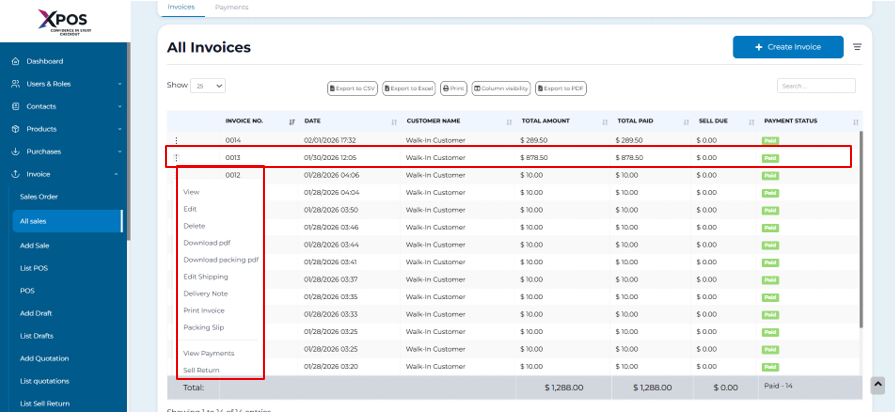
5. Select Delivery Note to generate the delivery note.
Printing the Delivery Receipt
Once the delivery note is generated, it can be printed directly.
Steps to Print the Delivery Receipt
-
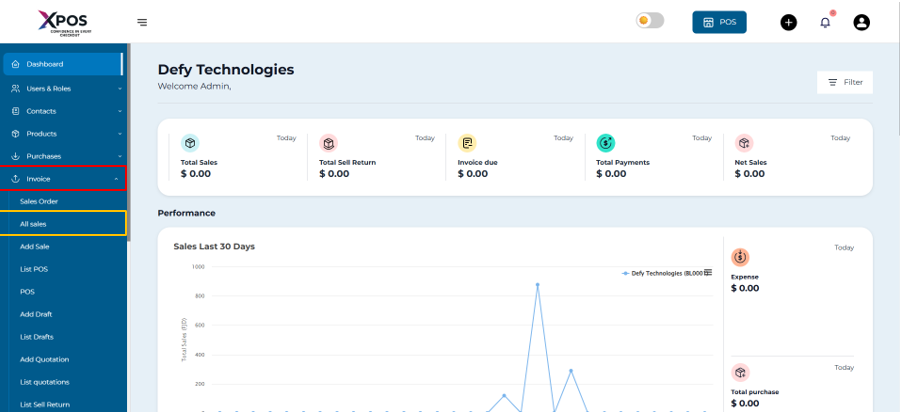
Open the All Sales screen.
2. Find the sale with delivery details.
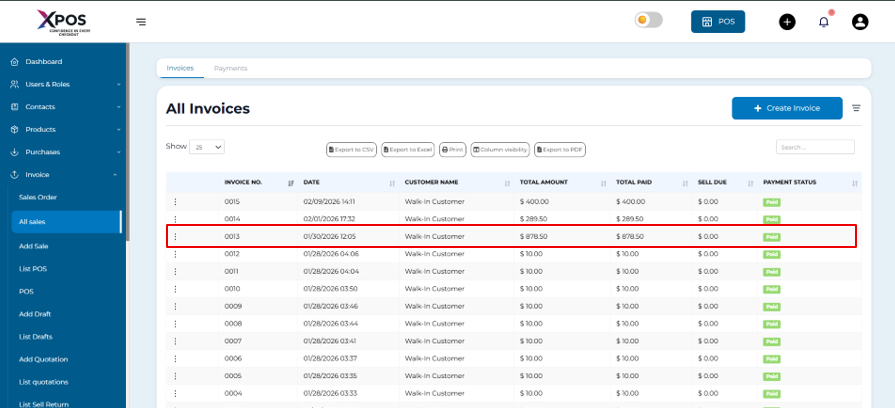
3. Click the Action dropdown.
3. Select Delivery Note.
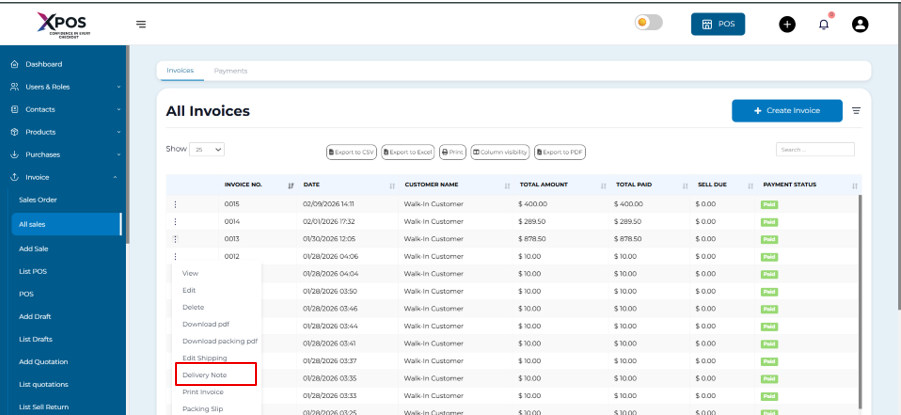
4. Print the delivery receipt from the preview screen.
FRCS TaxCore VMS System
FRCS TaxCore VMS Setup Guide
1. Overview
FRCS TaxCore is the digital tax reporting platform used by FRCS. Approved POS/ERP systems integrate with the VSDC (Virtual Sales Data Controller) to submit VAT transaction data electronically for compliance.
- Real-time or near real-time sales submission
- Digital invoice signing via VSDC
- Compliance with FRCS VMS requirements
Note that once TaxCore is configured, upon operation start, the POS and V-SDC are mutually authenticated.
2. Communication Protocol
XPOS always communicates with VSDC over HTTPS. If a connection attempt is made via HTTP, the system automatically redirects and handles it securely over HTTPS.
3. VMS Setup
3.1 Prerequisites
- VMS VSDC Certificate
- PAC (Provisioning Access Code)
- Certificate Password
- Admin access to POS
3.2 Access Settings
URL Method:
/taxcore/settings

From POS:
- Open POS
- Click TaxCore icon (bottom)
- Select Settings

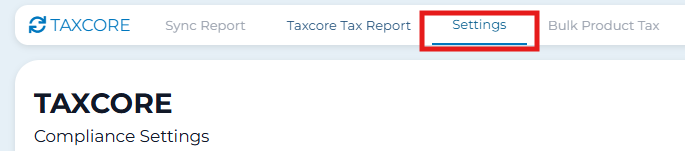
3.3 Configuration
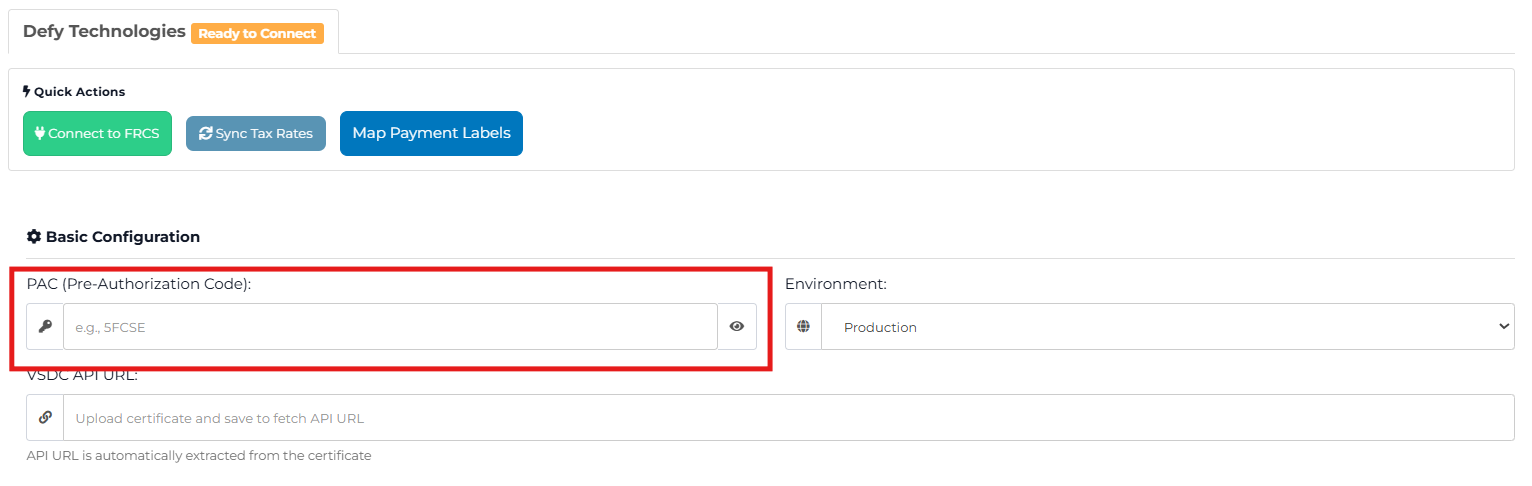
Enter PAC
Enter PAC exactly as issued.
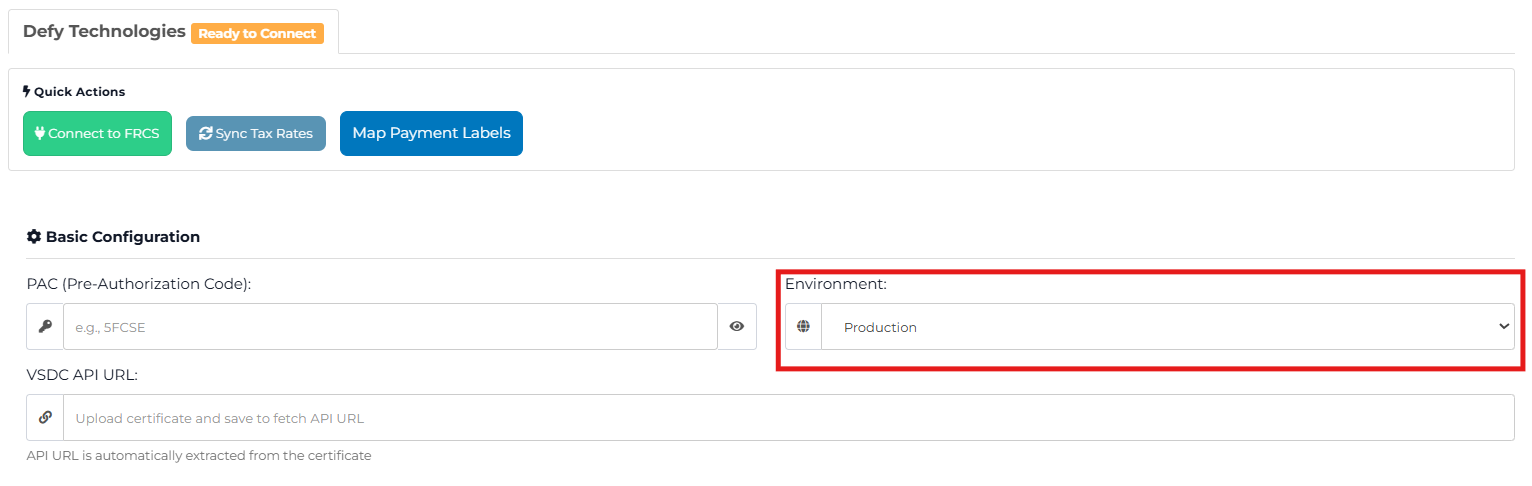
Select Environment
- Production (Live)
- Sandbox (Test)
Upload Certificate
- Click Upload Certificate
- Select VSDC certificate file

Certificate Password
Enter certificate password.

3.4 Connect to FRCS
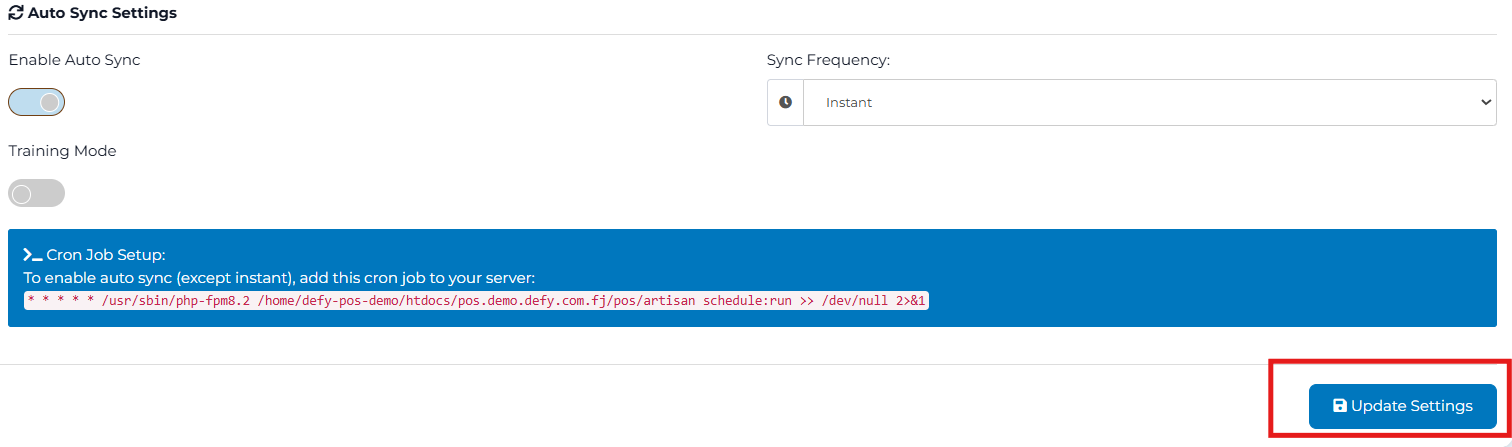
Save Settings
- Scroll down
- Click Update Settings
- Click Connect to FRCS
- Wait for validation
Connected
4. Optional Settings
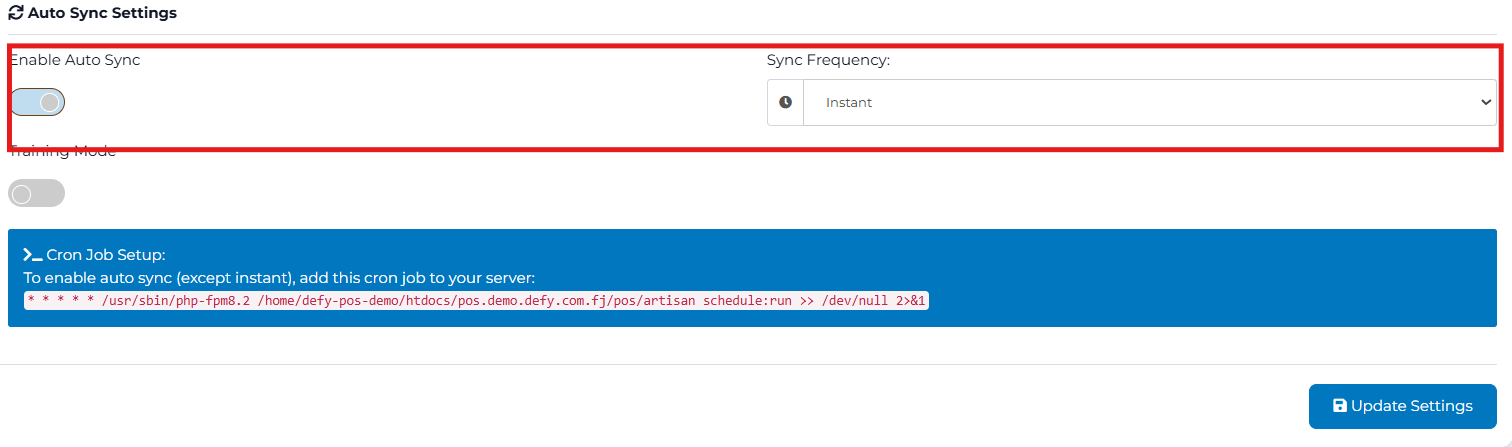
Sync Settings
- Real-time sync
- Scheduled sync
- Retry on failure
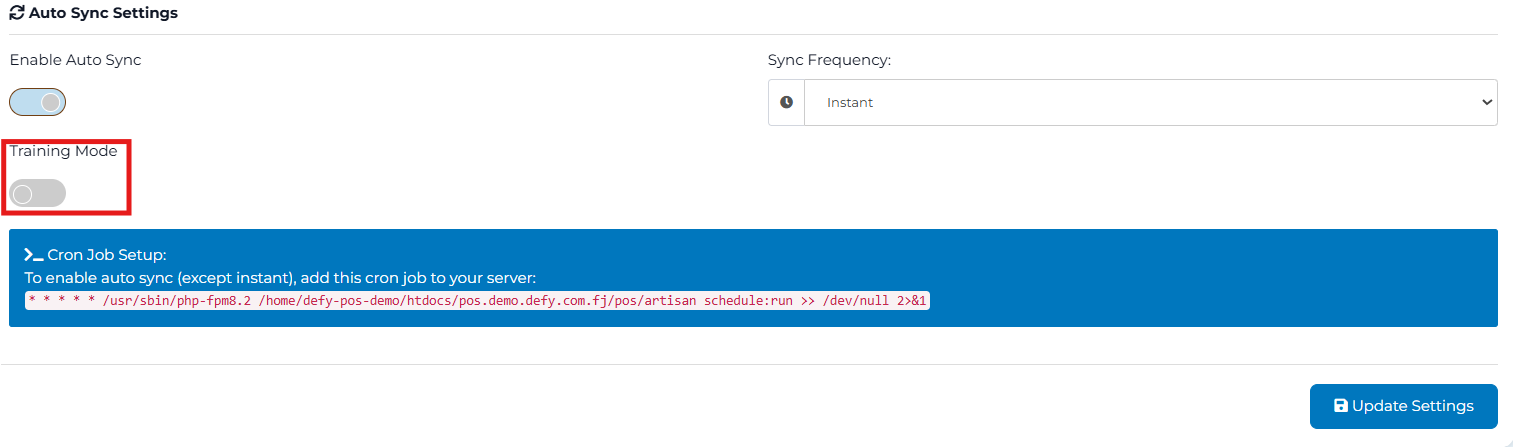
Training Mode
Enable for testing. Disable before going live.
5. Go-Live Checklist
- PAC entered
- Correct environment selected
- Certificate uploaded
- Password correct
- Status shows Connected
- Settings updated
- Training Mode OFF (Production)
6. Troubleshooting
- Recheck PAC
- Verify certificate
- Confirm password
- Check environment
- Ensure internet connection
Supported Devices
- Barcode Scanner
- The POS supports a standard barcode scanner.
- Can be attached via USB or wirelessly.
- Managed directly by the POS system.
- USB Printers
- Supports 80mm USB thermal and non-thermal printers for receipt printing.
- Note: Non-thermal printers print to the maximum area required by the receipt.
- Printers smaller than 80mm are not officially supported.
- Network Printers
- Supports 80mm thermal printers connected over the network.
- Note: Only printers supporting ESC/POS commands can connect directly via IP/Port.
- Printers without ESC/POS support must be added as a System printer.
- Cash Drawer
- Can connect with the POS.
- Opens automatically when connected to a Network Printer.
- A4 Printers
- Supported by the POS system for printing standard A4 documents.
- General Note
- Normal POS operations are not affected by connected devices.
- The POS does not require external devices to function.
Email Notification Settings – Microsoft 365 & Google Workspace
1. Email Setup in Business Settings
Emails to customers, suppliers, and users can be sent through XPOS for purposes like:
- Sale/Purchase Email Notifications
- Recurring Invoice Notifications
1.1 Steps for Setting Mail Details
- Go to:
Settings > Business Settings > Email Settings - Add the required email details:
MAIL_DRIVER=smtp MAIL_HOST= MAIL_PORT= MAIL_USERNAME= MAIL_PASSWORD= MAIL_ENCRYPTION=
1.2 Microsoft 365 SMTP Settings
Use these settings for Microsoft 365 / Office 365 accounts:
MAIL_DRIVER=smtp MAIL_HOST=smtp.office365.com MAIL_PORT=587 MAIL_USERNAME=your-email@domain.com MAIL_PASSWORD=your-email-password or App Password MAIL_ENCRYPTION=TLS
- Ensure SMTP AUTH is enabled for the mailbox in Microsoft 365.
- If Multi-Factor Authentication (MFA) is enabled, use an App Password.
1.3 Google Workspace / Gmail SMTP Settings
Use these settings for Google Workspace or Gmail accounts:
MAIL_DRIVER=smtp MAIL_HOST=smtp.gmail.com MAIL_PORT=587 MAIL_USERNAME=your-email@domain.com MAIL_PASSWORD=your-email-password or App Password MAIL_ENCRYPTION=TLS
- Enable “Less secure apps” or use an App Password if 2FA is enabled.
- Port 587 is recommended for TLS. Use port 465 for SSL if needed.
1.4 Testing Configuration
After entering the details, click the Test Email button to check the configuration. Fix any errors as needed.
Splitting Payments Across Multiple Payment Type
XPOS allows a single invoice (Sale & Purchase) to be paid using more than one payment method. This is useful when a customer wants to combine cash, card, or other approved payment methods to complete a purchase.
Steps to Split Payment on an Invoice
- Go to Sale Creation: Navigate to
/pos/createto start a new transaction.

- Add Items to Sale: Add all items the customer wants to purchase to the invoice.
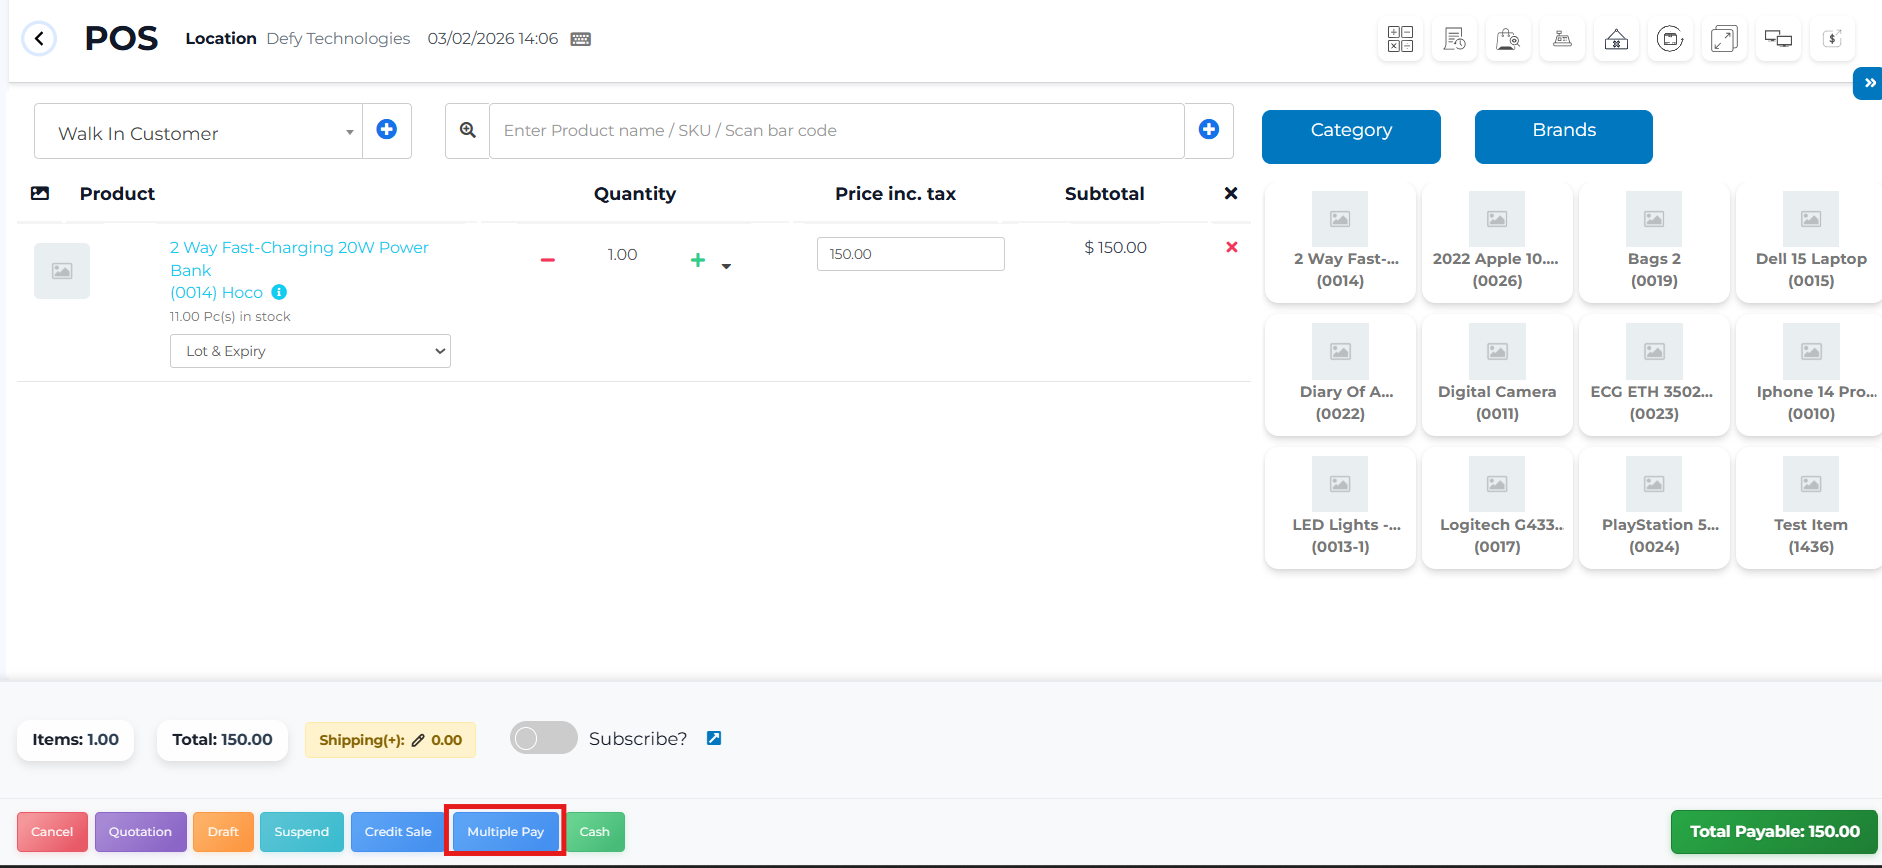
- Click Multiple Pay: Open the multiple payment options.
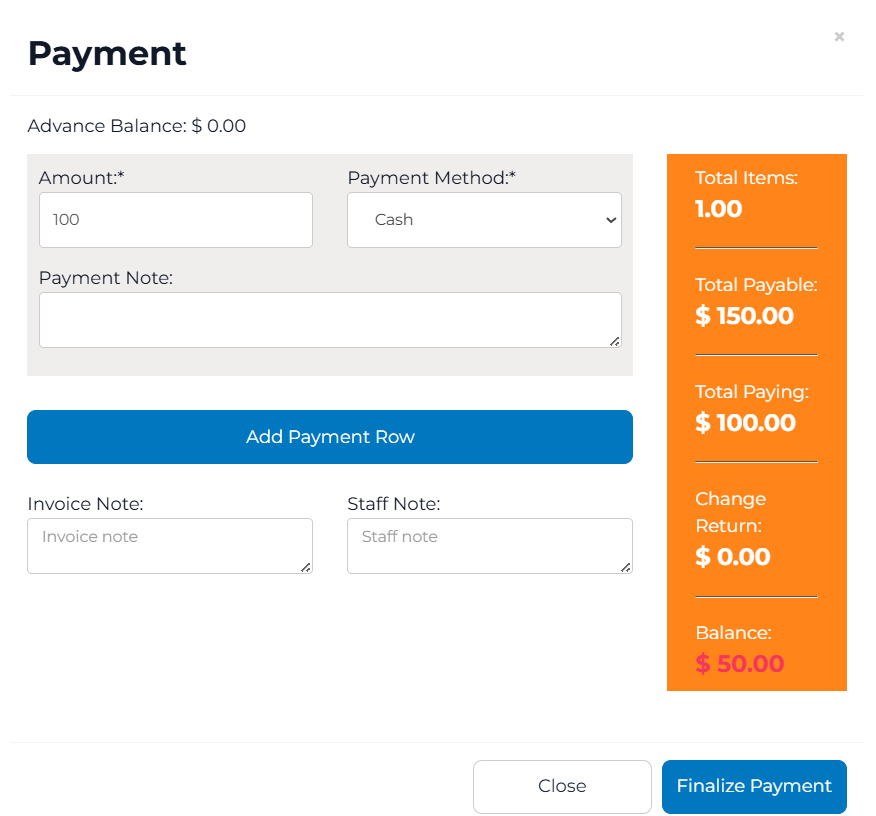
- Add Payment Row: Click Add Payment Row to include another payment method.

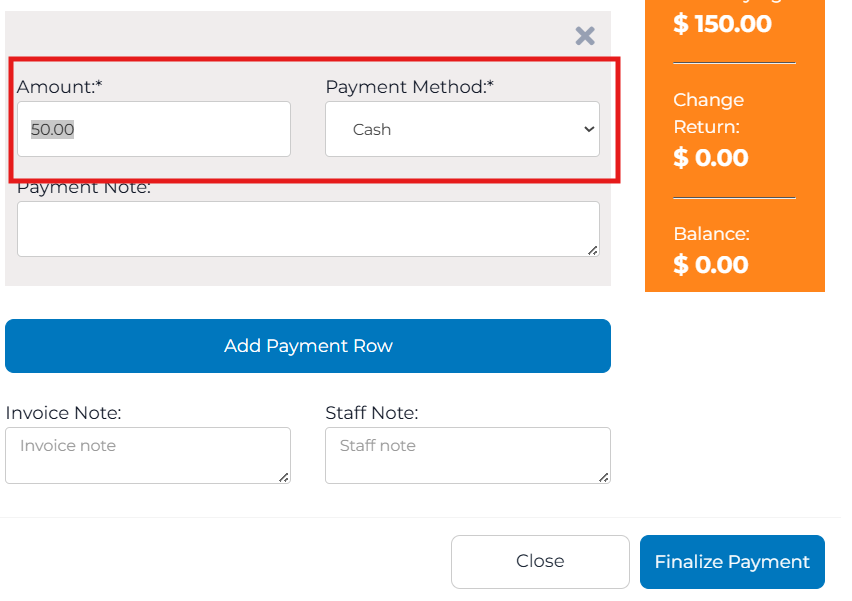
- Select Payment Method: Choose the payment method for the new row and enter the amount.

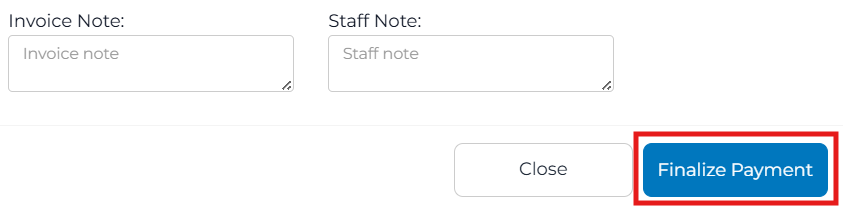
- Finalize Payment: After all splits are entered, click Finalize Payment to complete the transaction.

Supported Payment Types
- Cash
- Card
- Check
- Wire Transfer
- Voucher
- Mobile
- Other
Notes
- The system ensures the total payment matches the invoice amount before allowing finalization.
- Partial payments are recorded under each payment method for accurate reporting.
- This feature complies with VSDC-based VMS requirements when connected.
Reference Number Handling in POS
1. Normal Sale Invoices (linked to Advance/Proforma invoices)
- The POS allows the operator to enter a reference number when finalizing the invoice.
- The system automatically validates and tracks the reference number to ensure consistency with the linked advance/proforma invoice.
2. Refund and Copy Invoices
- The POS requires a reference number to be entered.
- This ensures accurate linkage to the original invoice and prevents submission errors.
Automation and Compliance
- All reference numbers are automatically validated by the POS against FRCS TaxCore.
- The system prevents incorrect submissions, minimizing user error, as it operates in real-time online mode with TaxCore.
Searching Invoices
Overview
XPOS allows operators to search and retrieve invoices efficiently. You can search using invoice numbers or refine results with multiple filters including customer, payment status, date, and more. This ensures accurate invoice tracking, reporting, and auditing.
Steps to Search an Invoice
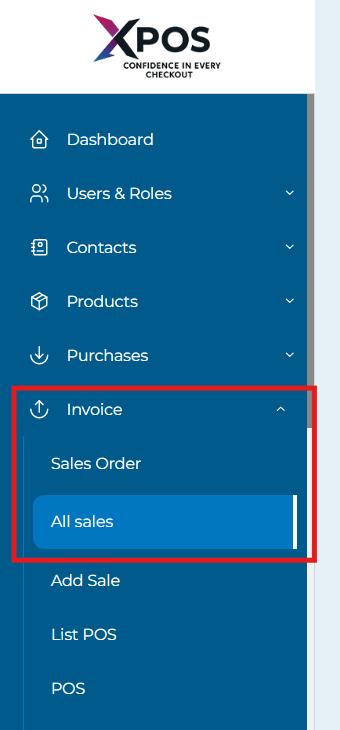
- Log in to XPOS and navigate to the Invoice section from the right-hand side menu.
- Click All Sales to open the list of all sales. The system navigates to
/sells.

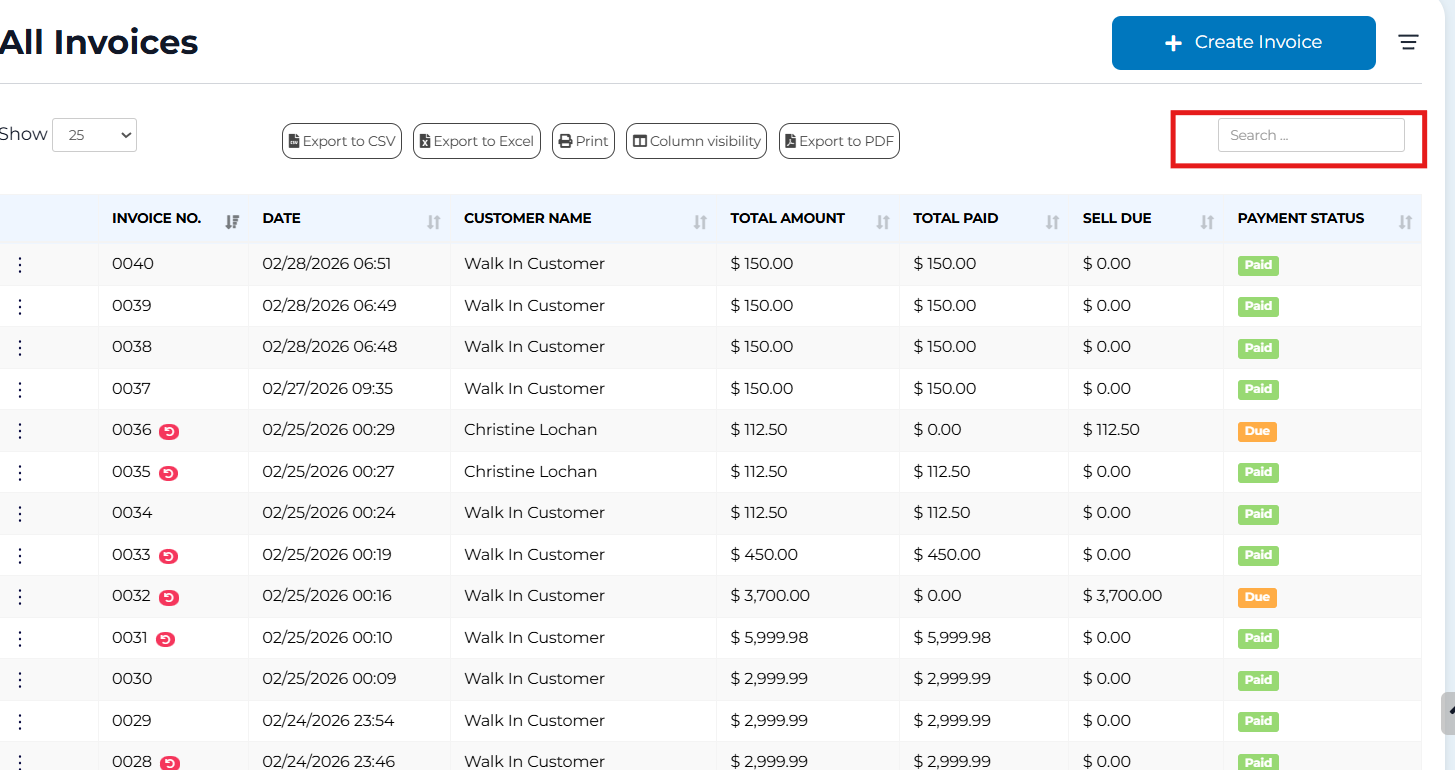
- Enter either:
- Local Invoice Number – the invoice generated by XPOS locally.
- SDC Invoice Number – the number submitted to TaxCore.

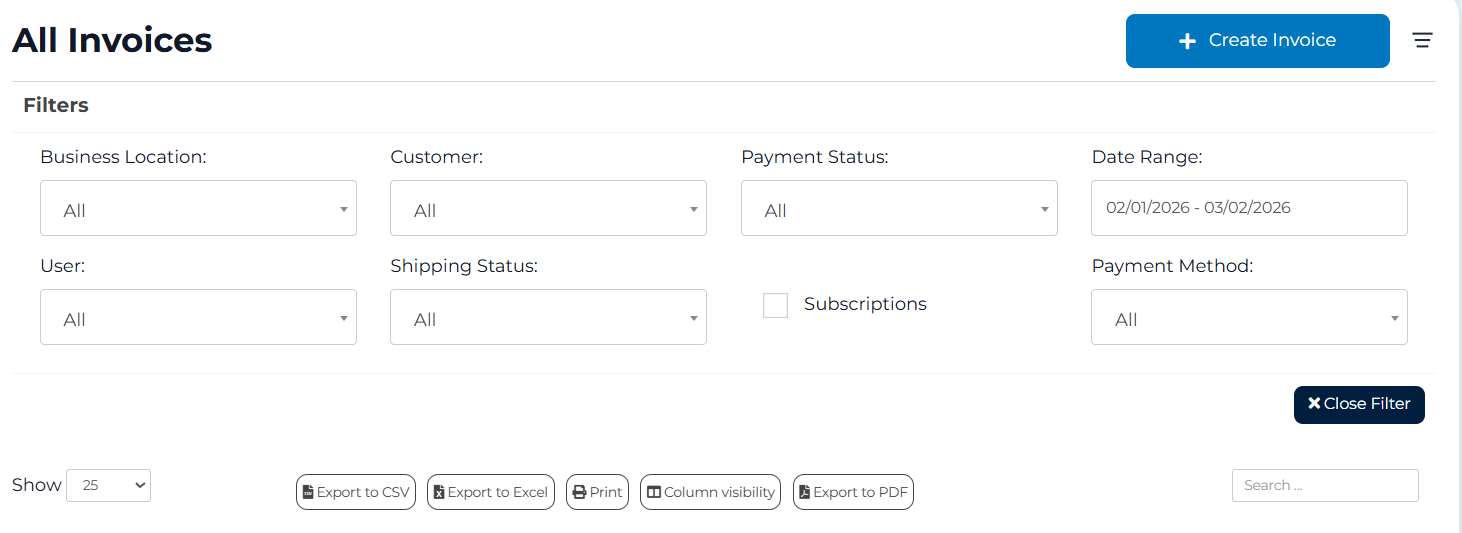
- Optionally, apply filters to narrow down results.
- Upon entry of the invoice number, system automatically performs search via Ajax Mode.
Available Filters
| Filter | Description |
|---|---|
| Business Location | Filter invoices by specific business branches or locations. |
| Customer | Retrieve invoices for a specific customer. |
| Payment Status | Filter invoices by payment status (Paid, Pending, Partially Paid). |
| Date Range | Specify a start and end date to retrieve invoices issued within the range. |
| User | Filter invoices generated by a specific user/operator. |
| Shipping Status | Filter invoices by delivery status (Shipped, Pending, Cancelled). |
| Subscriptions / Payment Method | Filter by subscription type or payment method used. |
Tips for Searching
- Always double-check invoice numbers before searching to avoid empty results.
- Use multiple filters together (e.g., Date Range + Customer) to quickly narrow down results.
- For refunds or copy invoices, always use the reference number to find the correct original invoice.
- XPOS automatically syncs with TaxCore, ensuring that search results match submitted data.
POS Hardware Compliance
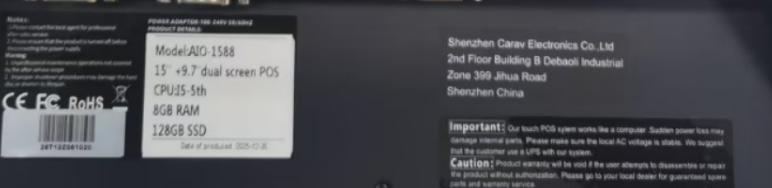
XPOS provides both software and hardware solutions. To comply with FRCS requirements for accreditation, all hardware POS devices clearly display the following information:
- Manufacturer Name: Identifies the maker of the device.
- Serial Number: Unique identifier for each device.
- Software Version: The installed POS software version.
- Hardware Version: The device model/version.
- Electrical Information: Stickers showing voltage, amperage, and other specifications.
Note: Access to software version is also be available via the POS interface for auditing purposes.
Sticker Samples:
Configuring keyboard shortcuts for POS screen
1. How to Add or Change Shortcuts
- Open XPOS and go to Settings → System Settings → POS Section.

- Find the Operations list with the current shortcuts.
- Click the shortcut field of the operation you want to change.
- Press your desired key combination using the Available Key Names (see below).
- Click Update Settings to save the shortcuts
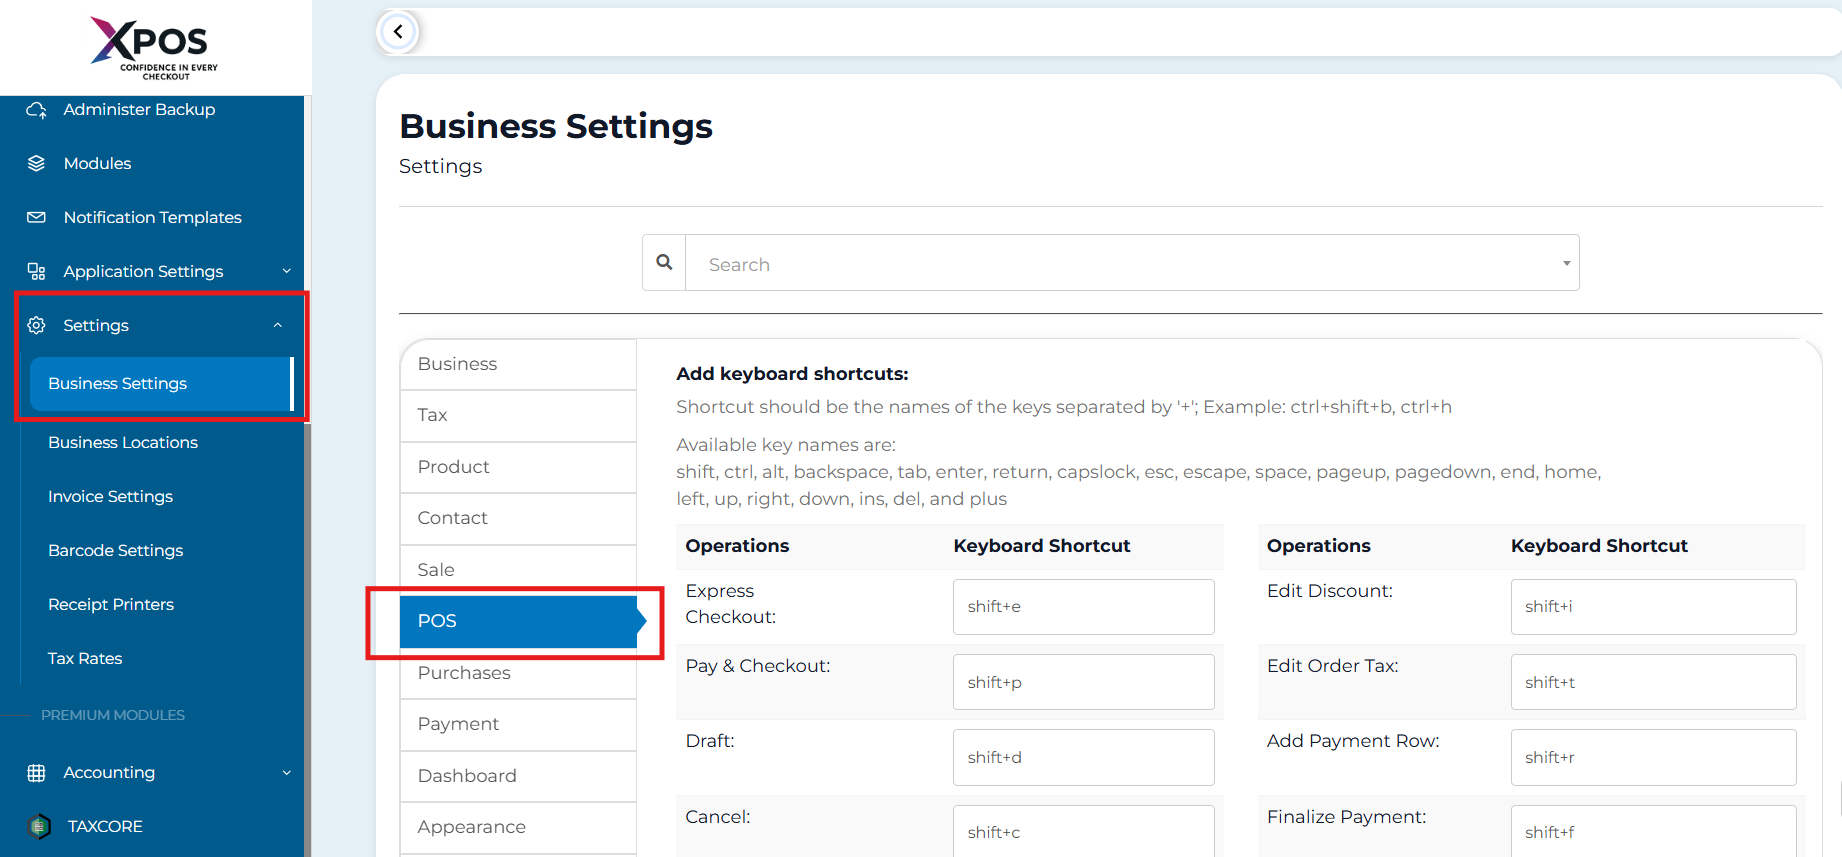
Important: Do not use shortcuts that conflict with your browser (e.g., Ctrl+T opens a new tab).
2. Available Key Names
- Modifier keys: shift, ctrl, alt
- Navigation keys: backspace, tab, enter, return, esc, escape, space, pageup, pagedown, end, home, left, up, right, down, ins, del
- Other: plus
3. Default XPOS Shortcuts
| Operation | Keyboard Shortcut |
|---|---|
| Express Checkout | shift+e |
| Pay & Checkout | shift+p |
| Draft | shift+d |
| Cancel | shift+c |
| Go to Product Quantity | f2 |
| Edit Discount | shift+i |
| Edit Order Tax | shift+t |
| Add Payment Row | shift+r |
| Finalize Payment | shift+f |
| Add New Product | f4 |
4. Tips for Safe Shortcut Configuration
- Test new shortcuts immediately on the POS screen.
- Keep a reference of your customized shortcuts handy.
- Use modifier keys (ctrl, shift, alt) to avoid accidental conflicts.
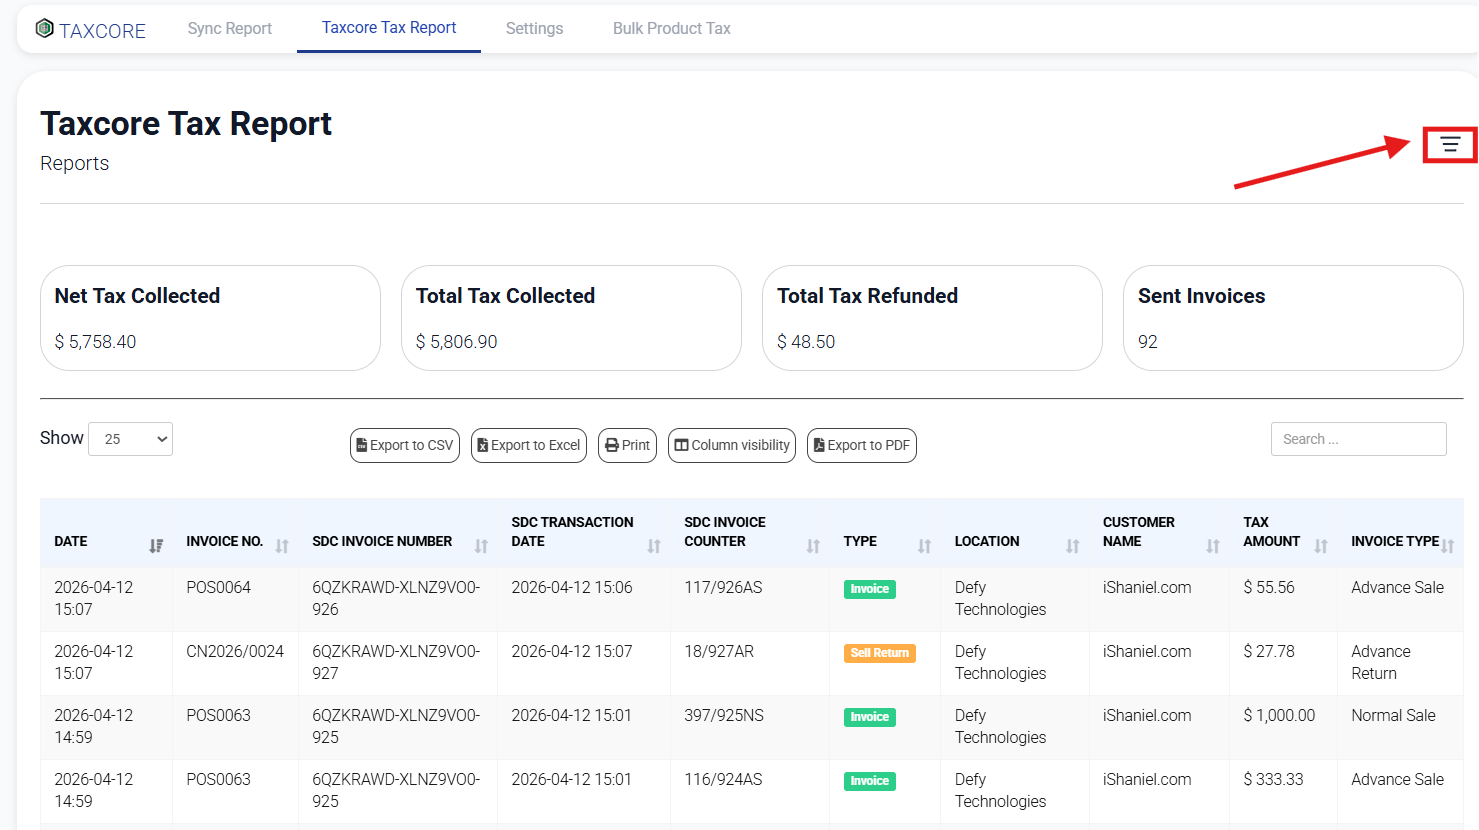
Daily Report Functionality
The POS system supports generation of daily reports upon user request.
Features
- Number of fiscalized invoices, categorized by:
- Invoice type
- Transaction type
- Total sales amount (applies only to Normal and Advance invoices)
- Total refund amount (applies only to Normal and Advance invoices)
- Aggregated totals per payment type, including (but not limited to):
- Cash
- Card
- Digital payments
Access
- TaxCore Module → Taxcore Tax Report
- Select Appropriate Filters.
Invoice Cancellation Functionality
The XPOS system implements invoice cancellation in accordance with fiscal requirements by issuing corresponding refund invoices rather than deleting or modifying existing invoices.
Cancellation Method
- Normal Sale invoices are cancelled by issuing a Normal Refund invoice.
- Advance Sale invoices are cancelled by issuing an Advance Refund invoice.
Steps on performing a refund can be found here: https://learn.defy.com.fj/books/xpos-confidence-at-every-checkout/page/sales-return
System Behavior
- When a user selects the Cancel option on an invoice, XPOS automatically generates the appropriate refund invoice (Normal Refund or Advance Refund).
- The generated refund invoice mirrors the original invoice, including all key components (items, amounts, taxes), ensuring full traceability.
Special Field Handling
- Buyer ID Field: Automatically populated with the Taxpayer Identification Number (TIN) of the seller.
- Reference Number Field: Automatically populated with the SDC Number of the original Sale invoice being cancelled.
Data Integrity & Compliance
- Original invoices are retained and cannot be edited or deleted after fiscalization.
- Each cancellation is recorded as a separate fiscal transaction (refund invoice).
- Refund invoices are linked to the original sale invoice via the reference number.
- All cancellation actions are included in reports and audit logs.
Access Control
Compliance Statement
XPOS fully complies with the requirement that invoice cancellation must be performed through the issuance of corresponding refund invoices, ensuring auditability, traceability, and data integrity at all times.