# All Sales (Selling, Credit Sales, Draft, Quotation & Suspended Sales)
Step 1: Open the POS Screen
----------------------------------------------------------------
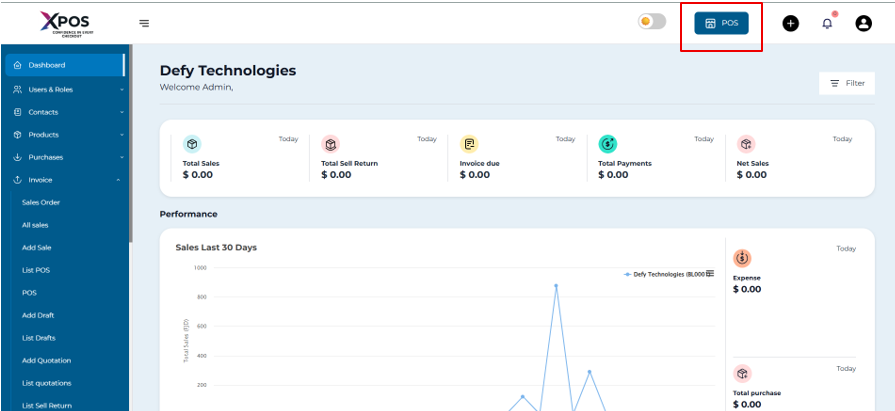
1. Click on **POS**
[](https://learn.defy.com.fj/uploads/images/gallery/2026-02/YKCtHzSV0jhkTh7Z-screenshot-2026-02-08-130743.png)
****
Step 2: Select a customer
--------------------------------------------------------------
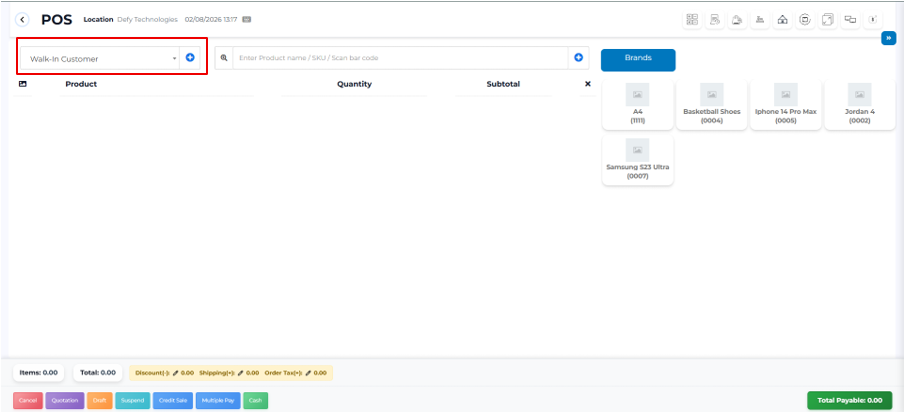
1. By default, **Walk-In Customer** is selected.
[](https://learn.defy.com.fj/uploads/images/gallery/2026-02/eEVVFEw0eLmURfoL-screenshot-2026-02-08-132038.png)
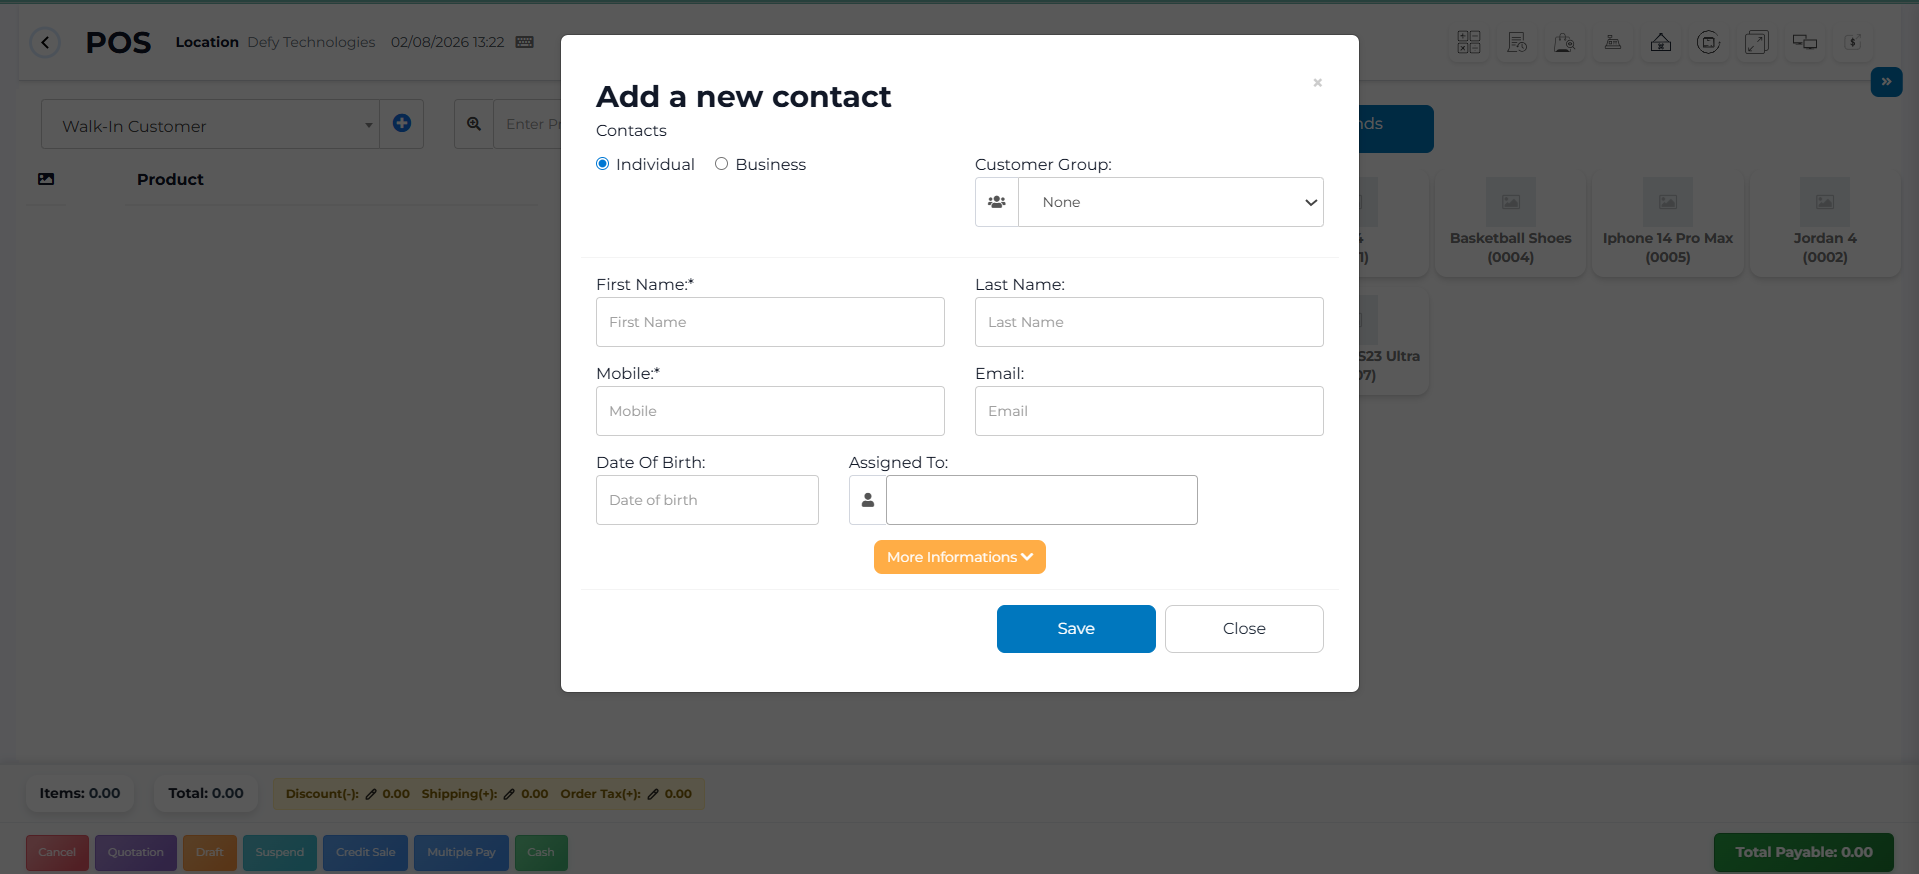
2. To select an existing customer:
- Search by **Name**, **Email,** or **Phone Number**
[](https://learn.defy.com.fj/uploads/images/gallery/2026-02/6H8ANBHc47dNHsmX-screenshot-2026-02-08-132252.png)
Step 3: Search and Add Products
--------------------------------------------------------------------
1. Enter the **product name** in the search bar **or** scan the barcode.
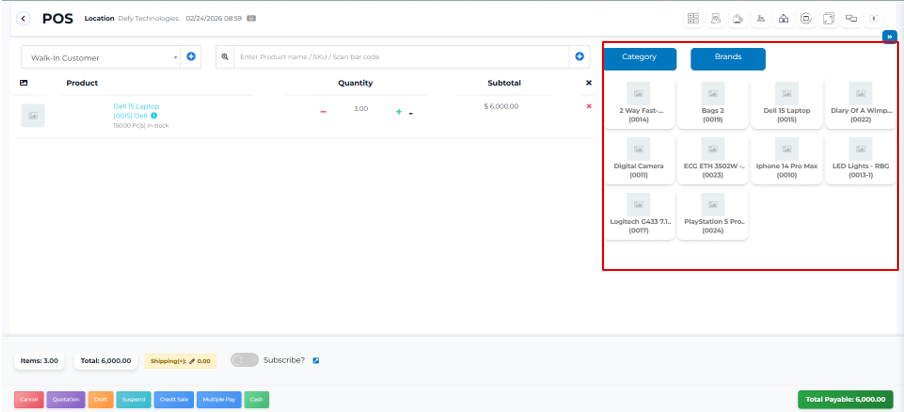
2. If multiple products appear:
[](https://learn.defy.com.fj/uploads/images/gallery/2026-02/Gku0bs29BaBx1LzJ-screenshot-2026-02-24-090323.png)
- Select the correct product from the dropdown list.
3. If only one product matches:
- The product is added to the cart automatically.
[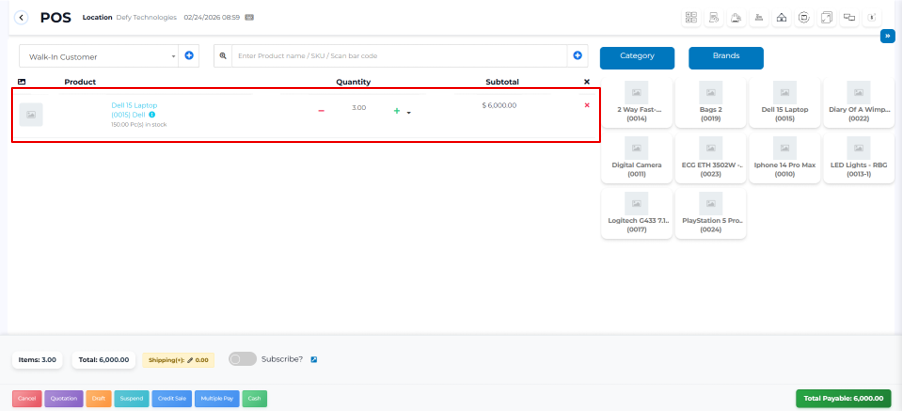](https://learn.defy.com.fj/uploads/images/gallery/2026-02/s79Cs2xoDj9JEdAL-screenshot-2026-02-24-090657.png)
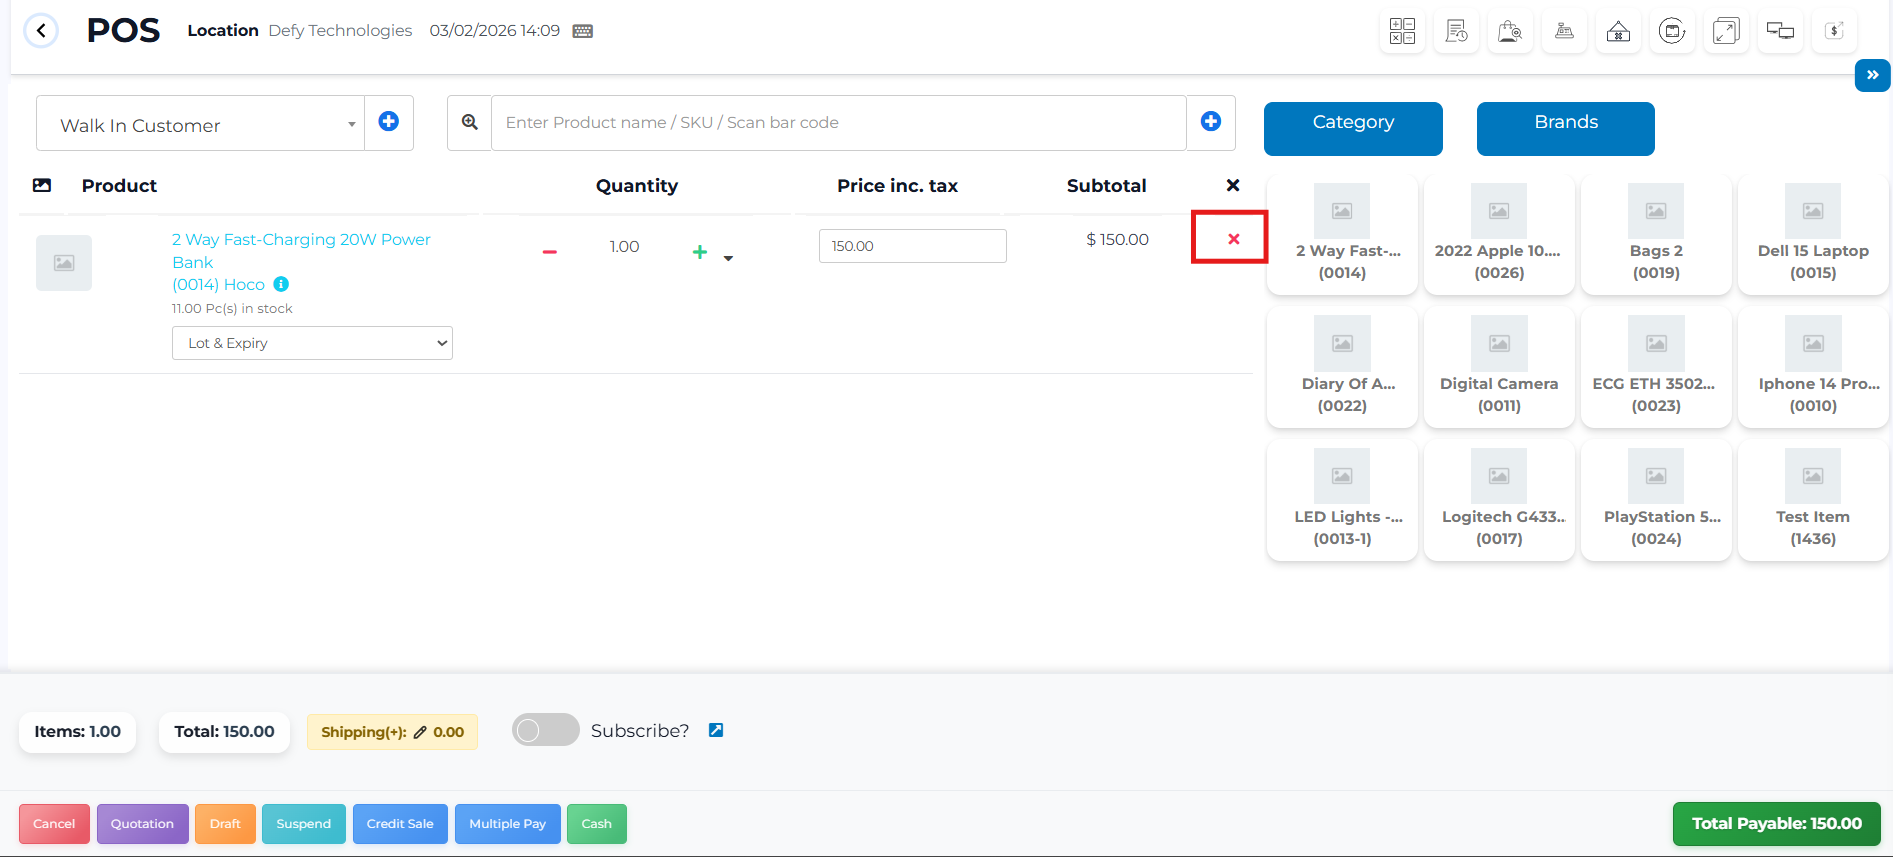
4. To remove an added item, simply click the **X** on the right. See the screenshot for reference.
[](https://learn.defy.com.fj/uploads/images/gallery/2026-03/VJ7xcxN49DMSfaKs-screenshot-2026-03-02-142149.png)
Step 4: Modify Product Details (If required)
---------------------------------------------------------------------------------
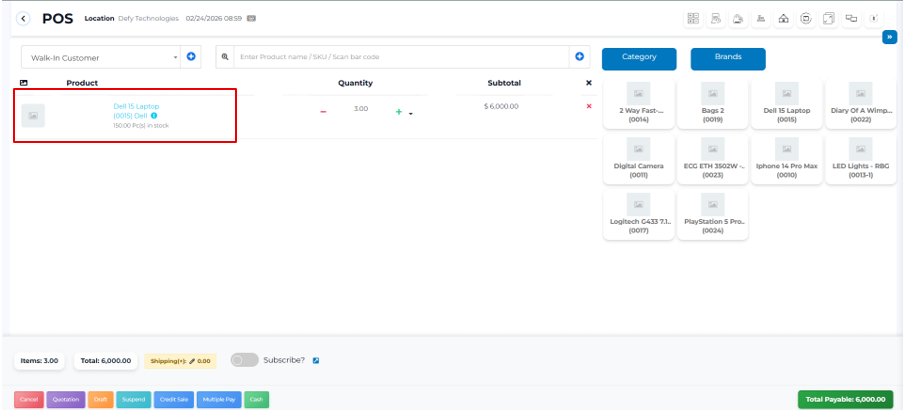
1. Click on the **product name** in the cart.
[](https://learn.defy.com.fj/uploads/images/gallery/2026-02/QxYytIx0PE72iqxC-screenshot-2026-02-24-091032.png)
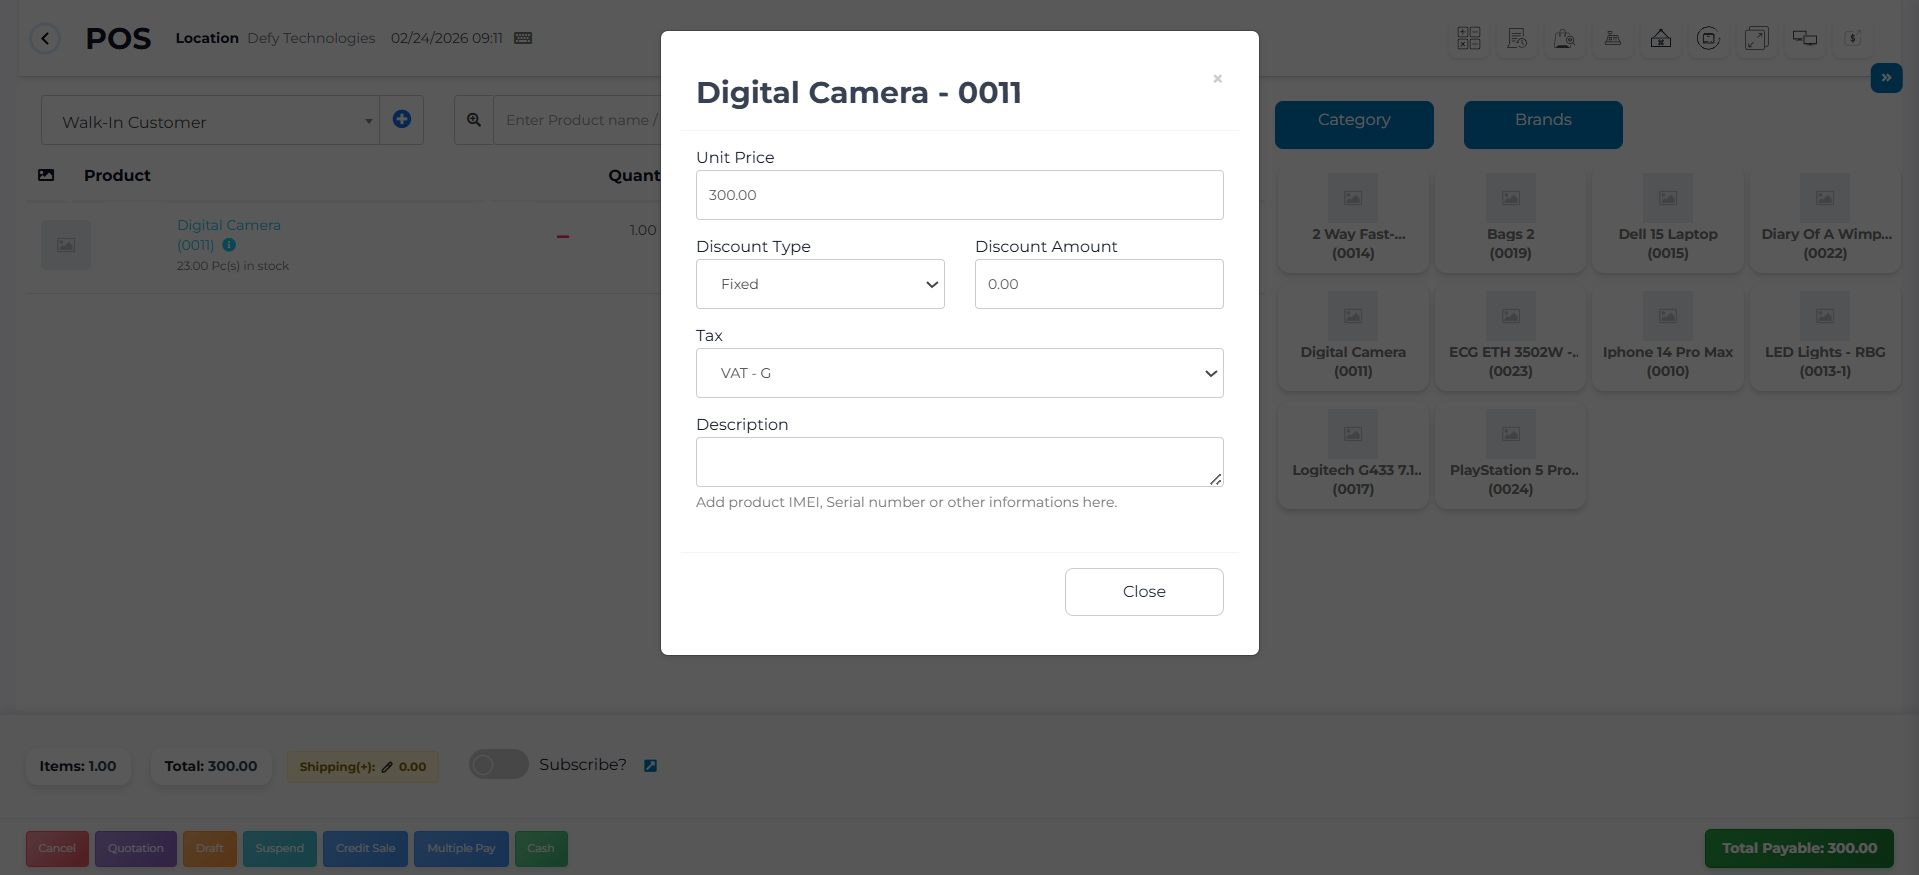
2. Update any of the following:
- Selling price
- Tax
- Discount
[](https://learn.defy.com.fj/uploads/images/gallery/2026-02/S2QHcyFLm2eZincC-screenshot-2026-02-24-091230.png)
**Note:** Product-level tax editing is available only if **Inline Tax** is enabled
(*Business Settings → Tax → Enable Inline Tax in Purchase and Sell*).
Step 5: Select Lot Number or Expiry Date (If enabled)
------------------------------------------------------------------------------------------
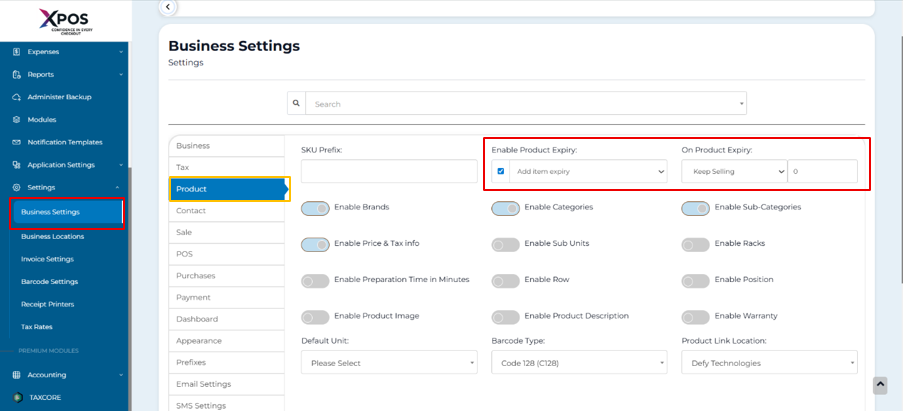
1. If lot tracking is enabled, choose the **lot number**.
2. go to **Business Settings** → **Product** → click on **enable product expiry**.
[](https://learn.defy.com.fj/uploads/images/gallery/2026-02/NYigUkgd7XwwjjRA-screenshot-2026-02-24-092236.png)
Step 6: Cancel the Sale (Optional)
-----------------------------------------------------------------------
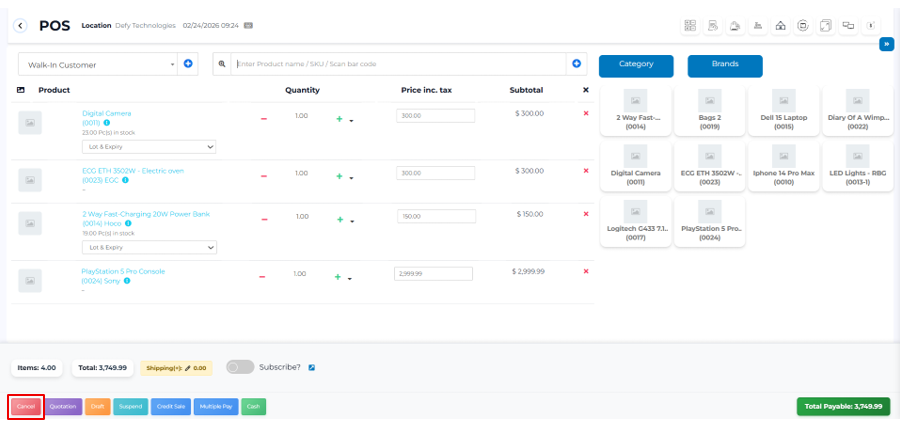
1. Click **Cancel** if the transaction should not proceed.
2. Canceled sales are **not saved**, and **stock remains unchanged**.
[](https://learn.defy.com.fj/uploads/images/gallery/2026-02/8WGI7qtKNCRNmAJd-screenshot-2026-02-24-092631.png)
Step 7: Finalize the Sale
--------------------------------------------------------------
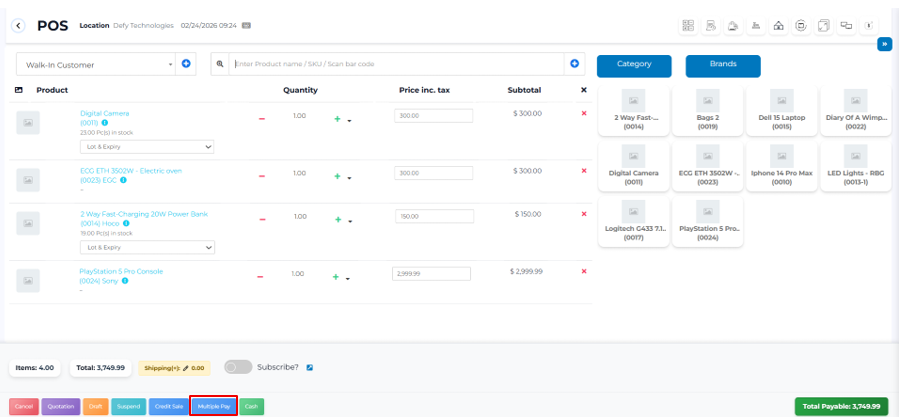
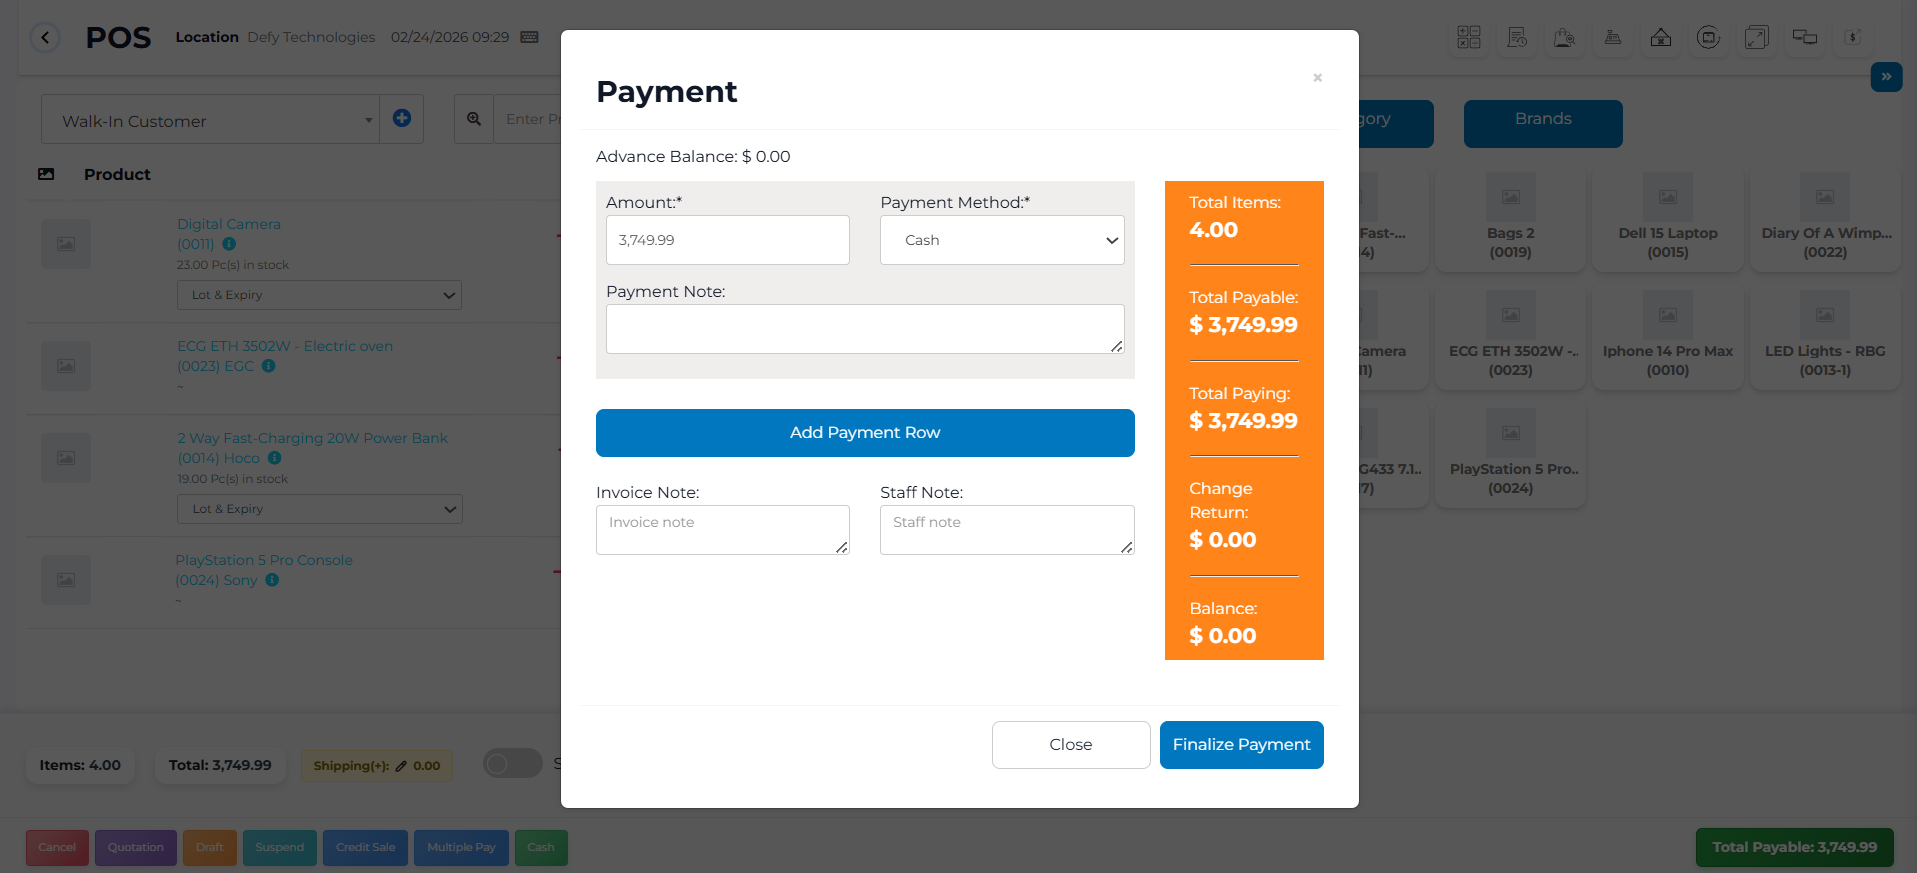
Click **Finalize Payment**.
1. Select the **Multiple Pay**.
[](https://learn.defy.com.fj/uploads/images/gallery/2026-02/aOltodrlcX5lyxCW-screenshot-2026-02-24-092856.png)
2. Enter the payment amount.
3. Click **Save** to complete the sale.
[](https://learn.defy.com.fj/uploads/images/gallery/2026-02/2aSZ0EnwFirMGdU1-screenshot-2026-02-24-093038.png)
Step 8: Print the Invoice
--------------------------------------------------------------
1. After saving, select the **Print Invoice** option.
2. Ensure margin settings are set to **Default** for correct printing.
Step 9: Use Express Checkout (Optional)
----------------------------------------------------------------------------
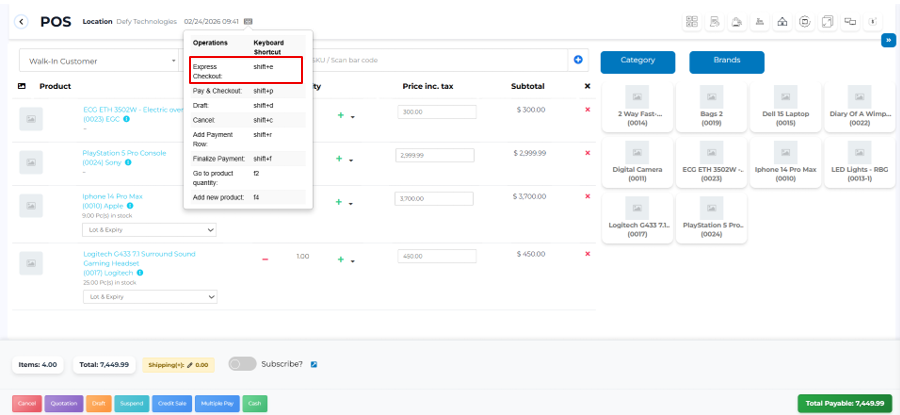
1. Click **ctrl**+**e**. It will Enable Express Checkout Automatically.
2. The system:
- Marks the sale as **Paid**
- Sets the payment method to **Cash**
- Skips the payment screen
3. Invoice printing depends on location settings.
[](https://learn.defy.com.fj/uploads/images/gallery/2026-02/Ih3siT5TfxEFOO6Y-screenshot-2026-02-24-094252.png)
Step 10: Make a Credit Sale (Optional)
---------------------------------------------------------------------------
### A. Full Credit Sale
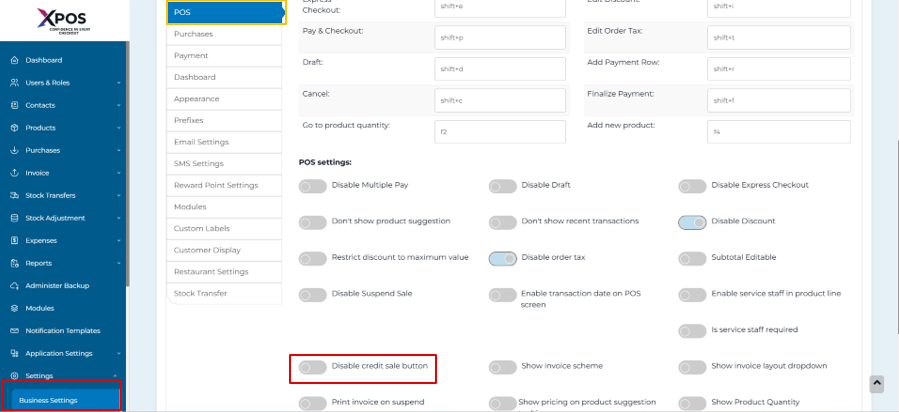
1. Enable credit sales:
- Go to **Settings → Business Settings → POS**
- Enable **Show Credit Sale Button**
2. On the POS screen, click **Credit Sale**.
[](https://learn.defy.com.fj/uploads/images/gallery/2026-02/AXUpb3n6CS8LYuql-screenshot-2026-02-24-094841.png)
### B. Partial Credit Sale
Example: Invoice total = $1,000
Customer pays = $700
Steps:
1. Click **Multiple Pay**
2. Select payment method and enter **$700**
3. Finalize payment
4. Remaining amount is saved as customer credit.
Step 11: View or Edit Sales Records
------------------------------------------------------------------------
1. Go to **Sell → List Sales** to view completed sales.
2. Go to **Sell → Drafts** to view draft sales.
3. Sales and drafts can be edited before finalization.
Step 12: Create Drafts or Quotations
-------------------------------------------------------------------------
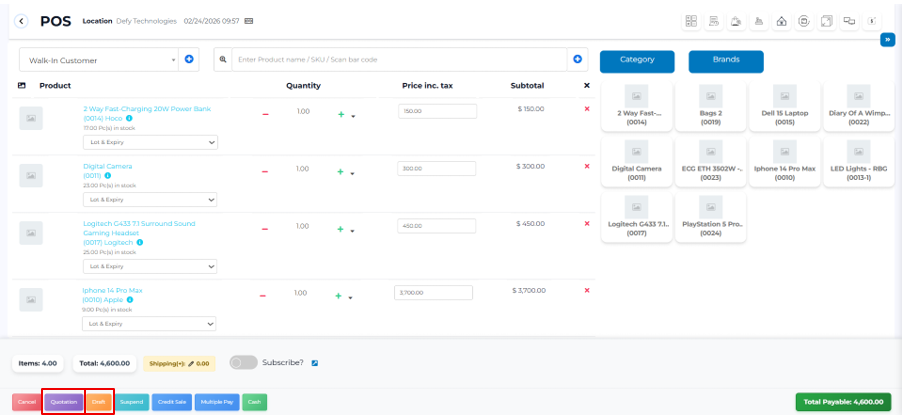
1. During a sale, select **Draft** or **Quotation**.
2. Save the transaction.
3. Stock is **not deducted**.
[](https://learn.defy.com.fj/uploads/images/gallery/2026-02/nq54gUhI39srQbs3-screenshot-2026-02-24-095944.png)
Step 13: Convert Draft or Quotation to Sale
--------------------------------------------------------------------------------
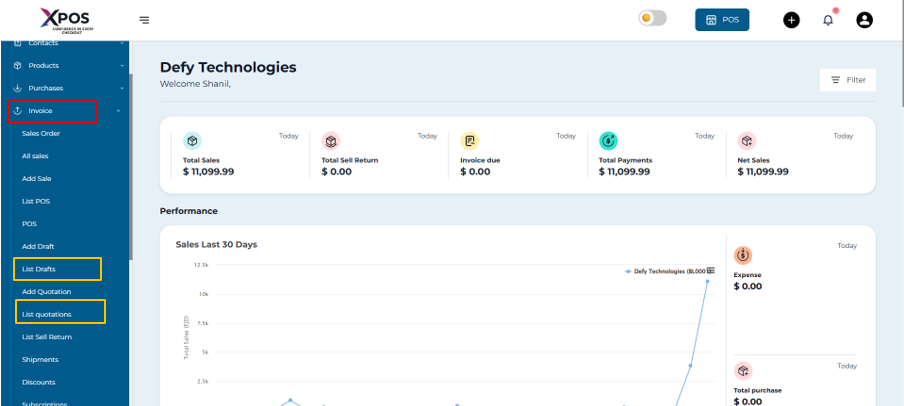
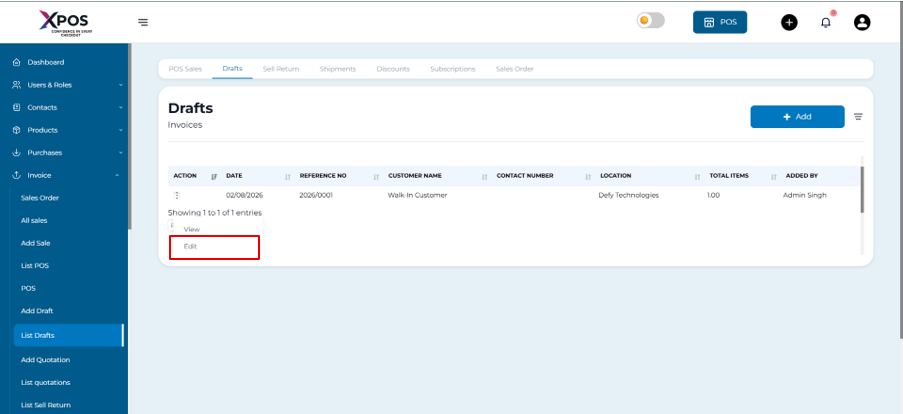
1. Go to **Invoice → List Drafts** or **Sell → List Quotations**
[](https://learn.defy.com.fj/uploads/images/gallery/2026-02/iTaAFu4Jk758hDXJ-screenshot-2026-02-24-100719.png)
2. Click **Actions → Edit**
[](https://learn.defy.com.fj/uploads/images/gallery/2026-02/9hxRJI3PhFmzlodP-screenshot-2026-02-24-101126.png)
3. Change status to **Final**
4. Save the transaction.
Step 14: Copy a Quotation
--------------------------------------------------------------
1. Go to **Invoice → List Quotations**
2. Click **Actions → Copy Quotation**
Step 15: Use Suspended Sales
-----------------------------------------------------------------
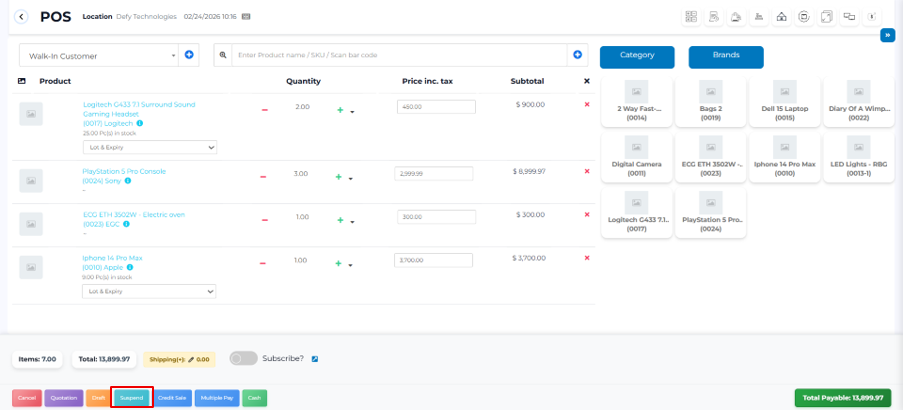
1. Click the **Suspended Sales (cyan button)** on the POS screen.
2. Enter a reference (e.g., Table number or Room number).
3. Resume and finalize the sale when required.
[](https://learn.defy.com.fj/uploads/images/gallery/2026-02/wYccYPCgK4uvz0kK-screenshot-2026-02-24-101730.png)
Step 16: Accept Payments
-------------------------------------------------------------
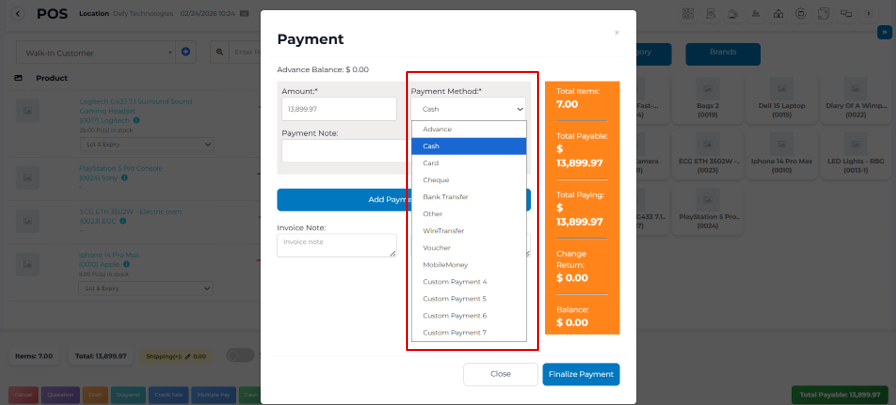
1. Choose a payment method:
- **Cash**
- **Card**
- **Multiple Pay**
[](https://learn.defy.com.fj/uploads/images/gallery/2026-02/i5hCzp8EJWyPvTWs-screenshot-2026-02-24-102552.png)
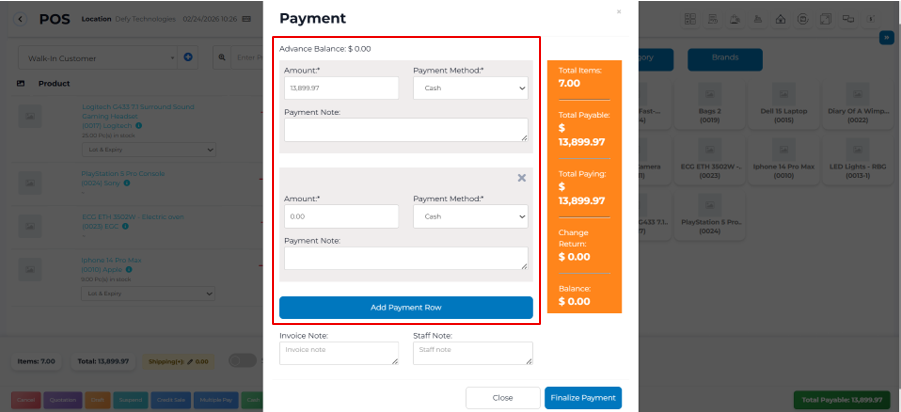
2. Use **Multiple Pay** when:
- Customer uses more than one payment method
- Change return is required
[](https://learn.defy.com.fj/uploads/images/gallery/2026-02/TZpT4NLdvUmEUCAV-screenshot-2026-02-24-102812.png)
Step 17: Pay Supplier Due Amount
---------------------------------------------------------------------
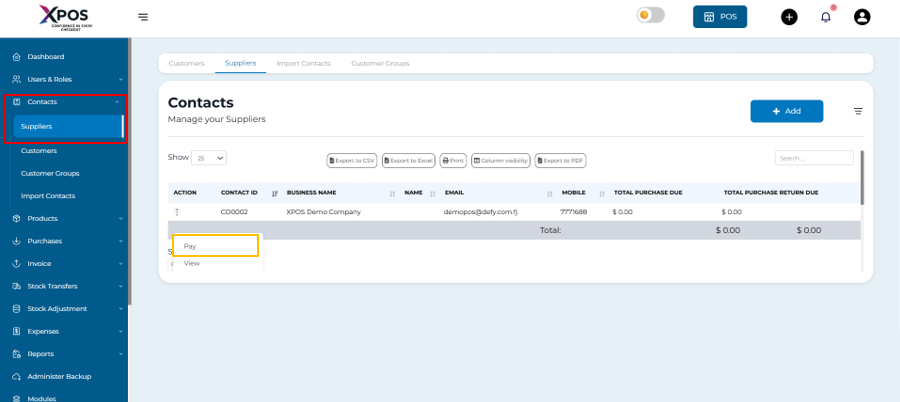
1. Go to **Contacts → Suppliers**
2. Click **Actions → Pay Due Amount**
[](https://learn.defy.com.fj/uploads/images/gallery/2026-02/FuSQtm32NzAROxXr-screenshot-2026-02-24-103448.png)
3. Enter payment details and save.
Step 18: Enable Sales Amount Rounding
--------------------------------------------------------------------------
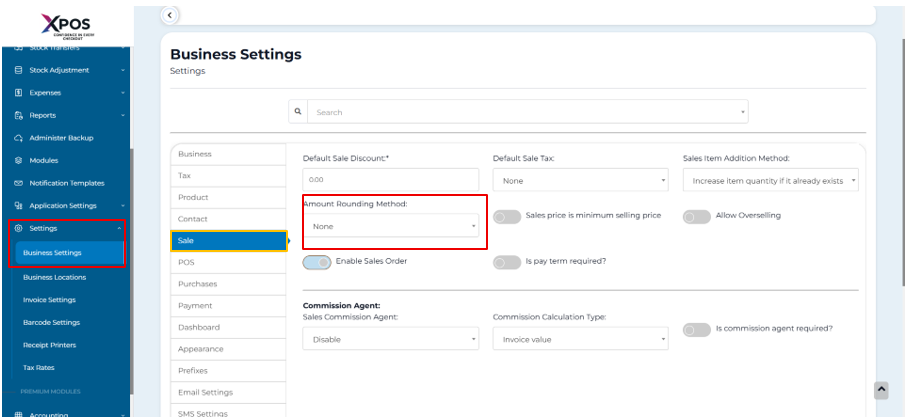
1. Go to **Settings → Business Settings → Sales**
2. Select a rounding method:
- Nearest whole number
- Nearest decimal (e.g., 0.05)
[](https://learn.defy.com.fj/uploads/images/gallery/2026-02/2oTvTbh5ltB8AAme-screenshot-2026-02-24-104515.png)
Step 19: Add Sales for a Past Date
-----------------------------------------------------------------------
### From POS Screen
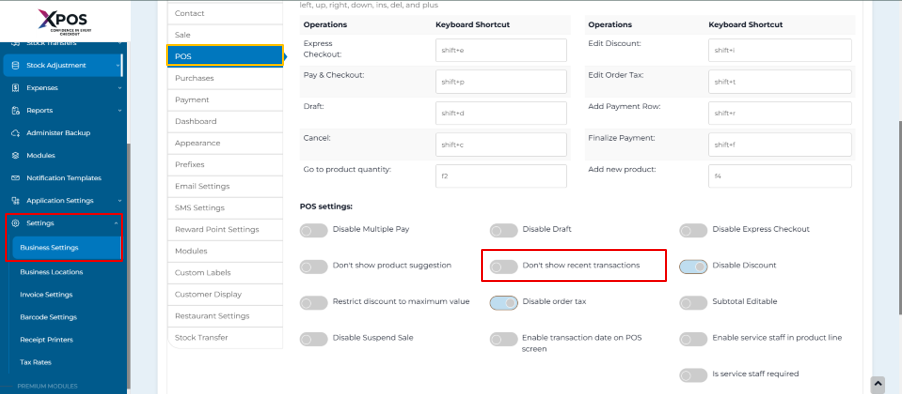
1. Go to **Business Settings → POS**
2. Enable **Transaction Date on POS Screen**
3. Select the required date while selling.
[](https://learn.defy.com.fj/uploads/images/gallery/2026-02/OIAltd0JWAVd8097-screenshot-2026-02-24-104729.png)
### From Sales Screen
1. Go to **Invoice → Add Sale**
2. Select the desired **Sale Date**
3. Save the transaction.